In this post, I am going to be showing a couple of different sewing alterations. I will be replacing a snap-on button on jeans, replacing the elastic waist on another pair of jeans with some buttonhole elastic, patching a hole on the knee on a pair of sweatpants, and shortening the straps on a sports bra.
In sewing repairs and alterations, there are so many things that you might need to fix which are not the regular hems and zippers. I very often need to approach the problem with creativity and find a solution that is not following the rules.
That’s why I am writing this tutorial to show some random, every day repairs.
If you’d rather watch the video tutorial, scroll down to the bottom of this page.
Replacing a snap-on button on jeans
To begin, I am going to replace the snap-on button on a pair of jeans.
Snap-on buttons for jeans come in two parts – one needs to go under and the other one needs to go over the fabric (image 1). First of all, make sure to buy the right size for the buttonhole.
They can be put on with special snap-fastener tools that I own and use. But here I am going to show you how to do it if you don’t have one. To press both parts of the button together, you need to apply some force, so you can’t just do it with your bare hands.

First, push the sharp part of the bottom piece through the fabric (image 2). There might be a bigger hole left by the old button. If you need to, close it with some hand stitching.
When you do, match it with the top part (image 3). Put the face side of the button down on top of some fabric so you don’t damage the surface you are working on.
I am using a hammer to help me press both parts together. I am also going to cover the back of the button to protect it from the hammer (image 4).
Hold everything in place and snap both parts of the button together hitting with the hammer (image 5). I am not hitting too hard, because I don’t want to damage the button. I just apply enough force so that both pieces snap together.
Once they do, the button is holding strong to the fabric and you can wear your favorite jeans once again (image 6).

Fix an elastic waist with some buttonhole elastic

Next, I have this pair of jeans that are stretched at the waist and on top of that have the pockets coming out.
Replacing the pockets and understitching them is a lot of work that I am not willing to put in this old pair of jeans. Even more so, my girl is going to wear these jeans for just a couple of months.
The same goes for the waist. If I follow all the right steps I would have to remove all the belt loops and the old elastic before I attach the new one. So, here is a quick and easy fix.
First, I’m going to fix the waist. I am going to use some buttonhole elastic. It has small holes right in the middle which are attached to buttons on the inside to adjust the waist size (image 1). You can often see it in childrenswear.

To insert the elastic, I’m going to need a large safety pin and two buttons that are the right size for the buttonholes (image 2).
I am going to open two small holes on the inside of the waist and put them closer to the front because I want the gathering to be distributed evenly (image 3).
Then, attach the safety pin to one end of the elastic and insert it in one hole, pushing and pulling the fabric back until you reach the other hole (image 4).
You can pre-cut the right amount of elastic if you prefer. I like to measure on the go.
Next, I am hand sewing the buttons. I put one on each side, close to the holes I just made.
Adjust the right gathering of the elastic and fasten the button and the elastic together on each side (image 6).

The waist is fixed, but Í was really annoyed with the pockets that are popping out like this. This is something that I see often in jeans. It happens when the pockets are not sewn and understitched properly.
The fast, cheaper way to fix it is to close the pockets with a topstitching seam. And this is precisely what I am going to do, although I prefer all garments with pockets. Otherwise, I will have to unpick half of the jeans to replace and fix them.
I pin the pockets in place (image 7) and then I sew them over (image 8).
How to fix a hole on the knee with an embroidered patch
Next, I am going to cover this hole on the knee (image 1) with an embroidered patch. Whoever has kids knows that they destroy the knee area on their pants without mercy.

So I’ve come up with a couple of other tutorials on knee repairs which you might go to for more ideas.
To start, open the inseam at the knee area (image 2). Unpick as much of the seam as you need to put it on the machine and sew freely. If you don’t open the inseam, you will not be able to insert the knee all the way into the machine and sew without restriction. Next, put and pin the patch in the right place (image 2).
Go all around the patch with a straight or narrow zigzag stitch (image 3). And last, redo the inseam as it used to be (image 4).

Shortening the straps on a sports bra
Next, I have this sports bra that comes with extremely long straps for my body composition I’ve already cut one side to take measures on myself and this is the amount I need to remove (image 1). That’s why I want to shorten them. I would usually go for the elastic part at the back but it doesn’t look right on this one. So I am going to remove some fabric from the front.

I start by releasing the front from the strap ring (image 2). I’ve already cut one side to take measure on myself and this is the amount I need to remove. Then I measure and cut the other side as well (image 4).
And then, I am going to reattach the front to the strap while minding the direction (image 5). My strap is significantly wider now but it would still do (image 6).
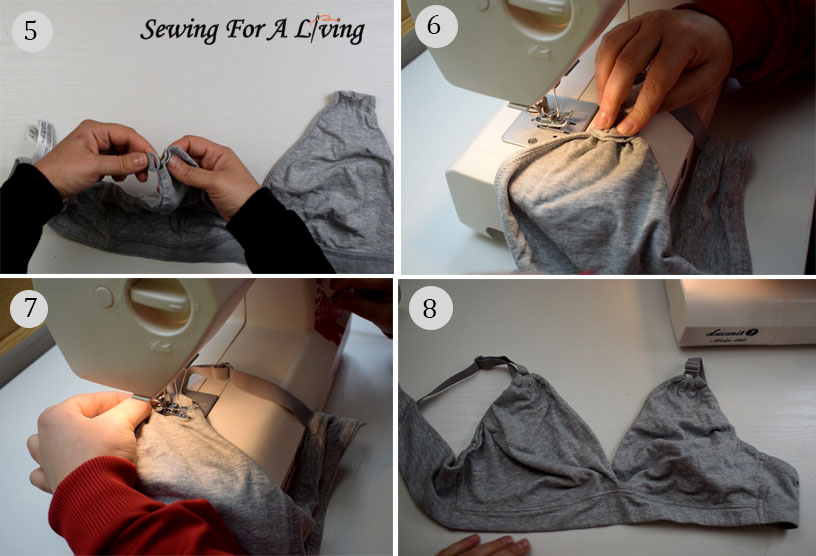
I am sewing as close as my foot would let me (image 7). I am going forward and back a couple of times to make sure the seam holds strong. And here is my result (image 8). The bra is much better fitting and comfortable.
Like what you read here? Support my site
If you would like to help me continue delivering similar content, please consider buying me a coffee to keep it going. It really helps me focus and have more time to prepare these tutorials and develop my lessons.
I can devote more time and do all the things involved in order to make this happen and share with you what I’ve learned about sewing and pattern making.
I would really appreciate it.
Watch the video tutorial on everyday sewing alterations:
I hope you like this tutorial on daily sewing alterations. Please, let me know what you think in the comments below.
If you use any of my tutorials to fix or make something on your own, tag me on Instagram at @sewingforaliving, so I can see it and love it.
More sewing alterations tutorials:
- How to replace the zipper on a jacket
- Shorten sleeves on a lined jacket or coat
- How to fix torn jeans pockets
- How to replace elastic in swimwear
- How to fix torn jeans pockets
SIGN UP FOR THE SEWING FOR A LIVING NEWSLETTER
If you like what you read here, join our mailing list so we can send you our new sewing tutorials, pattern-making lessons, and patterns, as well as some occasional offers that we think, might interest you!
We will protect and use your data in accordance with our Privacy policy.
You may unsubscribe at any time by clicking the link in the emails we send.
Keep these coming – they are so useful!! I alter and repair garments all the time. The easiest alteration I did this year was on a beautiful vintage sun dress from the 80’s – it had a gorgeous floral impressionist print in muted greens, deep purples and hot oranges – it looked rather like a Monet painting and it was in my size. The trouble is French sizes (I live in France) do not always equate to the English ones but I was sure it would fit. Guess what? The measurement across the shoulders was way too small. This used to be a problem for me when buying antique French clothes. As the story goes, back then French women did little in the way of racket and other sports and had very narrow shoulders unlike their English counterparts who played tennis and went in for sea bathing. However, when I investigated, I found the upper seams and the facings had all been altered and luckily obviously by a professional. All the fabric was still in place but skillfully hidden and it was so easy to undue and return the garment to its original size.
The most complicated and in fact the most interesting alteration I did, was when my niece asked me to work as as costume designer on an independent film. As usual, there was little or no budget, so this was a challenge but great fun. This is the costume I made for the villain of the piece, using two garments fused together – a silk shift dress and a boho ethnic skirt. If you are interested you can find it here: https://upcycledwardrobecostumeandclothes.blogspot.com/2015/08/refashioning-project-boho-chic-ethnic.html It’s more of a fusion than an exact alteration but it is an alternative way of making something fit. When I bought it in a sale, the sheath dress was too small for me and it was cut so near the seam there was no way to let it out, I’d intended to add something to it, even before the costume job. I’d love to see how you’d handle a fusion project, I’m sure you’d have a lot of useful pointers – in particular I’d be interested in how you handle silk combined with other fabrics. At the moment I’m working on a 90’s couture silk ‘slip’ evening dress – I’m actually returning it to lingerie – the silk is fabulous and I’m way too old for this sort of dress! All the very best from Normandie, Sue