In this tutorial, I am going to show you how to replace the elastic in a swimsuit with a self-tie waist bottom.
There are some specific things you need to do compared to a regular leg bottom.
Here is the video tutorial. Scroll down for the step-by-step written instructions on how to do it.
What you are going to need for changing the elastic in swimwear
When sewing with swim fabric, make sure you use an appropriate knit needle and possibly a knit foot or even better a walking foot to make it easier on yourself.
In this tutorial, I am going to show how to sew elastic in swimwear on a regular sewing machine with a universal foot. You are going to need only a piece of elastic.
In industrial sewing, it’s very common to use rubber elastic in swimwear. The reason is that rubber elastic doesn’t hold up to water that much. But at the same time, it’s not very resistant to water and salt exposure and gets destroyed in a relatively short period of time.
That’s why I like to use cotton elastic. It’s knitted and the structure it has makes it much more durable and resistant. It will hold on better over time than rubber elastic.
For this project, I’m going to use ¼ inch or (7 mm) wide knit elastic as this is the width used by the manufacturer. I’ll link to the type of elastic I use in the description below.
I have the rule to be as consistent as possible with the original materials and the order of technical steps. This usually gives the best results in repairments and alterations, although there are exceptions.
In this case, the width of the elastic is appropriate for the seam allowance, so I’m going to keep it consistent.
Prepare the bathing suit – remove the ties
Here I have my daughter’s 2 piece swimsuit from last year that still fits. But the elastic has gone completely stretched and the bottom piece is moving around as she wears it.
Surprisingly, the top’s elastic is in shape so I am not going to mess with it at this point. The reason for that might be that there is a binding over the elastic, but in any case, the elastic is still functioning and that’s why I’m going to work only on the bottom.
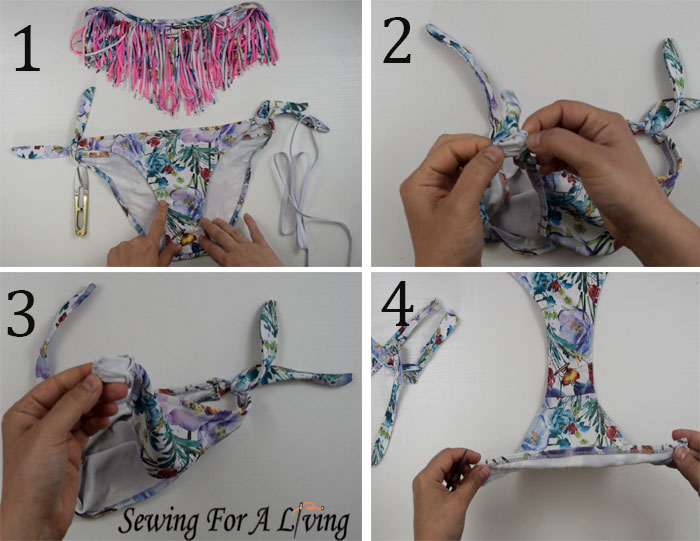
What’s specific about this bottom is that it has 4 ties on the sides and the legs are not in a continuous circular shape (image 1).

If the legs are in a circular shape, you may check my other video on how to attach the elastic to the waistbands. It might help you get a perspective on how to join the ends of the elastic and how to size the elastic to accommodate the circular shape of the leg.
There are 4 ties at the sides, 2 at the front, and 2 at the back. I need to remove them first in order to be able to start working on the legs and waist from the beginning.
To do that, I am going to look for the openings, left for turning the ties out (image 2). Sometimes these openings are topstitched closed. Very often on swimwear, they are left unclosed as the swim fabric doesn’t unravel. And this is our case as well.
To remove the tie, I m going to turn it inside out and get to the seam (image 3). Then, I’m going to unpick the seam and the tie will fall off.
It’s a serger seam and I have a video on how to easily remove serger stitches.
This tie is off now and I’m going to continue with the other three (image 4).
Unpick the zig-zag topstitching
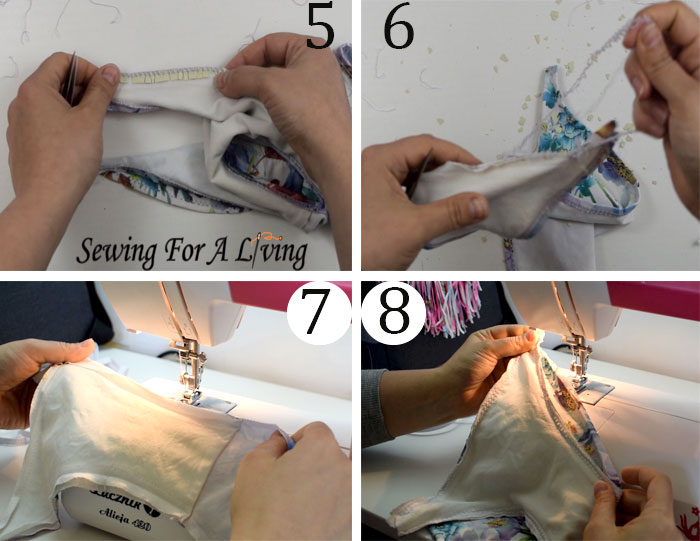
Now that the ties are out of the way, I am going to start unpicking the zig-zag topstitching (image 5). Honestly, for me, this is the most unpleasant part. I do have some tricks on how to unpick the serger and coverstitch seams, but I’m helpless with the zig-zag. So if you know any tricks for it, please share in the comments.
Remove the old elastic on the legs and waist
As you can see, pieces of the rubber elastic started to fall off (image 6). It’s so damaged that it falls into small, rigid pieces. Sometimes, the rubber elastic gets melted inside of the swimsuit and it’s hard to remove. In all cases, you need to fully remove all pieces of old rubber elastic so it doesn’t stay in the way and make it hard to attach the new one.
You can see now why I prefer the knitted elastic as it can also get stretched over time, but never to this degree and after such a short period of time.
Once I am done with the topstitching, I am going to remove the serger seams that hold the elastic on all 4 sides of this bottom (image 6).
Once the elastic is removed all around, I am going to replace it with the new one.

Sewing the new elastic on the legs and waist of the swimsuit
In most cases, I would use a serger to attach the elastic. I would also use a walking foot or at least a knit foot to make it easier to feed the slippery swim fabric through the sewing machine. But in this video, for demonstration purposes, I am going to use only my very basic regular sewing machine with the regular foot.
Fix the lining to the fashion fabric
This bottom has the front lined (image 7). The lining can be on the whole bottom, partially on the front, or all over the front as it’s here. In any case, you might want to stitch the lining to the fashion fabric first so that they act like one fabric before you attach the elastic.
I’m going to use a wide zig-zag stitch and sew at the edge of both fabrics. This will serve as a basting stitch, although you won’t need to remove it at the end. Just make sure you sew close to the edge so that this seam is not visible on the face side later when you start topstitching the elastic (image 8).
Measure the amount of elastic you are going to need
The next step is to measure how much elastic I will need for every section. If this was a new swimsuit, the length of the elastic is usually given in the sewing instructions. But since this is not the case, we have to figure out the length of the elastic ourselves.
The elastic needs to be shorter than the section I am going to attach it to and that’s how it’s going to create some gathering. A bit of the gathering will disappear later with the topstitching as it stretches the elastic.

So how much elastic?
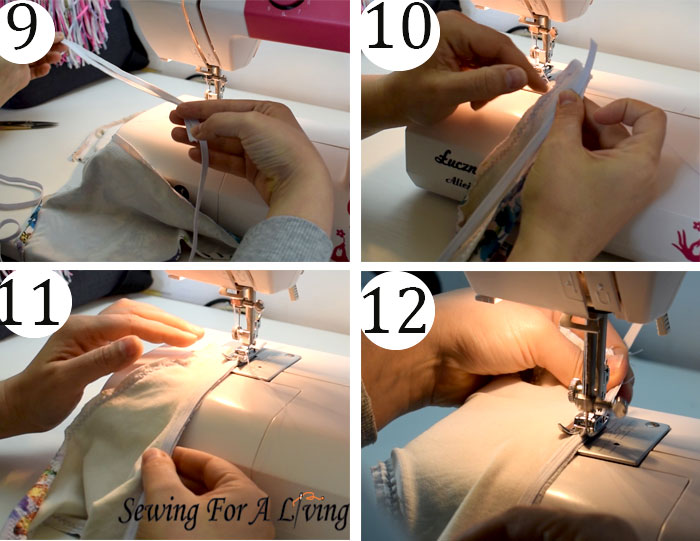
For the legs of this bottom, I would need the elastic approximately 2 inches or 5 cm shorter than the leg. I am going to cut it one inch shorter than the leg. I am going to show where the other inch goes in a minute. But first, I am going to cut the second leg as long as the first one so that they create equal gathering on both sides (image 9).
The other inch I am going to leave at the beginning (image 10). I call this a tail. I like to leave a tail because if I start attaching the elastic from the beginning of the fabric, especially on the regular sewing machine, the fabric gets over just half of the feed dogs. And more often than not it gets eaten by the machine.
The elastic and slippery swim fabric underneath is not transported forward easily if you start from the beginning, which can be frustrating. And if you don’t start sewing the elastic from the beginning you are going to have another functional and aesthetic problem, so this is the solution I came up with.
Sew the elastic to the bathing suit
Replace the elastic in the swimsuit legs
I’m leaving that one-inch tail and aligning the elastic to the fabric (image 11). Then, still using the wide zigzag seam, I am gonna start sewing without pulling anything.
I’m going to make the beginning of the seam and lock it. Once the elastic is secured, I am going to pull it so that it matches the length of the leg (image 12). For a good gathering, it’s very important to pull only the elastic and not the fabric itself. Then, I’m going to hold it in the middle so that I work on a smaller section and the elastic is still stretched.
In the beginning, you can hold on to the tail and slightly pull so that you help the fabric feed through the machine. This is how it looks now (image 13).
I’m going to repeat with the other leg. Again, stretch the elastic to match the fabric and sew it by constantly adjusting it to reach the edge of the leg curve.

Replace the elastic in the swimsuit self-tie waist
Next, I have to attach the elastic to the waist. Here I am not going to pre-cut the elastic. The front waist is really short, so I am going to stretch the elastic as I go.
Again, I am starting with an elastic tail and making the first couple of stitches without pulling. Then, I am going to start pulling the elastic as I go. Not too much and not too little, just enough to gather the fabric.
And I‘m going to repeat with the back waist.
In the end, the waist should look as gathered as the legs (image 14).
Use the zig-zag seam to topstitch the elastic on the swimsuit
What’s left to do is the top stitching. I want to stay consistent with the look of the top, so I’m going to use a more narrow zigzag seam and the same light purple thread.
To topstitch, fold the fabric over the elastic tightly. Insert it into the machine (image 15). I’m still using the elastic tails as an assistant to help me feed the swim fabric.
I’m pulling the elastic so it matches the fabric as I go and I’m sewing over the inner side of the elastic. This way the elastic will be nicely covered and not going to show on the inside. Keep pulling the elastic stretched, so that it matches the fabric. This way you are not going to have wrinkles of fabric and popping threads.
Once all 4 sides are done, remove the elastic tails and clean the threads.
The last step here would be to attach the ties at the sides.

Attach the ties to the self-tie waist bottom
To do that, I’m going to turn the tie inside out through the hole (image 16) so that I sew on the wrong side of the fabric. I am going to insert the swimsuit’s bottom side in the tie opening.
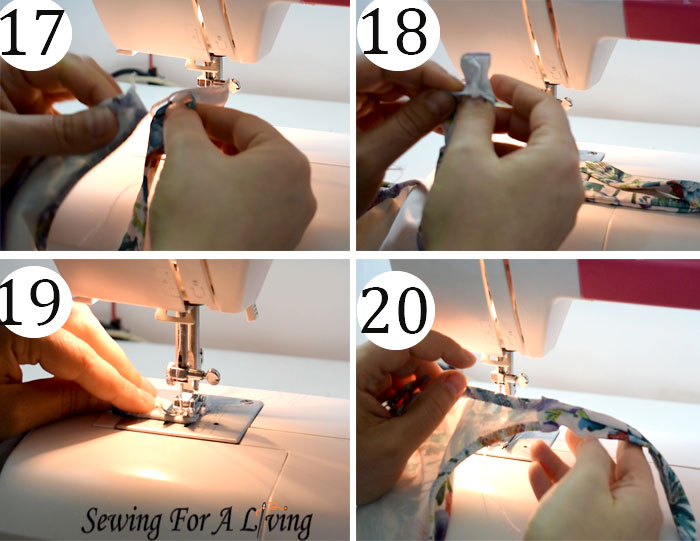
I want the seams on the ties and the holes to stay on the inside, so I am going to position the tie seam at the center and toward the inside of the bottom (image 17). Adjust nicely, so that the side of the bottom lies nicely into the string and doesn’t fold or twist (image 18).
I’m going to sew them together with ⅜ of an inch or 1 cm seam allowance (image 19). Make a couple of locking stitches from beginning to end to make sure that the seam will survive the pulling of the tie.
ITurn the tie outside in and this is how it looks when done (image 20). Pretty much what we are aiming for. And the hole stays on the inside as we intended to make it less visible.
And then, repeat with the other three ties. Again, align the seam of the tie at the center of the wrong side of the bottom.
And that’s all there is to replace the elastic in a self-tie swimsuit bottom. It looks pretty much the same as in the beginning. But now the elastic is going to do its job and my daughter is going to wear it for much longer or at least until it fits.
Like what you read here? Support my site

Hi sewing friends, Daniela here! As a passionate sewist and pattern maker, I love to empower fellow creators to sew their dream wardrobes. Join me on a fun journey where we unlock our creativity, stitch by stitch.
If this tutorial has helped you, please consider supporting the blog with a small donation. This way I can keep it up and continue sharing for free.
It is always greatly appreciated!
I hope you enjoyed this tutorial. Happy sewing!
Related posts:
- How to replace a zipper on jeans
- How to fix a torn belt loop Clothing alterations – sleeves and collar
- How to make a neckline smaller (or bigger)
- How to fix a hole between the legs of jeans
- Change a turtleneck into a crew neck – another way
SIGN UP FOR SEWING FOR A LIVING NEWSLETTER
If you like what you read here, join our mailing list so we can send you our new sewing tutorials, pattern-making lessons, patterns, and some occasional offers that we think might interest you!
We will protect and use your data following our Privacy policy.
You may unsubscribe at any time by clicking the link in the emails we send.

I would found this article way more helpful if the pictures would have been of you fixing the bathing suit bottoms and not something of someone fixing a patch on jeans or something. Is there any way that you have a video of this?
Ha, you are most certainly right 🙂 . There was a technical issue that I fixed. It should show the steps, as well as the embeded video now. Thank you for the heads up!