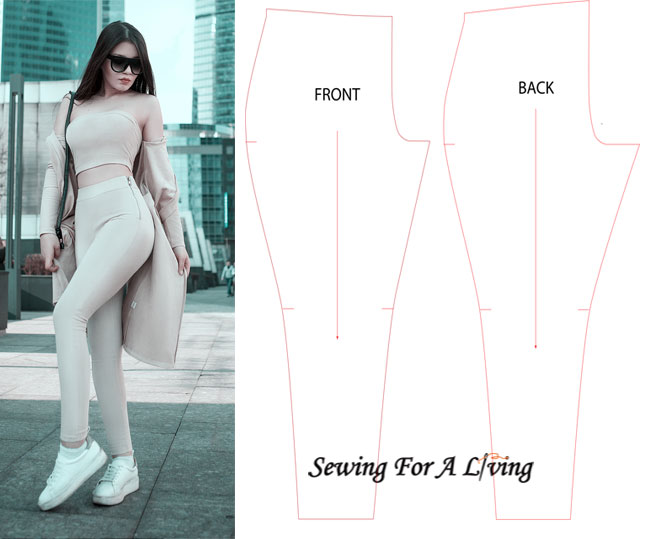
I love knitted fabrics and how they fit and sew. That’s why I like to make patterns for knits often. The basic pants pattern for knit fabrics is simple to draft and can be used as a base for casual wear such as leggings, yoga pants, sweatpants, etc. and also more stylish knit pants with flared or straight legs.
You might be wondering,
can’t I just use the basic pants pattern that I showed you how to draft in a previous post?
You most certainly can. But then you will have to make some adjustments like leaving the darts out and possibly shaping the leg further at the knee and ankle. You should also adjust for the specific behavior of knit fabrics i.e. adding some negative ease.
I prefer to draft my pattern for knit pants from scratch to skip all the adjustments and here is how you can do it, too.
The pants pattern we are going to draft is for a stable knit, which means that it is for knit fabrics with little to no stretch.
If you want to make a pattern for stretchy knits or leggings, you are going to add some negative ease. I will show you how to do that at the end of this post. If you aim for a looser fit, you can add some design ease here and there.
I will also show how to make some common modifications to the basic pants pattern to add cuffs, design ease, sew-in elastic waistband, flared legs, and wide legs, etc.
But for now, let’s learn how to draft the basic knit pants pattern, which you can modify for different fabrics and in many designs.
What you are going to need
Measurements you are going to need
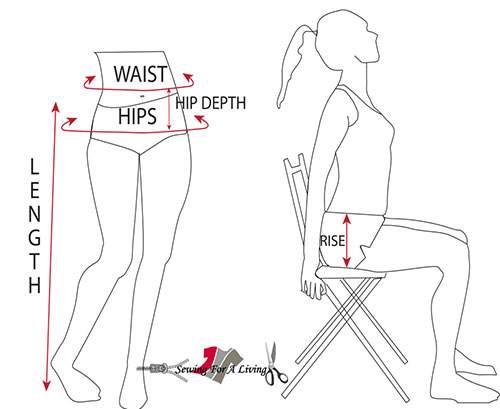
To draft the basic pattern for knits, you are going to need the following measurements:
- ¼ waist
Measure the waist at the smallest and divide that measurement by 4.
- ¼ hips
Measure at the widest part of the hips. Again, divide this number by 4.
- Crotch depth
You can get this measurement by sitting on a chair and holding a ruler next to your hips. Measure from the chair up to the waist.
- Waist to knee
Measure from the waist down to the knee.
- Waist to ankle
Measure to the waist down to the ankle.
- ¼ of ankle
Take the circumference of the ankle and divide it by 4.
- ¼ of knee
Take the circumference of the knee and divide it by 4.
You are also going to calculate some additional measurements that are not taken directly off the body:
- Front crotch extension
The front crotch extension can be calculated as 1/4 from the quarter hip measurement we are using for the front pattern.
- Back crotch extension
Calculate this as 1/3 the back hip measurement (1/3 of 1/4 hips).
- Crotch angle length
This is calculated as 1/2 of the front crotch extension. The crotch angle helps to make the crotch curve more accurate.
Drafting the knit pants pattern
Outline the pattern
Start with a straight horizontal line at the top of the paper which is as long as ¼ hips. Mark it A-B (figure 1).
Using the L-square ruler, square down from B, apply the crotch depth measurement and mark point C.
From point C, square a straight line that measures ¼ hip and mark point D.
Connect point A and point D. The distance between A and D should measure the crotch depth.
From point B towards A, apply ¼ waist measurement and mark point E.
Divide the crotch depth line (line D-E) into thirds and mark one third with point F and the other with point G (figure 2).
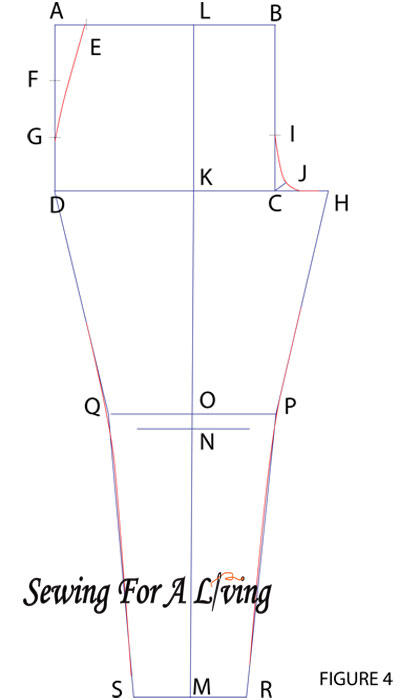
From point C, extend the line and apply the front crotch extension (¼ front hip measurement). Mark point H. From point C up (towards B) apply the crotch extension once again. Mark point I.
Then, using the clear grid ruler, draw a line at 45 degrees from point C that measures the crotch angle length. Mark it J (figure 2).

Draft the pants pattern leg
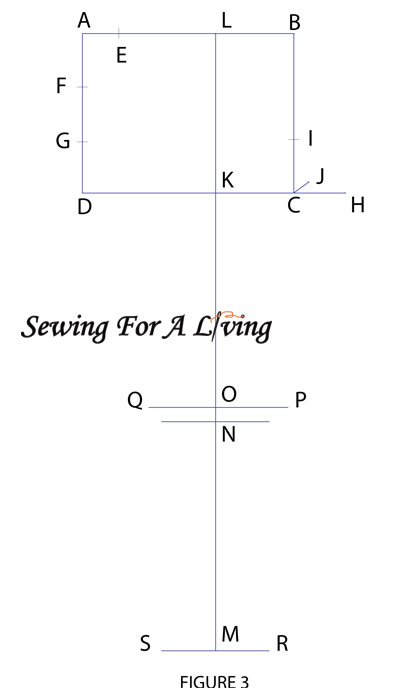
Measure the middle between points D and H and mark point K (figure 3). This point will be our guide to make sure that we extend the leg in a straight line.
From point K, square straight up to the waistline and mark point L. From point L, apply the waist to ankle measurement and draw a line that goes through point K and squares straight down.
At the end of the line, mark point M.
Measure the mid-point between K and M and mark point N.
Square out on each side of N. Measure one inch up (2.5 cm) from N and mark point O. Use the clear grid ruler and draw a line parallel to the line through point N.
We’ve just determined our knee level. Square out in both sides from O and apply the ¼ knee measurement. Mark the new points P and Q (figure 3).
Next, we need to draw the ankle. Starting at point M, square out on each side and apply ¼ ankle measurement. Mark points R and S. The distance between R and S should measure our ½ ankle.
Drafting the front pattern piece
Using the French curve, connect I and H, passing through J (image 4). This will form the front crotch curve.
Using the hip curve, connect point A with point G with a gradual curve. Depending on your measurements, this line can be more curved or completely straight (if there is little or no difference between waist and hips).
Connect H to P with a straight line. Connect P to R with a straight line and connect S to Q with a straight line. Connect Q and D with a straight line as well to finish shaping of the leg (figure 4).
Connecting those points created shapes that are a bit unnatural. To smooth the lines, use the hip curve and redraw at the joining points to make the shape of the leg as one gradual line (the red markings on figure 4).
And we are done with the front.
Drafting the back pattern piece

To draft the back, you have two options. To start from the beginning and draw the same shape except for the length of the crotch extension. Or, draw the changes over the front pattern and then transfer it on tracing paper.
I prefer the second option and here is how I like to do it.
Extend from C past H and apply the back crotch measurement (figure 5). Mark point T. C-T is going to be our back crotch, while C-H is our front crotch.
Connect T to P with a straight line and blend with a curve.
Rase B ¾ of an inch (2 cm) to form the center back waist and mark U (figure 5). We do that to accommodate the behind and the pants don’t go too low when we sit down.
To shape the waist a little more, square up ⅜ of an inch (1 cm) from A and mark point V. To shape the back waist, use the hip curve to connect U and V. To shape the front waist, use the hip curve to connect B and V (figure 5).
When I draft for regular size figures, I like to exaggerate this shaping of the waist even more. I take the center front a bit lower and raise the center back a little higher (up to 1″) for a better fit.
Final touches
Mark notches on both sides of the knee because this will help you match and sew the pants later.
It can also serve as a reference point when modifying the pattern.
Mark a notch on the side seam at the hip level on both front and back (figure 6).
Draw the grainline, parallel to the centerline (L-M).
As this is a basic knit pants sloper, you are going to need seam allowance added. You are most probably not going to need any zippers, buttons or elements added as the knitted fabric wraps around the body.

To adjust for knits with different stretch percentage, you need to add negative ease. This can be calculated as a percentage, or you can use a fixed number.
To keep things simple, I am going to use fixed numbers that work well.
- moderate knits – reduce the side seam, inseam, and crotch curve by 1/16” or 0.2 cms;
- stretchy knits – reduce the side seam, inseam, and crotch curve by 3/16” or 0.5 cms;
- super stretch knits – reduce the side seam, inseam, and crotch curve by 1/4” or 0.6 cms;
- rib knits – reduce the side seam, inseam, and crotch curve by 3/8” or 1 cm.
To learn more about the stretch percentage of knit fabrics and how to measure it, read this post.
Modifying the knit pants pattern into different designs
Here I will show you how to make some modifications to the existing knit pants pattern to achieve different designs and styling.
Cuffed knit pants with sewn-in elastic waistline and a side tape
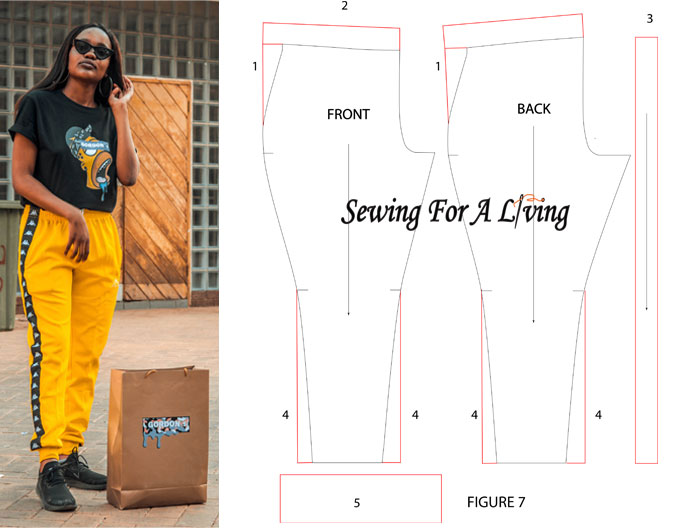
You can use the existing basic pattern to create the design from the image above. What you need to do is this:
- Starting from the widest part of the hip curve (figure 7), extend with a straight line toward the waist to make room for the elastic gathering.
- Extend the waist up as much as the width of the elastic you are about to use. This extension is to cover up the sewn-in elastic. For this type of pants, I like to use 1-1.5 inch (3 – 4 cm) wide elastic.
- Draft a tape that is 1-1.5 inches (3-4 cms) wide and as long as the side seam. You are going to need two – one for each leg. Or, use a ready-made ribbon with the same dimensions.
- For the cuffs, draft a rectangle that is twice as tall as the ready cuff (you are going to fold the fabric by half) and just a bit more narrow than the ankle measurement. How much you need to narrow the cuff will depend on the stretch percentage of the fabric you are using.
To make the cuffs, you can use the main fabric or some Rib fabric in the same or a contrast color.
Flare leg knit pants pattern with an added waistband
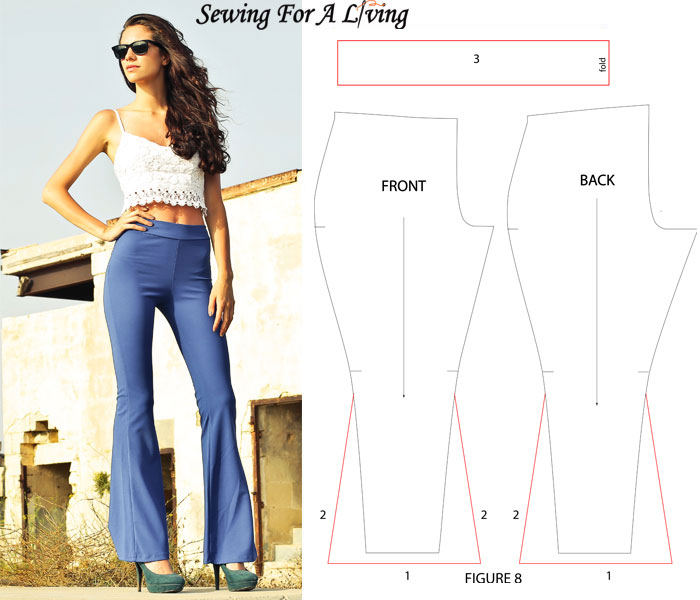
This is a fairly easy modification. Here’s how to make it (figure 8):
- When making flare leg pants, it’s usually better to add some length to the pattern so they look and fit better. The basic pattern is ankle length. In most cases, I would add somewhere between 4-5 inches /10-12 cms in length.
- Measure from the new hemline out in both directions and apply the desired flare. Make sure to add the same amount of flare to both sides of the leg, as well as both front and back pants pattern. Otherwise, the legs seams will twist later when you sew the pants.
Starting at the knee level or a bit below it (depending on where you want the flare to begin) draw a straight line down to the marks for flare at the hemline.
Make sure you start the flare at the same level on both inseam and outseam, as well as at the same level on the front and back pattern piece.
3. Draw the waistband as one rectangular piece that is as wide as twice the waistband width and as long as the waist measurement.
Draft the wide leg knit pants
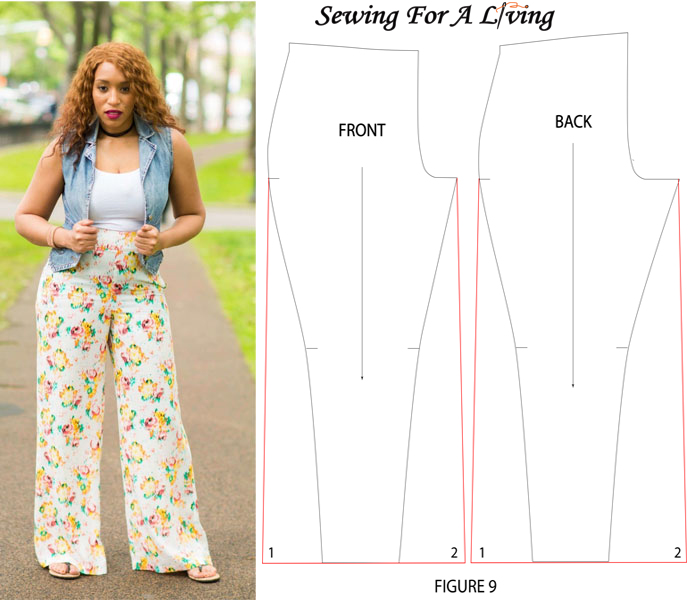
To draft the wide leg knit pants (figure 9):
- Determine how wide you want the legs to be. Mark the same distance on both sides of the ankle. Make sure to add the same amount of flare to both front and back pattern pieces.
- Connect the marks at the hemline and the notches on the hipline with a straight line. Connect the mark at the hemline with the crotch point with a straight line.
Usually, when I make my wide-leg pants pattern, I would go as wide as a straight line from the crotch/hip and square straight down to the hem.
You can make the legs more narrow and you can make them wider. It’s up to your design preferences. Just keep in mind that going too much beyond the hip will distort the shape of the pattern.
If you are aiming for really wide legs (almost like a skirt) this will not be a good approach. To get this shape, I would rather use the splash and spread method to add flare in the middle of the leg, but this is the point of another tutorial.
3. To get the legs as long as the ones in the picture (figure 9), lengthen the leg as shown in the previous example. The basic pattern is ankle length. In most cases, I would add somewhere between 4-5 inches /10-12 cms in length.
Short knit pants pattern
This is probably the easiest adjustment to the basic pattern. Just measure and mark the desired length (figure 10).
You can go for a shorts length, knee length, mid-calf length (as in the picture) or any other in between according to your design preferences.

Now that you know how to make your basic knit pants pattern and modify it for different styles you are off to try it yourself.
Sewing with knits might be a bit tricky. Here you can read how and why.
Like what you read here? Support my site
If you would like to help me continue delivering similar content, please consider buying me a coffee to keep it going. I would really appreciate it.
Here are some more resources on making pattern for knit fabrics:
- How to draft a bodice pattern for knit fabrics
- How to draft a sleeve pattern for knit fabrics
- Pattern drafting for knits – stretch percentage
- How to Sew With Knits
SIGN UP FOR SEWING FOR A LIVING NEWSLETTER
If you like what you read here, join our mailing list so we can send you our new sewing tutorials, pattern-making lessons, patterns, and some occasional offers that we think might interest you!
We will protect and use your data following our Privacy policy.
You may unsubscribe at any time by clicking the link in the emails we send.
I’m going to have tones of fun with this, and maybe learn something. 🙂
I have so far made one pair of knit pants (the length is just below the knee) very nice and I found some cheap polar fleece which turned out to be really comfortable, but it pilled up like crazy. Looks nothing like it did before, Still feels great and looks interesting. 🙂 I am interested in your bodice tutorial. I would like to turn it into a sleeveless, pocket less jacket? with a zip down the front. Arms and neck finished with a simple binding, the kind you see on T-Shirts, and made once again with my cheap polar fleece.
Thank you for sharing your fantastic Knit pants guide.
I’m confused. It says in the instructions for modifying the pattern for stretch knits “reduce side seam, crotch, and inseam WITH 1/16 inch…” Does that mean reduce it BY 1/16 inch, in other words, removing 1/16 inch? Please explain that part of the process better. Thanks!
That’s right. Thanks for the heads up!
I just recently drafted a pattern for knit pants and sewed my first pair. The one thing I can’t seem to “google” and find is how to take out/fold out/eliminate darts from my pattern which had two darts in the front waist (4 in all) and two darts in the back waist (4 in all). Since my backside is flat, I was told to remove the darts from the pattern since I really did not need them. Could you answer this important question for me so I can make this adjustment? Thank you.