In this post, I’m going to be working on another jeans repair and more precisely I am going to show how to fix ripped back pockets.
I get to do this one a lot in the studio as well as at home, so I hope you are going to like this tutorial.
First, I am going to put the written instructions. If you prefer to skip straight to the video, scroll down to the end of the post.
So, here is how I like to do it.
Check for ripped and worn off fabric around the pockets
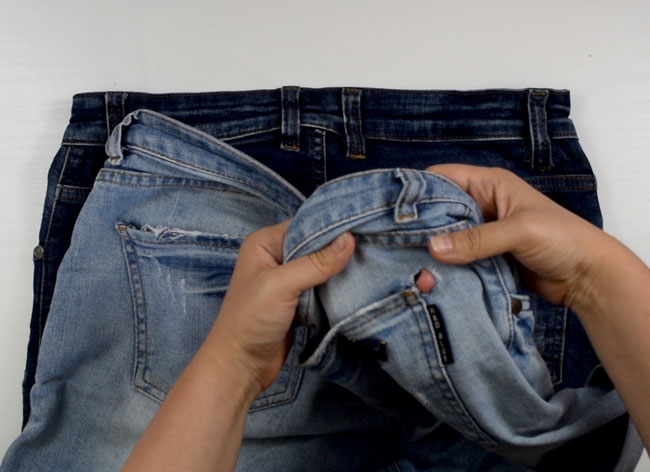
In most cases, when there is a tear on one side of the pocket there is one on the other side as well, or at least the fabric is getting worn off.
That’s why I always check all 4 sides under the pockets for tears and worn off fabric (image 1). On this pair, it turns out that I need to work only under the outsides on both pockets.

What I am going to need
Here is what I am going to use (image 4):
- matching thread
- denim thread
- some denim scraps
First, I need a matching thread that will be as invisible as possible on the jeans fabric. I am going to use it to darn over the thorn areas. I am also going to need some denim thread to topstitch over the pockets.
I am using some denim scraps to patch under the torn fabric. Ideally, I would use scraps that are closer in color to the jeans I’m working on, but this is what I have right now and I am going to use these much darker ones.
Move the pockets out of the way
To begin, I am going to break the topstitching over the pockets (image 2). I need to remove just as much of the thread as so I could work on the torn area without the pocket standing in the way.
In my case that would be up to the middle of the side seam. If there is a bigger rip, you might need to go lower.
The most challenging part here is the bar tack. This is the dense stitching that is usually made at the end of seams on jeans.
For unpicking seams, I prefer the clippers but for bar tacks, I like to use the seam ripper. It goes through the thread easier and helps to keep the fabric untacked.
I am really careful when removing the bar tacks as I don’t want to damage the fabric any further. And I also want to take off all the unpicked threads so that they don’t bulk the sewing area and make it harder to sew over later.
I am going to repeat with the other pocket.
Now that I have the pockets out of the way (image 3), I am going to start darning over the ripped part.
Patch the holes
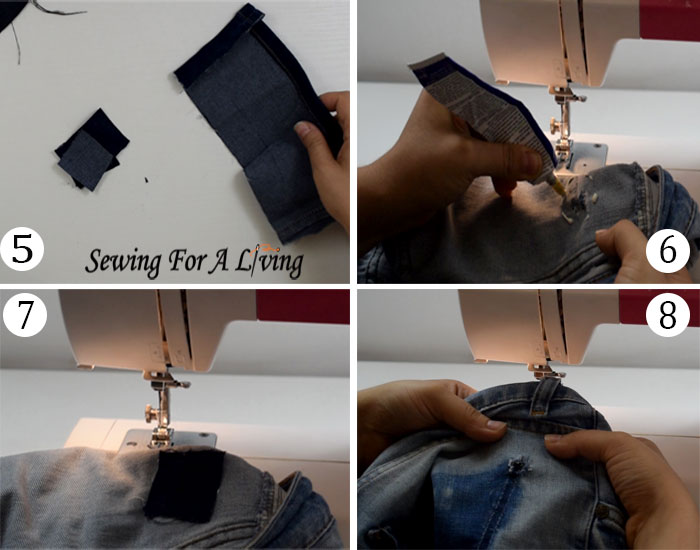
I am cutting out two squares (image 5). The size of the patches you need will depend on the size and shape of the holes.
My jeans are torn just under the edges of the pockets, so I am going to use smaller pieces. Make sure that your patches are big enough to go under the whole tear as well as the torn fabric around it so that this repair lasts longer.
For these jeans, I would usually prefer lighter patches as I want the darning to be as invisible as possible. But I’m not that worried because I am working on smaller sections. The darning thread and the unraveled fabric threads, as well as the pocket itself, will cover the patch.
Normally, I would also use the pinking shears to cut the patches or surge around them to prevent unraveling. But as I make this fix on the go and for myself, I am going to use what I have here.
The patch is going underneath the fabric and I am going to sew on the face side. You can fix the patch in place with some stay tape, pins or directly with the thread. It’s up to you. I am going to use some fabric glue for that purpose (image 6).
Sometimes, when I patch jeans and I want the patch to show, I use only the fabric glue to fix it in place.
This time I want to cover the patch completely and I also want to darn over it which will strengthen the worn off fabric around the tear and hold the pocket in place.
Darning is my preferred method when fixing rips at places that are usually prone to more stress like belt loops and pockets.
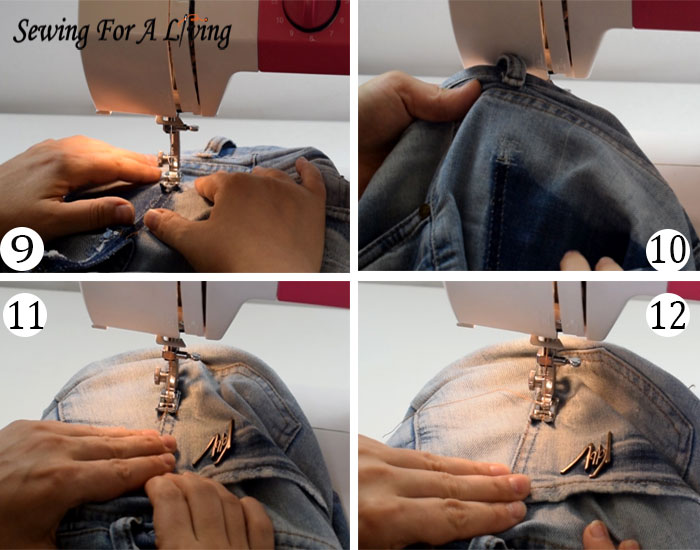
Darn over the torn area with the matching thread (image 9).
I’m making many forward and backward stitches while pulling the fabric slightly so that my stitches also move. Go over the worn off fabric and then repeat with the other side.
Here is how it looks like when done (image 10).
Sew the pockets back in place
Now I need to sew the pocket back in place (image 11).
I’m careful to set it right at its original place because these jeans were dyed after sewing and the pocket placement is very obvious. And I’m always trying to make my work less obvious when I make alterations and repairs.
Using the denim thread, I’m making two parallel top stitches to sew the pocket in place. I’m locking my stitches in the beginning and I’m careful to sew exactly over the stitching lines.
I also like to over secure my seam at the end, because there is a lot of stress at the pocket edge. I do that by locking my seam many times.
If you prefer, you can try to restore the bar tack with a very narrow zig-zag seam, but keep in mind that there are many layers of fabric here and you might find that to be challenging (and brak some needles).
The second line of stitching is easier to make because the pocket is already set in place (image 12).
I’m going to repeat with the other pocket and I’m done.
Here are my fixed pockets. On the face side, you can hardly tell that there is something that’s been done.

It’s much more obvious on the inside, but that’s because I’ve used another color to patch and I’ve used the denim thread in the bobbin. If you are concerned with the look on the wrong side, use matching patches and thread that matches the fabric color.
You can now enjoy your favorite pair of jeans for longer.
Like what you read here? Support my site
If you would like to help me continue delivering similar content, please consider buying me a coffee to keep it going. I would really appreciate it.
Here is the video tutorial on how to fix torn back pockets on jeans:
Some more resources on jeans alterations:
- Fix a torn belt loop
- How to fix torn jeans
- Replace a zipper on jeans
- How to hem jeans
- Take in the waist of jeans
- How to fix a hole between the legs on jeans
If you find this post useful, please share it, comment below or pin for later.
SIGN UP FOR SEWING FOR A LIVING NEWSLETTER
If you like what you read here, join our mailing list so we can send you our new sewing tutorials, pattern making lessons and patterns, as well as some occasional offers that we think might interest you!
We will protect and use your data in accordance with our Privacy policy.
You may unsubscribe at any time by clicking the link in the emails we send.
Pingback: Top Rated 26 How To Fix Ripped Pocket On Jeans 2022: Full Guide - Dream Cheeky
Pingback: Sewing Pattern: Mend torn jeans pockets – Sewing