This is a tutorial on how to make a box pleat skirt. In the instructions, I tried to explain the math behind the pleats with examples in inches and centimeters.
If you prefer to go straight to the video, scroll down to the bottom of this page.
When I say box pleats, it’s not necessarily done the way I did it here. Box pleats may vary in their size and number. Mine look exactly the same on the face side as well as the wrong side. This is so because I’ve intentionally used more fabric to make the skirt fuller.
I like the way the pleats look when I fold them like this and I’ve made quite a few skirts using this technique. If you happen to like it as well, here is how to do it.
Measurements you need to take for a box pleated skirt
The first step here is to calculate the right amount of fabric for the skirt. We need to know the right width prior to folding the pleats in order to make them even and pretty.
The math I’m using to calculate the amount of fabric is simple, although I have to admit it took me a while to figure it out. But once you grasp it, you can use it for numerous projects with different number and size of pleats.
Here is how I’ve calculated the fabric consumption for this skirt.
I am only going to use two measurements:
- length;
- the circumference of the waist or lower on the hips where you want the box pleats to sit.
I’ve measured the high hips because I’m planning on an extended knit waistband and this is where the pleated skirt needs to fit.

Calculate the right amount of fabric for the box pleated skirt
To calculate the amount of fabric, you have to multiply the number of pleats by twice the size of the pleat, plus the size of the waist.
What does this mean and why we multiply by twice the size of the pleat?
We know that in each pleat because of the way the fabric is folded, 4 times the size of the pleat disappears into the folds (image 2). And in this example, our pleats are 2 inches wide. That’s 2” on each fold. So, we need to calculate 4 times by 2 inches which equals 8 (see image and figure 3).
Calcilations in inches
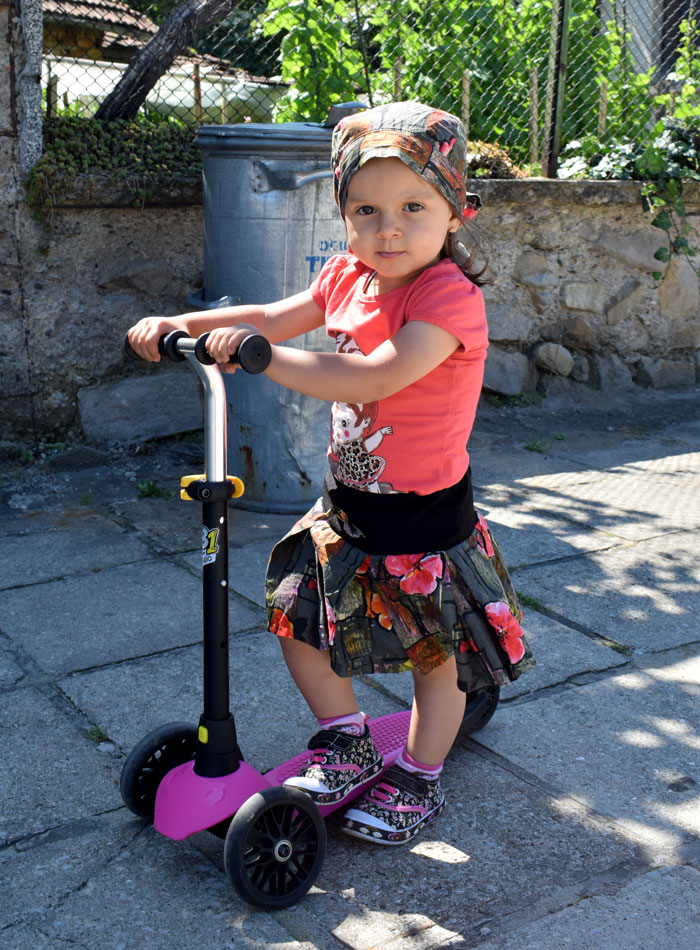
In this example, the waist is 33 inches and we want 8 double pleats all around the skirt – 3 at the front, 3 at the back and one on each side (image 1). If we want our pleats to be 2 inches wide and it’s a double pleat to form the box pleats, we multiply 2 inches by 2×2 for the double pleat folds.
And then we need to multiply these 8 inches by 8 which is the number of pleats we want.
This gives us 64 inches of additional fabric. 64 inches for the pleats plus our waist circumference which is 33 gives us a total of 97 inches of fabric.
Here is the formula:
waist circumference + ((width of the pleat x 4) x number of pleats) = skirt width
33+((2×4)x8) = 33+(8×8) = 33+64= 97 inches
You can use it and change the number of pleats and their size to make any shape of the pleats on a skirt.
If this formula gets you frustrated, just replace 33 inches with your waist measurement and fold the pleats as I show in the instructions below.
To continue with our example, this means that we need to have a tube of fabric that is 97 inches wide and as long as we want the skirt to be. Because there is usually no fabric at that width, we would need to join 2 rectangles 48.5 inches each (half of 97”) plus seam allowance for the side seams (image and figure 4).
Join the front and the back with side seams to make one whole piece of fabric .


Here is the same example in cm:
We know that in each pleat because of the way the fabric is folded, 4 times the size of the pleat disappears into the folds (image 2). And in this example, our pleats are 5 cms wide. That’s 5 cm on each fold. So, we need to calculate 4 times by 5 cm which equals 20 (see image and figure 3).
In this example, the waist is 84 cm and we want 8 double pleats all around the skirt – 3 at the front, 3 at the back and one on each side (image 1). If we want our pleats to be 5 cm wide and it’s a double pleat to form the box pleats, we multiply 5 cm by 2×2 for the double fold.
And then we need to multiply these 20 cm by 8 which is the number of pleats we want.
This gives us 160 cm of additional fabric. 160 cm for the pleats plus our waist circumference which is 84 gives us a total of 244 cm of fabric.
Here is the formula:
waist circumference + ((width of the pleat x 4) x number of pleats) = skirt width
84+((5×4)x8) = 84 +160=244 cm
The waist measures 84 cm and the pleats are 5 cms deep. 5 cms by 4 folds of fabric for each pleat by 8 pleats in total gives us 244 cm.
You can use it and change the number of pleats and their size to make any shape of the pleats on a skirt.
If this formula gets you frustrated, just replace 84 cm with your waist measurement and fold the pleats as I show in the instructions below.
To continue with our example, this means that we need to have a tube of fabric that is 244 cm wide and as long as we want the skirt to be. Because there is usually no fabric at that width, we would need to join 2 rectangles 122 cm each (the half of 244 cm) plus seam allowance for the side seams(image and figure 4).
Join the front and the back with side seams to make one whole piece of fabric .

Marking the pleats on the skirt
Now let’s start folding the pleats.
I am going to begin by putting a mark every 2 inches of the width (image 5). Or if you work in cms, that would be 5. This is going to help me fold the pleats later. To mark the pleats you can use chalk or clips to cut small marks. I am going to use large pins.
Once I’ve marked enough of the fabric, I’m going to start folding the pelats (image 6).
Folding the pelats
I want the fold of my first pleat to point to the side seam and each next one to point in the opposite direction.
I’m using the first pin as a center mark for the fold and fold the fabric at the second pin (image 7-10).
I’m going to match the centerfold pin with the next one to make sure that everything is aligned nicely (image 11). And then I am going to use another pin to fix the folded pleat in place (image 12).

For the next fold, I’m starting at the second pin again but this time folding in the opposite direction (image 13), matching at the marks (image 14, 15) and fix the pleat with another pin (image 16).

If we look at the wrong side, we are going to see that the box pleats look exactly the same as on the face side (image 17).
I am going to continue with the rest of the skirt. To save some time and effort, I’m marking every 4 inches instead of 2 and skip the center fold mark. It doesn’t really matter which way you are going to do it. What matters at the end is to fold the pleats precisely. The centerfold mark helps with that a bit.
I remove all excessive pins and keep only those that fix the pleats in place. If you are using chalk or clippers to mark the fabric you are going to skip this step.
When folding the pleats, make sure to keep the fabric straight and nicely folded, because the way you shape the pleats now is how they are going to look when the skirt is done.
If I’ve measured and folded precisely, my last pleat will match the first one. I’m double checking myself and measure if my pleated skirt matches my lower hip circumfеrence (image 18) which it does, so I am going to move on.

Sewing the box pleated skirt
The next step is to fix the pleats in place with a seam (image 19). I am sewing close to the edge because I want this seam to hide in the seam allowance later. It’s sort of a basting stitch that I don’t want to show when the skirt is done.
The way I fix the pleats now is the way they are going to look at the end, so I am very careful to keep them nice and straight and I fix them here and there as I go.
Attaching the waistband
Now that my pleated skirt is done, I am going to move to the waistband. I’m choosing to add a knit waistband because it’s a child’s skirt and I’m mostly interested in comfort. And I also will get to skip adding a zipper.
For the knit waistband, I cut a rectangle that is twice the height and approximately 3 inches shorter in width.
I’m sewing both sides vertically, face sides together (image 21). I’m using the zig zag seam because it tolerates the stretching for the knit fabric better.
I fold the waistband in half, wrong sides together (image 22) and I’m ready to attach it to the skirt. But before that, I’m going to join the free ends together.
Knitted fabric tend to roll at the edges when stretched and I’m going to stretch it in order to attach it to the skirt. This seam will help align both waistband layers.

I’m going to put the waistband inside the skirt face sides together and align at the side seam. I’m going to lock the waistband to the skirt with a seam at least 1 inch long (image 23). This way the fabric is not going to get pulled out of the machine when I stretch the waistband to match the skirt.
I match the center of the skirt with the center of the waistband and stretch to sew them together (image 24). This way the waistband will distribute evenly to the skirt.
Hem the skirt
What’s left to be done is to hem the skirt. I prefer to make a wider hem.
First, I’m going to mark how long I want the skirt when done (image 25). Then, I’m going to fold the hem allowance in up to the mark (image 26) and then fold it once again (image 27).
I put a pin here and continue on small sections with the rest of the hem (image 27). I sew the hem on the wrong side, close to the edge of the fold (image 28).

I use this double folded hem a lot and it’s widely use in RTW. Here is how to make it on pants.
Last but not least, I steam iron all seams and pleats and the box pleated skirt is ready!
I believe figuring out pleats is not that complicated as it seems and I’ve tried my best to explain them here. But if you would rather use a pattern, I have one in girls sizes that is free for my email subscribers.
Here is the video tutorial on how to make a box pleated skirt:
Like what you read here? Support my site

Hi sewing friends, Daniela here! As a passionate sewist and pattern maker, I love to empower fellow creators to sew their dream wardrobes. Join me on a fun journey where we unlock our creativity, stitch by stitch.
If this tutorial has helped you, please consider supporting the blog with a small donation. This way I can keep it up and continue sharing for free.
It is always greatly appreciated!
I hope you enjoyed this pattern-making lesson. Happy sewing!
Related posts:
- How to make a skirt pattern like an expert
- How to make a wrap skirt with a great fit
- How to draft a circle skirt pattern
- Draft and sew a collar and a collar stand
- How to make a pencil skirt pattern
SIGN UP FOR SEWING FOR A LIVING NEWSLETTER
If you like what you read here, join our mailing list so we can send you our new sewing tutorials, pattern-making lessons, patterns, and some occasional offers that we think might interest you!
We will protect and use your data following our Privacy policy.
You may unsubscribe at any time by clicking the link in the emails we send.
That’s a lot of calculation but the way you brokedown the process of making the box pleated skirt is fantastic! The skirt is so cute and I love that you’ve also created one for your daughter. Plus, your skill in explaining each step makes it super accessible for people like me. This will help me in making my own “”clothing patterns“” for this skirt. Thank you!
You are such a good teacher love and understood everything you taught