
In this post, I am going to show you how to make a wrap skirt. You are going to need an existing straight skirt pattern that you drafted yourself or purchased. If you don’t know how to draft the basic skirt sloper, read the instructions here.
Or,
use a commercial skirt pattern that you like.
A pattern that you already know fits great is a good base for modifications. This way you can be certain that all designs that come out of it will fit nicely as well.
Here are the modifications you need to make to the basic pattern to create a wrap skirt with a great fit.
Read below to also learn how to make an asymmetrical front, how to curve the fronts, how to draft a flared wrap skirt pattern, and how to add a tie to a wrap skirt.
Make a DIY wrap skirt pattern
There are different options for a wrap skirt design that differ in length, width, and flare. Let’s start with the simplest pattern modification – by extending the front in width.
Extend the front skirt pattern
To do that, use the basic front skirt pattern as it’s drafted on the fold (figure 1, A). Determine how much you want both front skirt pieces to overlap at the front.
The options here depend on your design preferences.
For example, the front skirt piece could be extended up to the dart on the other front skirt piece, all the way up to the side seam, or (as a usually good rule of thumb) with 6 inches (15 cms). The more you extend it, the closer it gets to the side seam.
Again, how much you are going to extend is a matter of your design preferences. Just make sure that there is going to be enough overlapping to provide good coverage.
Once you’ve decided how much you are going to extend the front, draw a straight line extending from the top of the center front. That line should be as long as the amount you want to add as an extension (figure 1, B).
Starting at the end of this new line, square straight down until you reach the hemline. Then connect the end of this new line with the center front at the hemline (figure 1, B).

The back skirt pattern will ask for no changes, as the wrapping takes place only at the front.
When cutting the fabric, use the new pattern for both front skirt pieces.
And that’s it! You made yourself a wrap skirt pattern.
If you want to design a wrap skirt that has no side seams and looks as if it is one continuous piece of fabric read below where I am going to show you how to do it.
You can also lengthen or shorten the basic skirt pattern and then extend for the wrap to achieve a different style.
Use some tracing paper to transfer the new pattern shape. This way you are going to keep your original pattern and use it for other pattern modifications in the future.
Make an asymmetrical front wrap skirt
Here is one way to vary the wrap skirt by drafting an asymmetrical front.
To do that, for the most part, follow the steps described above.
Once you’ve decided how much you are going to extend the front, draw a straight line starting from the top of the center front that is as long as the amount you want to add as an extension (figure 1, C).
Starting at the end of this new line, square straight down until you reach the hemline. Then, continue for an inch or two down (2.5 – 5 cms) or as long as you wish to. Connect the end of this new line with the side seam at the hemline.
You can do this modification to only one or both ½ front skirt pieces according to your design preferences.
Don’t forget to extend the other front piece with or without the asymmetrical change, so that both front pieces overlap properly.The back skirt pattern will ask for no changes, as the wrapping takes place only at the front.

Make a curved front wrap skirt
Very often, a wrap skirt is curved at the front. If you want to draft a wrap skirt pattern that looks like this, here is what you need to do.
Once again, start with deciding how much you want to extend the ½ front skirt pattern. Draw a straight line extending from the top of the center front that is as long as the amount you want to add as an extension (figure 2, А).

Decide on how low towards the hemline you want the curve to start. Usually, a midpoint between the hem and the waist will result in a nice curve that doesn’t reveal too much, but this again is up to your taste and design preferences.
Square a line down from the end of the width extension (figure 2, А). Using a French curve ruler or your free hand, draw a smooth, natural curve that ends at the hemline (figure 2, B).
It doesn’t have to end at the center front, although it might. Just make sure that you like the shape of the curve that you end up with.
The back skirt pattern won’t change. Make sure to use the new pattern for both front skirt pieces.
DIY flared wrap skirt
Another common silhouette of the wrap skirt is the one that has a bit more flare added to it. Here is how to add flare to a basic straight skirt pattern and extend the front to draft a flared wrap skirt.
This design will ask for changes at both front and back skirt patterns as we want to add the same amount of flare to both the front and back of the skirt.
Adding flare to the front
We are going to work on the front skirt first. To begin, draw a straight line starting from the dart tip and going all the way down to the hemline. The line should be perpendicular to the hemline (figure 3, A).

Cut the pattern through this line all the way up to the dart tip and continue through one dart leg. It doesn’t matter which dart leg you cut through (figure 3, B). Align one dart leg to the other and tape them closed together (figure 3, C).
This will work as a sort of a dart rotation and will result in some flare down the hemline.
Use a curved ruler or your free hand to smooth the curve at the waistline and close the gap at the hem (figure 3, D).
By the way, if you just want to make a flared skirt out of a straight skirt pattern, just repeat the steps up to here with the back skirt pattern. You’ll end up with a new skirt pattern that has an A-line silhouette.
But since we are interested in making the wrap skirt, here is what you need to do.
Once you’ve decided how much you are going to extend the front, draw a straight line extending from the top of the center front. That line should be as long as the amount you want to add as an extension (figure 4, A).
Square a straight line down that is parallel to the center front line. If you want to make a straight front, extend the line to the hemline and then close the gap between the extension and the center front at the hemline.
If you want to make a curved front, square a straight line down that is parallel to the center front line (figure 4, A). Go as low as you want the curve to start. Using a curved ruler or your free hand, draw the curve that connects the end of the extension line with the hemline (figure 4, B).
And that’s all for the front.
Adding flare to the back skirt
Now we need to add the same amount of flare to the back. We do that because we don’t want the skirt to twist at the side seams and have a weird shape.
If you’ve used my tutorial to draft the basic skirt, repeat the same steps with the back that you followed for the front:
- Draw a straight line starting from the dart tip and going all the way down to the hemline. The line should be perpendicular to the hemline (figure 3, A).
- Cut the pattern through this line up to the dart tip and continue through one dart leg. It doesn’t matter which dart leg you cut through (figure 3, B).
- Align one dart leg to the other and tape them closed together (figure 3, C).
- Use a curved ruler or your free hand to smooth the curve at the waistline and close the gap at the hem (figure 3, D).
And that’s all you need to do to the back as there are no other changes required.

If you use another pattern or another technique to draw your own, it might happen that the front and the back dart are not the same widths.
If your basic block comes with a wider dart at the back, you might not want to remove the dart completely. A small dart at the back can give some nice shaping. That’s why instead of removing the dart completely, you can reduce it in half.
Here is how to do it.
- Measure the middle between the dart legs and mark it (figure 4, C).
- Draw a straight line starting from the dart tip and going all the way down to the hemline. The line should be perpendicular to the hemline (figure 4, C).
- Cut the pattern through this line up to the dart tip and continue through one dart leg. It doesn’t matter which dart leg you cut through.
- Align the other dart leg with the mark at the center of dart and tape the pattern pieces together (figure 4, D).
- Use a curved ruler or your free hand to smooth the curve at the waistline and close the gap at the hem.
Leaving a smaller dart at the back makes sense only if the back dart on the original pattern is wider. If it isn’t you don’t need to leave it. In my opinion, darts that are too small (less than 3/8 inch or 1 cm) are hard to sew and not very functional.
And that’s all there is to drafting the flare wrap skirt.
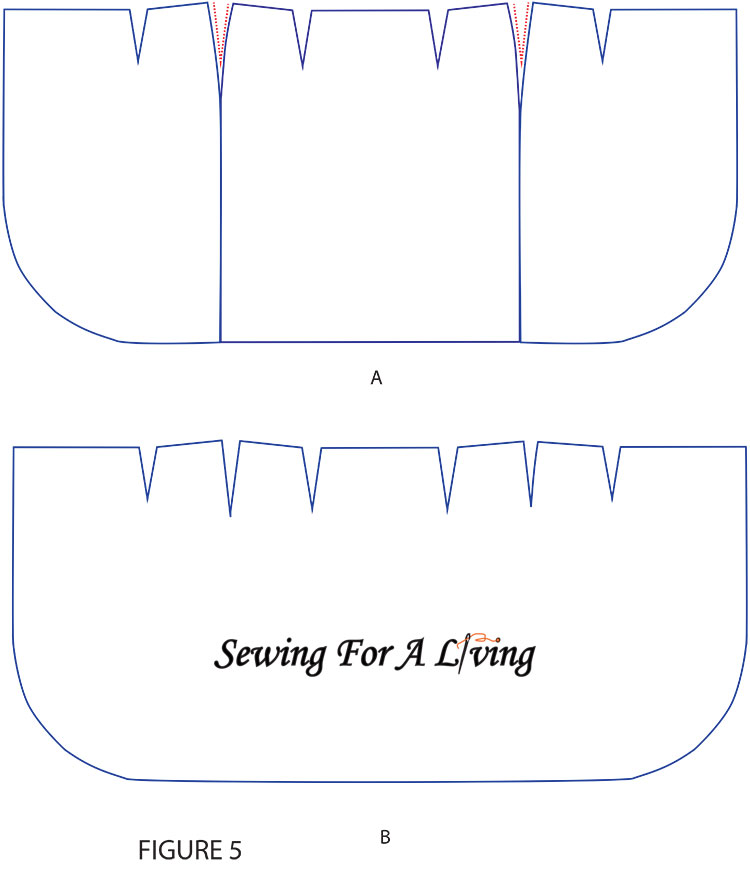
Make an easy to sew one-piece wrap skirt
Another common modification that you can apply to any of the examples above is removing the side seams of the skirt. Very often, a wrap skirt looks like one big piece of fabric that wraps around the body.
If this is the appearance you are looking for, here is how to do it.
After you made the changes you want to the pattern pieces that were described above (e.g. extending the front, changing its shape, and/or adding flare), you can get rid of the side seams as well.
First, align the front and the back skirt pattern pieces at the side seams (figure 5, A). The shaping at the waist is going to form a dart, often a bit too deep. To reduce the size, just add the seam allowance as you would all around the pattern (figure 5, A).
Tape the tree pattern pieces together (2 fronts and one back) and trace the new pattern shape (figure 5, B).
Add a tie to a wrap skirt
There are different ways to style a wrap skirt. For example, if you extended the front up to the side seam, you may sew front and back with two side seams as you would sew any other skirt (figure 6, A).
You may also put a button at the waistline (or waistband if there is one) somewhere close to the end of the front (figure 6, B).

Or,
you can add a tie to form a pretty bow at the side. To do that, sew a string with the desired width, or use a ready-made one.
Divide the string in half. Attach one half at the waistline level of the skirt front that goes on top (figure 6, C).
Attach the other half of the string to the other skirt front. To determine the best position, fit the skirt on you or the person that is going to wear it.
Mark at the same level as the other side. Sew the string end in place and tie both strings in a bow.
Like what you read here? Support my site

Hi sewing friends, Daniela here! As a passionate sewist and pattern maker, I love to empower fellow creators to sew their dream wardrobes. Join me on a fun journey where we unlock our creativity, stitch by stitch.
If this tutorial has helped you, please consider supporting the blog with a small donation. This way I can keep it up and continue sharing for free.
It is always greatly appreciated!
I hope you enjoyed this pattern-making lesson. Happy sewing!
Related posts:
- How to make a skirt pattern like an expert
- How to make a pencil skirt pattern
- How to draft a circle skirt pattern
- Clothing design – How to make any skirt
- Embellish Your Wardrobe: Create a Classic Box-Pleated Skirt
SIGN UP FOR SEWING FOR A LIVING NEWSLETTER
If you like what you read here, join our mailing list so we can send you our new sewing tutorials, pattern-making lessons, patterns, and some occasional offers that we think might interest you!
We will protect and use your data following our Privacy policy.
You may unsubscribe at any time by clicking the link in the emails we send.
Thank you! Your constractions are very very useful!!!
I feel so inspired and chuffed that I have discovered Sewing For A Living!!! I understand ALL your instructions and I love it when I read instructions that make sense! I want to learn how to draft patterns and I finally feel I have discovered someone who can teach me! THANK YOU!