
If you already know how to draft the basic skirt or, you own a commercial skirt pattern that fits well, you can easily design any skirt that you want.
And I mean any skirt – pencil or flared, gored, A-line, mini or maxi, mermaid or balloon, asymmetrical, etc.
Clothing design is primarily the process of selecting and combining different clothing elements, wearing ease, and positioning of darts and seams so that the finished garment represents the designer’s idea.
That’s why if you can modify the pattern to resemble your idea, you actually design your vision. In this post, I’m going to show you how to transform your skirt sloper into multiple styles.
Skirts vary in design mainly by the amount of fullness and the length. In this post, I am going to go through different skirt designs and how to make them, using the basic skirt pattern.
How to make a pencil skirt
This is a fairly easy modification. To make the pencil skirt, you need to narrow a straight skirt pattern at the hemline. How much you need to take depends on your measurements, the fabric you are going to use and how fitted you want the skirt to be.
In most cases, the amount is 5/8 to 3/4 inch (1,5 – 2 cm) on each side. Measure the distance on the hemline and put a mark. Draw a line from that point up to the under the hip area. The line should follow the natural shape of the body (figure 1, B).
Repeat with the back skirt pattern.
Keep in mind that for woven fabrics, you also need to add a slit at the back to compensate for the restricted movement. If you are making a pencil skirt pattern for knitted fabrics, a slit won’t be necessary in most cases but may be added as a design element.
If for some reason you prefer to draft a pencil skirt from scratch, I have a tutorial on that.

How to make an A-line skirt from the basic pattern
The steps here are very similar to the one above. Except, instead of taking in, add some inches to the hemline.
The amount you need to add is approximately the same – 5/8 to 3/4 inch (1,5 – 2 cm) on each side. But you can get a better perspective when drafting it on the actual pattern and see how your new design looks (figure 1, C).
Finally, redraw the hemline to make it even and smooth.
Another way to make the A-line skirt is by using the formulas to draft a circle skirt.
The quarter-circle skirt looks pretty much like the A-line skirt and this is another way to handle that design, especially if you are working with a knit fabric that doesn’t require darts.
Here is a step-by-step tutorial on how to do that.
Make a flared skirt from your basic skirt pattern
To make a flared skirt out of your basic pattern, cut through the dart point on the front straight down. Then, get both dart legs together (close the dart) and tape them (figure 2).
The bottom part of the skirt is going to spread and add some flare to the hemline. Redraw the new hemline with a smooth curve.
Repeat with the back. Always add the same amount of flare on the front and back. Otherwise, you can end up with some twisted side seams.
When you create a new design, think again over the clothing elements.
For example, you might find that you don’t need a slit anymore since you’ve added enough width to the skirt or a front fly doesn’t look well on a formal skirt and you are going to replace it with an invisible side zipper.

Make a 6 gored skirt
You can use a basic pattern to make a 6 gore skirt. To do that, you need to slash and spread the pattern. Here is how to do it.
Use an L-ruler or any other long ruler. Following the path of one dart leg, mark a point at the hemline (figure 3). Connect the tip of the dart with that new point on the hem.
Repeat with the other dart leg.
Using tracing paper, draw the new shape of the pattern pieces and cut through each dart leg all the way down the new point at the hemline (figure 3).
Make a mermaid skirt
To recreate a mermaid shape, you need to extend the length of the skirt. Usually, you need to go all the way down to the hemline. Once you do that, decide where you want the expansion to start (usually at the knee line).
Starting under the hips, draw a smooth curve towards the knee line and back to the side seam to fit the skirt a bit at the knees (figure 4).
Draw 4 perpendicular lines from the hemline up to the knee line at the same distance from each other.
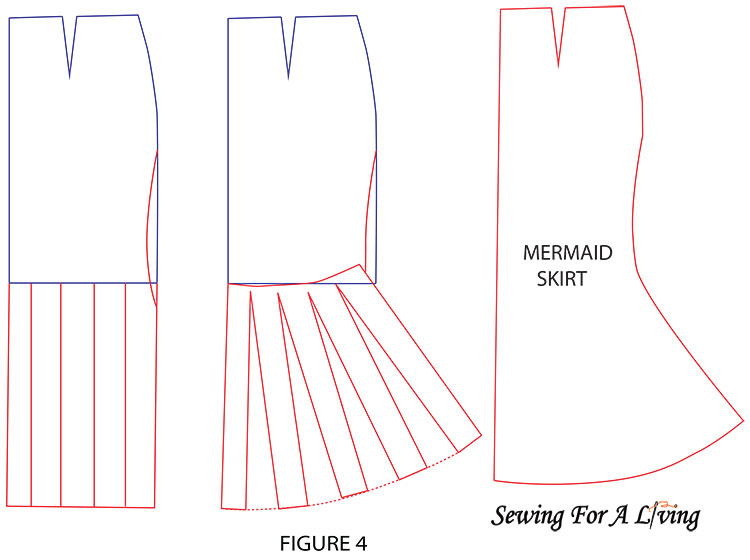
Slash through these lines and spread the pattern to create the mermaid shape. Redraw the side seam and the hemline with a smooth curve.
Design skirts by changing the length
This is perhaps the easiest way to change the design of a skirt. Just add or remove some inches from the overall length. This way you can make a mini, midi, or maxi length skirt from the basic pattern (figure 5).

Don’t forget to change the position of the slit (or remove it if needed) if there is any on your basic block.
Another thing you might consider when changing the length of the skirt is changing the width as well. When you modify the length, often the original width of the pattern doesn’t correspond to the new design.
For example, if you use a fitted pencil skirt for a base, you might want to add some inches near the new hemline in order to prevent restriction of movement.
Design by modifying the waistband
Just like when modifying the pants pattern, we can change the design of the skirt by manipulating the waistband.
For example, you can extend the waistband to design a high-waist skirt, or lower it down (figure 6 A, B).
Another thing you might do to create a new skirt design is to add some sewn-in elastic. To add elastic to the waistband, ignore the darts.
Draw a straight line from the hips up and square it out to the waistline (figure 6, C). Sew the elastic to the waistline to gather the waist back to its shape.

The extra fabric will compensate for the lack of another closure (like a zipper).
I sometimes like to replace the whole waistband detail with some wide exposed elastic.
There are some pretty printed elastics out there that you can use as a decorative element as well.
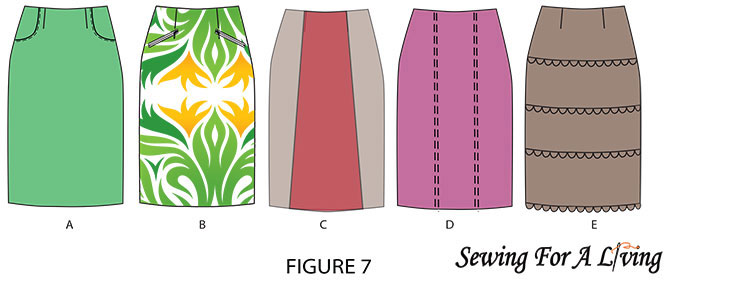
Design skirts by adding/changing different pattern elements
This type of design can really spark your creative potential. You can add, remove or change different pattern elements to achieve the appearance that goes best with your taste. The possibilities are endless.
Change the style of pockets, replace them with pocket welts, move a zipper from center back to the side seam; add zippers to replicate pockets or as a decoration on the hemline, etc (figure 7).
You can cut through the pattern details to create different shapes with a contrasting piece of fabric or pieces of leather. If you do that, don’t forget to add some seam allowance on the lines of those new cuts, though.
Another thing you can do is add decorative seams anywhere you like. Or, decorate with lace or ribbon.
Design skirts with fabrics
The fabric choice can make a significant difference. Knits give a lot of possibilities to drape and shape a skirt.
When you design a skirt for woven fabrics, you should consider leaving some ease of movement to the body. The amount of ease depends on how rigid the fabric is. If you are dealing with really rigid fabric, you should leave more ease.
When you design a skirt for knit fabric, you must consider adding some negative ease to the pattern. The amount of negative ease depends on the stretch percentage of the fabric.
Again, the amount of ease depends on how much elasticity and recovery qualities the fabric you are going to use has.
Design skirts by adding pleats or gathering
Make a gathered skirt
To make a gathered skirt, first, decide on how much gathering you want to have. For a nice gathering all along the width, I would normally double the amount of fabric for a finished skirt.
If I want to make the skirt from the image below, first I’m going to cut through the high hip line to create the yoke. I am going to tape the pieces together at the dart legs and smooth the edges with a curve (figure 9).
For the rest of the skirt, I am going to ignore what’s left from the darts and add to the centerfold. How much to add depends on the amount of gathering you want to achieve. Add the same amount to the front as you add to the back.

Adding pleats to a skirt
Another option to modify the basic skirt is to add pleats. The number, shape, and width of pleats can vary largely depending on the amount of volume you want to achieve.
Here are two examples: with two vertical pleats and with tree diagonal pleats at the front (figure 8).
In the first example, slash through the dart tip point straight down to the hemline. Spread the new pattern pieces as wide as you want the pleat to be. Add the same distance to the center front pattern to get three even pleats at the front.
In the second example, draw three diagonal lines at the same difference from each other as shown in the picture. Slash through these lines, but don’t go all the way through the side seam. Leave an inch so that it serves as a hinge at the side seam.

Spread the pattern to allow for the width of the pleats. Redraw the new pattern shape. You can ignore the dart as there is going to be enough shaping at the waist due to the pleats you just drafted.
These are just two possibilities to add pleats and spice up the basic skirt pattern. You can add as many pleats in different sizes and shapes to create a different design.
You can also make a skirt with pleats all across the width. Here I have a tutorial on how to calculate the amount of fabric for a pleated skirt.
Adding a waistband, yoke and/or facing to the skirt
Waistbands and belt loops can totally change the look of a skirt. The same goes for a yoke.
Here are two examples of different yokes that you can draft to change the style of a skirt (figure 10).
To make the yoke, draw and cut through the pattern in the shape that you would like the yoke to be. Tape both dart legs together (close the dart). Then, smooth the curves to shape the yoke.
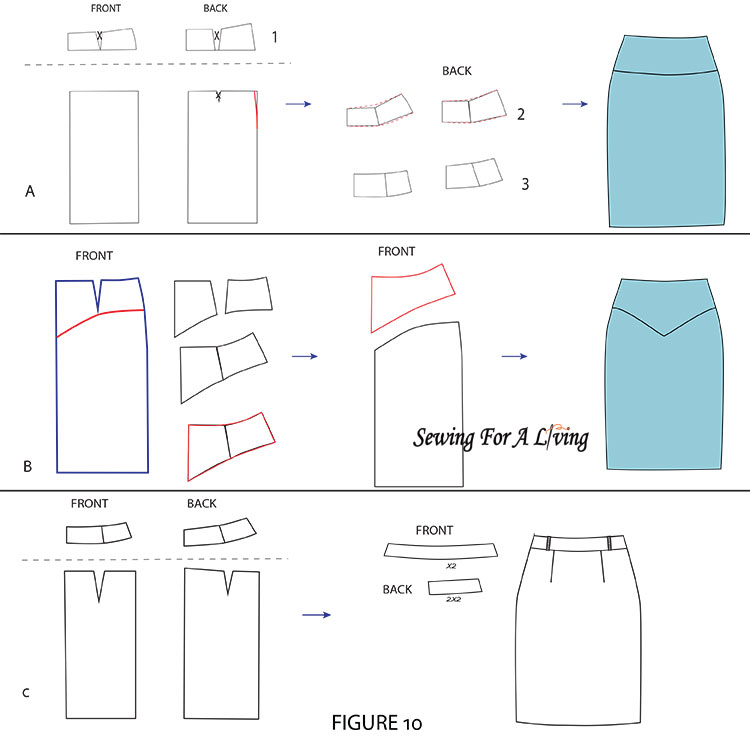
To make a waistband, the steps are pretty much the same (figure 10, C). Except, you need to cut higher than you do for a yoke.
Make a circle skirt
The circle skirt is considered to be a beginner-friendly project because it is simple to draft and sew. I would draft that from scratch as it is basically two circles inside of each other.
This article includes the specific calculations I use to make a full circle skirt, a half circle skirt and a quarter circle skirt.
Make a wrap skirt
To make a wrap skirt from an existing pattern, extend the front and curve at the hem. If you want to read more about making the wrap skirt, I have a full tutorial here.

When designing, the possibilities are practically endless. You can design with fabrics, decorative elements, shapes, and lines, etc. I hope you found something in this post to inspire your designer’s creativity.
I would love to hear what you think.
Like what you read here? Support my site
If you would like to help me continue delivering similar content, please consider buying me a coffee to keep it going. It really helps me focus and have more time to prepare these tutorials and develop my lessons.
I can devote more time and do all the things involved in order to make this happen and share with you what I’ve learned about sewing and pattern making.
I would really appreciate it.
More clothing design posts:
- How to fit pants – pattern adjustments
- Make a Knit Pants Pattern And Style It As You Wish
- Pattern grading – all you need to know
- Clothing Design – How to Design Pants
- Clothing design – design harem pants from a pants pattern
SIGN UP FOR SEWING FOR A LIVING NEWSLETTER
If you like what you read here, join our mailing list so we can send you our new sewing tutorials, pattern making lessons and patterns, as well as some occasional offers that we think might interest you!
We will protect and use your data in accordance with our Privacy policy. You may unsubscribe at any time by clicking the link in the emails we send.
TY! So much good information all on one post. Brilliant!
I like your website so much! Thanks for what you’re doing, I needed a place like this for so long! You are genious!
Such good instructions
Awww, thank you so much!
This is a fantastic tutorial. Very easy to understand. Drawings and instructions are perfect for anyone (beginners and experienced sewists).
I love your teaching, it makes my sewing easy.