You already know how to draft the basic pants pattern, or you might’ve bought one that fits great. But you want to add some variations in the design. Who wants to make the impression that they wear the same pair of pants all the time?
So,
you ask yourself how to design pants? It does sound like something complicated and fancy. But if you know the design elements of a garment (pockets, cuffs, width, and length of legs, etc.), you can design a different pair of pants.
There are several general ways to modify the pants pattern. In this post, I am going to show you how to manipulate the pant sloper into different styles.
Designing pants by modifying the length and width of the legs
Design with width
To create a new design, you can change the leg width. This change is usually applied from the knee line down (figure 1) or all the way from the crotch to the hemline.
You can make the legs more narrow, and create a cigarette pants pattern (figure 1, sketch A). You can design pants with a straight leg (figure 1 sketch B), or design a pair of palazzo pants (figure 1 sketch C).
Tip. When changing the width of the pants legs, follow this rule – what you take from the inseam, you take from the outseam. That way you keep the grainline straight and the legs won’t twist when you sew them. This rule also applies if you add instead of taking inches from the leg’s width.
If you make the legs wider than the pattern, perform the so-called trueing. This means connecting the new width through the knee up to the crotch.
The line shouldn’t go any wider than the crotch. If you want to make them even wider, the outseam can keep on going to the desired width.

Design with length
This is one of the easiest ways to change a pant pattern. If you wish to shorten the pattern, mark and cut where you would like the pants to end. Don’t forget to add some inches for the hem, though.
When you design with length, have in mind that often you need to make a few extra adjustments. For example, the width of the leg on the pattern that you are modifying might not look well with the new length.
For example, if you are designing shorts, straighten the lines from the crotch down (figure 2, sketch A). To change to a knee-length, check if the width of the leg opening fits well (figure 2, sketch B).
If not, you might make it a bit more narrow or wide so that it fits best, according to your new design and preferences.
This is also relevant if you want to design a pair of ankle-length pants. Another thing that can be done is to add a different type of finishing that looks nice with the new length of the pants (figure 2, sketch C).
All these adjustments can be made later when you are fitting the pants or before cutting the fabric.

Design pants by modifying the waistband
Another way to change the pants’ design is to modify the waistband. There are many possibilities here. You can lower the waist as shown in figure 3, sketch A.
To do that, remove some inches/centimeters from the pattern, starting from the waist down. Have in mind that you must extend the waistband to match the new width of the pant’s waist.
You can extend the waistband up to a pair of high-waist pants (figure 3, sketch B). Again, after this change, you must adjust the waistband width to match the main details of the pattern.
Another possibility is to add an elastic to the waist (figure 3, sketch C). In that case, replace the waistband details with one straight band that matches the pattern width. It should be as long as two times the elastic width plus seam allowance.

Or, you can remove the waistband detail completely and add a couple of inches to the main detail of the pattern. Use those inches to fold over an elastic waist and topstitch (figure 3, sketch D).
Design pants by adding/changing different pattern elements
This type of design can really spark your creative potential.
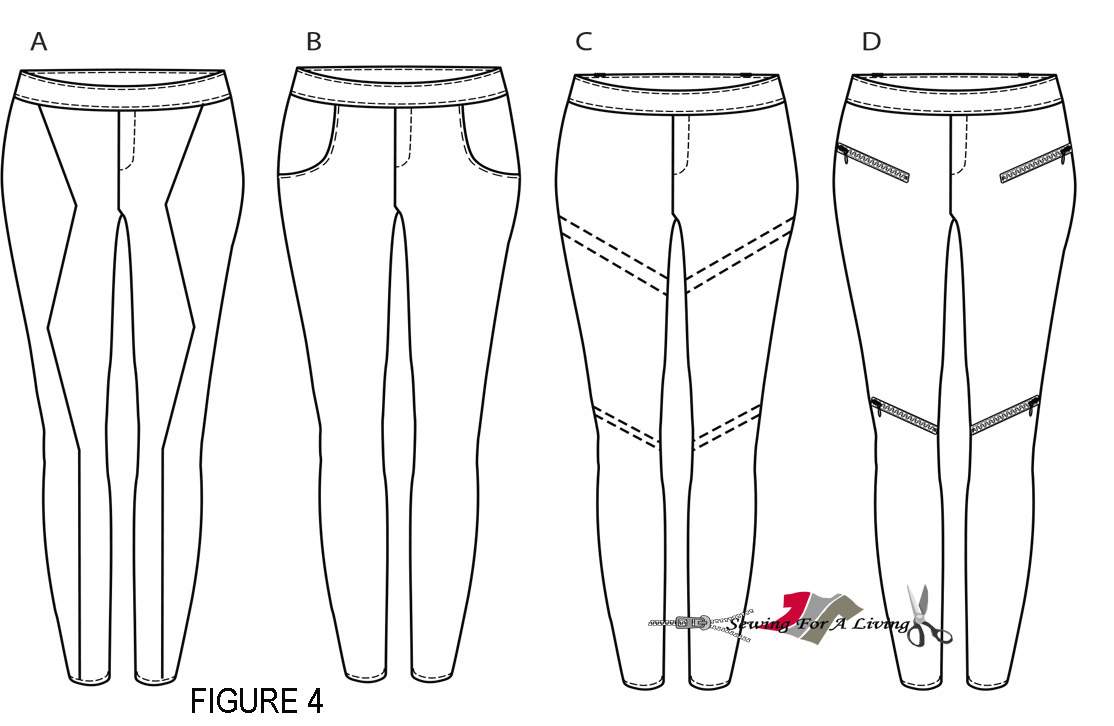
You can add, remove or change different pattern elements to achieve the appearance that corresponds best with your taste. The possibilities are endless. Change the style of pockets, replace them with pocket welts, move a zipper from the center front to the side seam; add zippers to replicate pockets or as a decoration on the hemline, etc (figure 4, B and D).
You can cut through the pattern details to create different shapes with the same or with a contrasting fabric or pieces of leather. Or add decorative seams anywhere you like (figure 4, A, and C).
Design pants with fabrics
If you have a pattern that is for wovens, you can achieve a different look by switching from one type of woven fabric to another. For example, you can achieve a different look with rayon challis and denim, using the same pattern. This can be done without modifying the pattern.
Or,
if you switch from woven fabrics to knits, you can modify the pattern from a pattern for woven fabric to a pattern for knits. This type of modification would be the topic of the next article on the blog.
Usually, it is a good idea to stick to wovens or knit fabrics if the pattern says so. This is necessary because the patterns are constructed with different specifics of the fabrics in mind.
Design pants by different finishing/hemming, darts, pleats, and gathering
To change the design of pants, you can pick a different type of hemming or finishing. For example, you can make a wider hem or extend the leg so that you add cuffs.
Here is the cuffs extension formula that I use – 2x the desired cuff length +1 inch/ 2.5 cm.
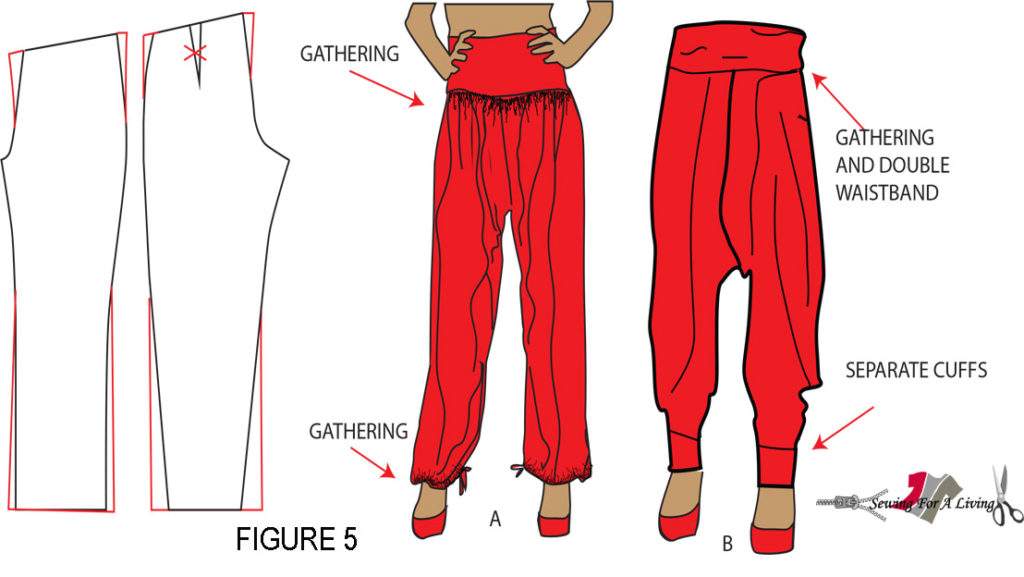
You can make a more narrow hem or add separate cuffs like the ones in figure 5, scheme B.
Or,
add a gathering or some pleats to the waist or to the hemline (figure 5, sketch A). You can add or remove darts to the front or the back pattern detail.
If you are designing with some of the elements above, make sure to add some inches to the pattern to achieve the fullness you desire (figure 5).
Design pants by modifying the crotch depth
Another way to create a new design is to change the crotch depth/rise. This is a pattern modification that I like to use when I design new styles. If you are interested in doing it yourself, there is a tutorial I made on how to modify the pattern to lower crotch/ harem pants. And another one if you want to draft the harem pants from scratch.
Is there something you would add to this article or a question you need to ask? Please, don’t hesitate to do so. I would be happy to help in any way I can.
Like what you read here? Support my site

Hi sewing friends, Daniela here! As a passionate sewist and pattern maker, I love to empower fellow creators to sew their dream wardrobes. Join me on a fun journey where we unlock our creativity, stitch by stitch.
If this tutorial has helped you, please consider supporting the blog with a small donation. This way I can keep it up and continue sharing for free.
It is always greatly appreciated!
Related posts:
I will like to design
Thank you so much! this is a great tutorial. I have a question? How you apply the the balance line/grain line to cut the pant
thanks Be
Hello Be,
I apply the grainline parallel to the yarn threads of the fabric or perpendicular to the knee/hemline. I make sure to follow the threads of the fabric and not the salvage because sometimes they differ (especially on knits).
Hope this helps!
To make straight legged pull on loose pants, do I add inches to the pattern on both inner and outer seams? How much should I add for the elastic waist and the crotch?
Thanks,
What am I missing? I can’t find any directions on how to determine the grainline on pants. There must be a way to calculate where to place the grainline. None of your patterns even mark the grainline. Without proper grainline, the pants will never fit.
Draw the grainline perpendicular to the knee line.
How do I add a fly zip to the pattern? Thanks