Learning the art of creating a perfectly tailored skirt pattern that complements your unique measurements is a skill every DIY enthusiast should embrace. In this post, I’ll guide you through the fascinating world of skirt patterns. We’ll start with the timeless elegance of the straight skirt, laying the foundation for your sewing journey.
Once you’ve made your custom pattern that fits, you can easily modify it into other types of skirts like a pencil skirt, A-line skirt, flared skirts of four, six and more parts, a wrap skirt, add a waistband or pockets, you name it.
Even more,
If you know how to make a skirt pattern and a bodice pattern, you actually know how to make a dress!
Let’s go straight into making the basic straight skirt.

Measurements for making the skirt
For the simple straight skirt, we are going to need waist, hips, waist to hips (hip depth) and overall length.
- Waist
Measure the smallest part of the waist. Or, if you prefer the skirt to start lower on the hips, measure that circumference.
- Hips

Measure at the widest part of the hips. If you have a bigger belly, you should measure the circumference of your hips through the
lower part of the abdominals (as shown on B on the right).
- Hip depth
This is the distance between the waist and the wide part of the hips you just measured.
- Length
Measure the overall length of the skirt on the outer leg. Start from the waist (or a bit lower if you prefer lower rise) and measure down as long as you want the skirt to finish.
You might want to add or remove a couple of inches for ease of movement. This depends on the fabric you are working with and the fit you want to achieve. So, there is not an exact number here.
In most cases, I don’t add much ease, just don’t take the measurements too tight on the body.
If you could use some help on ease, here is a post I wrote on sewing and design ease and how to add it to patterns.
What you are going to need
- a big sheet of paper
- grid ruler
- paper scissors
Drafting the skirt sloper (option 1)
Outline the pattern
Draw an AB line that goes 1/4 the hips measurement. Draw the vertical BC line that equals the length of the skirt. Make the ABCD rectangle (figure 1). The AD line is going to be the center front/back fold of the skirt, so you might make it with a dotted line or mark the fold as you prefer.
Starting from points A and B down, apply the hip depth and mark the hip line with a dotted line.
This is going to form the frame of the sloper.

The next step is to shape the skirt at the waist.
From point A towards B mark 1/4 waist measurement plus 1 inch (2.5 cms) for the dart.
Put a mark there (figure 2).
In most cases one dart is enough for a standart waist to hip ratio. If the difference between waist and hips is small, I would skip the dart altogether.
If it happens to be significantly bigger, I put two darts to compensate. Consider that when drafting the pattern with your custom measurements.

Mark the darts and waist points
Measure 3/4 inches (2 cms) up from the waist mark and mark that as well (the X point on figure 3).
Measure the middle between A and B and mark that with 1. Do the the same on the hip line and mark point 2.
Connect points 1 and 2 with a line. This line is for the dart placement.
To make a 1 inch wide dart (2.5 cms), we need to put marks in both directions at 1/2 inch (1.2 cms) from the middle point 1 (figure 3).
Now let’s mark the dart’s length.

There are some formulas used in the pattern making books on how to calculate the darts’ length. I am going to skip those in order not to overcomplicate the process and share my way to do it.
I make the darts on the front 3.5 inches (9 cms) long, and the darts on back 5 inches (12 cms) long. This works for 90% of our clients, no matter of their body structure.
For the back darts, you can also use the highest point of the buttox for a starting point.
But,
darts are very often customized to get the best fit possible. We are going to show how when we discuss final adjustments later.
Now that we have all these marks, let’s
Draw the pattern
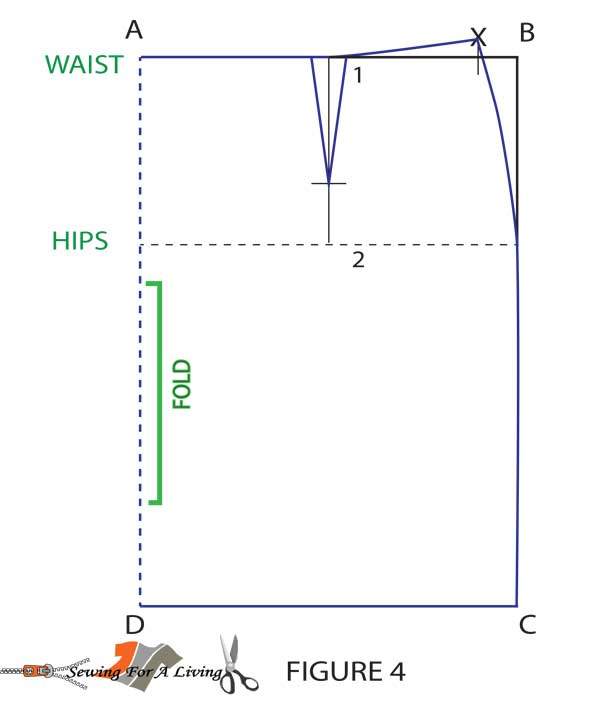
Starting at the X mark, make a curve that ends at the hip line (figure 4). You can use a french curve or just eyeball it. Continue down the rectangle until you reach point C.
Then, we draw the dart legs. We do that by connecting the points for length and width on both sides of line 1-2.
Connect the X point with the outer dart leg with a staright line to shape the waist (figure 4).
Trace the rest of the pattern following the shape of the rectangle.

The AD line is the center fold of the skirt sloper. Our straight skirt pattern is ready.
Because it is essentially the same, you can use it for a front and a back pattern piece. Just make sure to adjust the length of the darts for front and back.
You might want to draw two separate pattern pieces for the front and the back. I prefer to do this if I want to make a center back seam, make diffrent darts or pleats, and other design changes on the basic pattern. In that case you can follow the steps above and make two.
Or,
If you would rather draft separate patterns for the front and back skirt details at once, follow these instructions:
Drafting the skirt sloper (option 2)
Outline the pattern
This method of drafting the skirt pattern resembles very much the one we followed to make the basic pants pattern.
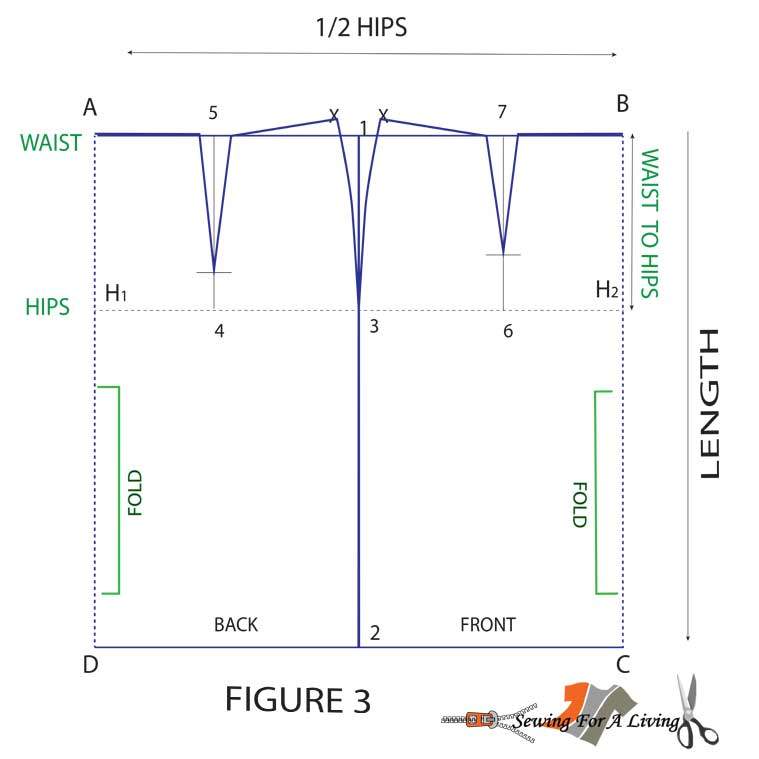
- Start building the rectangle ABCD where A to B is 1/2 the hips circumference and A to D and B to C is the length of the skirt (figure 1).
You can draw AD and BC with a dotted line, because they represent the center fold of the front and back sloper.
Steps to follow:

As in the previous example, we measure and apply the hip depth and mark the hip line with a dotted H1-H2 line.
Measure the middle beween A and B and mark with 1. We measure the middle between C and D and mark with 2.
Connect 1 and 2.
Where the line crosses the hip line, we mark point 3.
Mark the darts and waist points
Mark the front and the back pattern piece, because we are going to make different darts (figure 2).
That would be the only difference between them for that simple skirt.
If you have plans to create a different style out of it, however, having two separate pattern pieces can be of great use. For example, if you add pleats only at the front.
Next, we mark the center folds and the position of the darts.
Measure the middle between H1 and 3 and mark 4. Measure the center between 3 and H2 and mark 6.

Do the same on the AB line. Measure the center between A and 1 and 1 and B and mark those points with 5 and 7.
Connect 4 with 5 and 6 with 7. Those two new lines mark the positon of the darts.
Next, we mark the position of the dart legs and the dart length. As in the example above, we mark 1/2 inch (1.2 cms) in both directions of points 5 and 7 and mark the dark legs.
Then, from points 5 and 7 down we measure and apply the darts length. These would be 3.5 inches (9 cms) long on the front sloper, and 5 inches (12 cms) on the back.
Mark the waist. Starting at A, measure 1/4 waist + 1 inch (2.5 cms) for the dart and mark. Do the same starting at B towards 1.
Starting at those two new marks, measure 3/4 inches (2 cms) straight up and mark with X (figure 2).
Draw the pattern
Starting at the X marks, make curves that end at the hip line at point 3 (figure 3). Continue down the rectangle until you reach point 2.
Then, draw the dart legs. We do that by connecting the points for length and width on both sides of lines 4-5 and 6-7.
Connect the X points with the outer dart legs with a staright line to shape the waist (figure 3).
Trace the rest of the pattern, following the shape of the rectangle.

Like what you read here? Support my site

Hi sewing friends, Daniela here! As a passionate sewist and pattern maker, I love to empower fellow creators to sew their dream wardrobes. Join me on a fun journey where we unlock our creativity, stitch by stitch.
If this tutorial has helped you, please consider supporting the blog with a small donation. This way I can keep it up and continue sharing for free.
It is always greatly appreciated!
Zippers and slits
To add a slit, you need to add some inches to the pattern. That’s why often skirts come with a center back seam.If you make a pencil skirt, you don’t want to restrict the movement of the legs. A slit will not only give more freedom for movement but will also add a nice finishing touch to the skirt. To add a slit just add a couple of inches (5 cms) starting at the hemline and finishing approximately 8 inches (20 cms) up (figure 5).
If you make the skirt with a center back seam, you can sew the zipper at the back. If your skirt comes with two side seams, put the zipper on the side seam.

Adding wearing ease and seam allowance
How much wearing ease you are going to add depends on the design, as well as the weight and type of fabric. Keep in mind that the waist is where the skirt is hanging from, so you don’t need much ease added there.
Usually, the ease added to the waist line will vary from 1/2 inch for lightweight fabric to 1 1/2 inch for heavyweight fabric.
If you are interest to learn more about wearing ease, read this article.
The amount of seam allowance depends on the way you are planning to sew the skirt. If you are going to use a straight stitch, leave 5/8 (1.5 cms) for seam allowance. If you are using a serger, leave 3/8 inch (1 cm) or even a bit less.
For hem allowance 1 inch (2-3 cms) is usually fine. You might leave more for lighter fabrics to get the fabric fall nicer, this is also up to you.
Add the seam allowance everywhere you are planning to have an assembling seam. If the pattern is to be used on a fold, don’t leave seam allowance ther (figure 6A). If you are about to have a center back seam, leave seam allowance there (figure 6B).

How to add a facing to a skirt
Facing is a detail that is used to finish and conceal raw edges of garment opening. Facings are usually turned inwards and drafted over the master pattern. Facings are usually interfaced. If the skirt is lined, the lining is sewn to the facing.
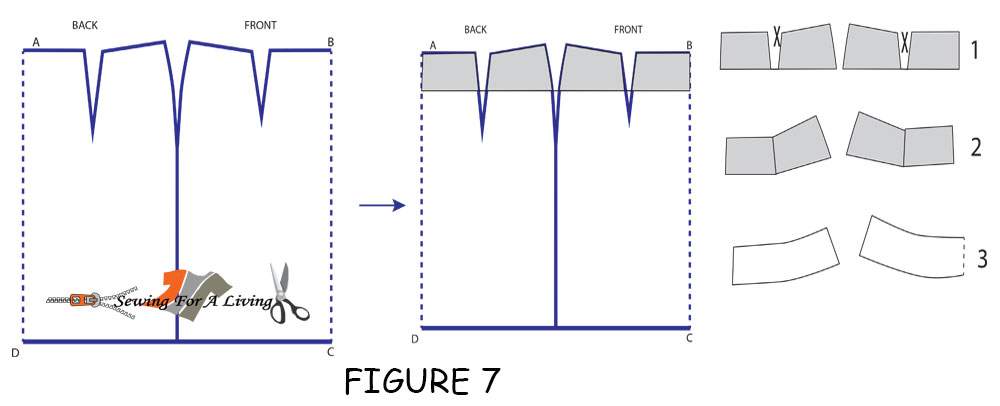
To draft the facing details, use some tracing paper to copy the upper part of the pattern (figure 7) and cut it out (figure 7-1). The facing is approximately 2 inches (5 cms) wide. Then, close the darts (figure 7-2) and smooth the curves (figure 7-3).
Do the same for the front and for the back.
The darts are removed from the facing because we don’t want additional bulk in the waist area.
Cut the facing from main fabric. Sew the darts, make the side seams and then assemble the skirt details with the facing ones.
If you would prefer a more thorough, step-by-step video lessons on drafting the skirt sloper, waistbands, facings, linings, waist variations, pockets, making a muslin, adding notches,etc., I highly recommend this Patternmaking Basics Course on skirts.

How to add a waistband to a skirt
Waistband is an additional, rectangular piece of fabric that holds the skirt in place. It is a way to finish the raw edge of the skirt at the waist.
To make the pattern of a waistband, just draw a rectangular piece of fabric that is long enough to encircle the waist plus enough length to accomodate the closure of the skirt. A closure could be a zipper, a button and buttonhole, or any other way you chose to close the skirt at the waist.
As for the width, the waistband is usually between 1 inch and 1 1/2 inch wide. If the rectangle waistband is larger than 2 1/2 inches, it will not fit at the natural waist line (because of the rib cage).
This width is for the finished waistband. Straight rectangle waistbands are cut twice the width in so that the band can form a self facing.
Straight rectangle waistbands fit great at the waist line, but not if the waistband sits below. If the skirt is on a lower waist, the waistband needs to be shaped.
To make a shaped waistband, follow the steps for making a facing.
But,
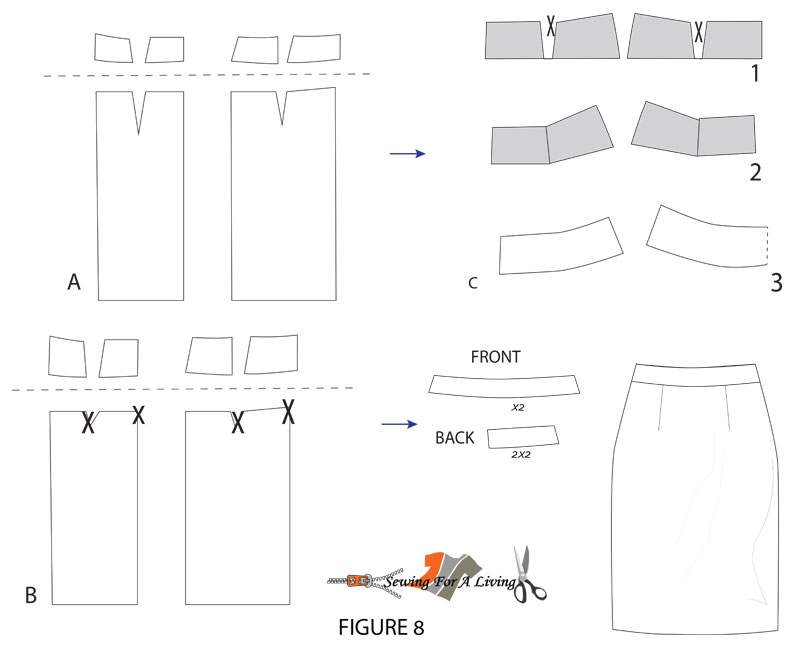
instead of tracing and cutting additional pattern piece, just cut out the waistband from the main pattern (figure 8). Then, close the darts and smooth the curves (figure 8 – 1,2 and 3).
Do the same for the front and for the back. When cutting from fabric, you are going to need two front pieces and two (or four if you have center back seam in mind) back pieces.
For shaped waistbands, you need to cut two layers of fabric and stitch them together at the top.
Don’t forget to add seam allowance everywhere that you are supposed to make a seam.

If you would rather make a wider waistband, there would be too litlle of the dart left on the main pattern piece (figure 8B). I would skip making the dart and take in a bit at the side seam if necessary to match the pattern details of the skirt.
Follow the steps above for the actual waistband pattern piece (figure 8 – 1,2 and 3).
Always use interfacing for a pretty and stable waistband.
I drafted a basic skirt pattern, now what?
By now, you’ve learned how to draft a basic straight skirt, how to add zippers and slits, seam allowance and ease, facings and waistbands, etc.
Now what?
You can make a lot of changes to modify the silhouette or draft a different style from scratch if you follow any of my other pattern making tutorials on skirts.
More on drafting and designing skirt patterns:
- How to draft a circle skirt pattern
- How to make a pencil skirt pattern
- How to make a wrap skirt with a great fit
- DIY box pleated skirt
- Clothing design – how to make any skirt
SIGN UP FOR SEWING FOR A LIVING NEWSLETTER
If you like what you read here, join our mailing list so we can send you our new sewing tutorials, pattern-making lessons, patterns, and some occasional offers that we think might interest you!
We will protect and use your data following our Privacy policy.
You may unsubscribe at any time by clicking the link in the emails we send.

I love it
Good description thank you
I am not seeing the graphics you are referencing (i.e. figure 1). Is there a way to access those graphics?
I learnt how to do a skirt pattern well
Thanks
Hi, Barbara! Thank you for the heads up! It was a technical issue and I’ve fixed the images.
Please, let me know if there is still a problem on your side.
Pingback: How to Make a Skirt - Is it Hard? - Helsinki WW
Hi, are there any instructions on how to sew a zipper?
Hi, I have some tutorials on zippers on my blog, just write “zipper” in the search bar and you’ll find them. I have in mind to make one that covers all the ways to sew a zipper. Meanwhile, I can recommend this Craftsy course on zippers.