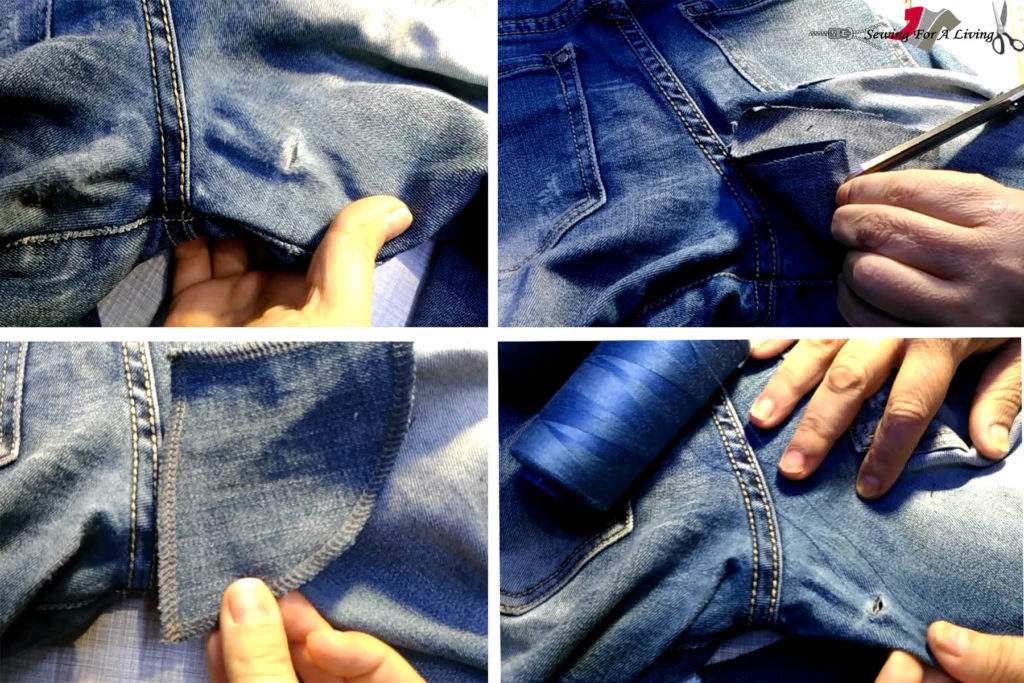
Perhaps you have a pair of jeans that fit perfectly, but are getting worn out between the legs? Why don’t you fix them and enjoy them longer? Or you want to try clothing alterations, but feel unconfident in your skills. This tutorial shows the steps to fix a hole in jeans between the legs.
Mending a pair of jeans is a beginner-friendly alteration. You can do it to practice those forward and back stitches. It doesn’t need a lot of preparation or tools.
We are going to use a top straight stitch on a regular sewing machine.
Materials and tools:
- a piece of denim or any other woven, not stretchy fabric;
- a matching thread;
- a sewing machine.
Here is how to fix that ripped jeans yourself.
Watch the video tutorial:
Or, read the accompanying written instructions:
Thе pair that we are about to fix has a hole only on one leg. But I always recommend doing both sides, because the fabric is going thin. And even if there is not a hole yet there will be one soon. What we are going to do is patch the inside of the legs under the holes.
1.Find a piece of denim fabric
that is similar in colour to the pair you are about to repair. In case you don’t have any denim, you might use any type of fabric as long as it doesn’t stretch. The fabric should be woven, so it holds the worn off part. It shouldn’t distort once it is done. But don’t pick a very thick patch, too. This might make the jeans uncomfortable to wear.
2.Cut out two patches
that replicates the shape of the hole. Leave the patches a bit bigger than the hole. Otherwise, the fabric that is worn off around the hole will break soon. This is what would happen then – another hole right next to the patch. Clean the edges of the patch, so they won’t fray. I use a serger, but if you don’t have one you can use a zigzag stitch or any type of overcasting stitch.
So,
Patches are ready and we need to attach them to the inside of the leg.
3.Choose a thread that matches the color of the jeans as much as possible.
All jeans have that melange color, so there is no way to find a thread that matches perfectly. But the best match you make, the less visible the repairment would be.
Tip: try a grey instead of a blue thread. Sometimes it might look better if the legs are really worn.

4. Attach the patches on the inside of the jeans.
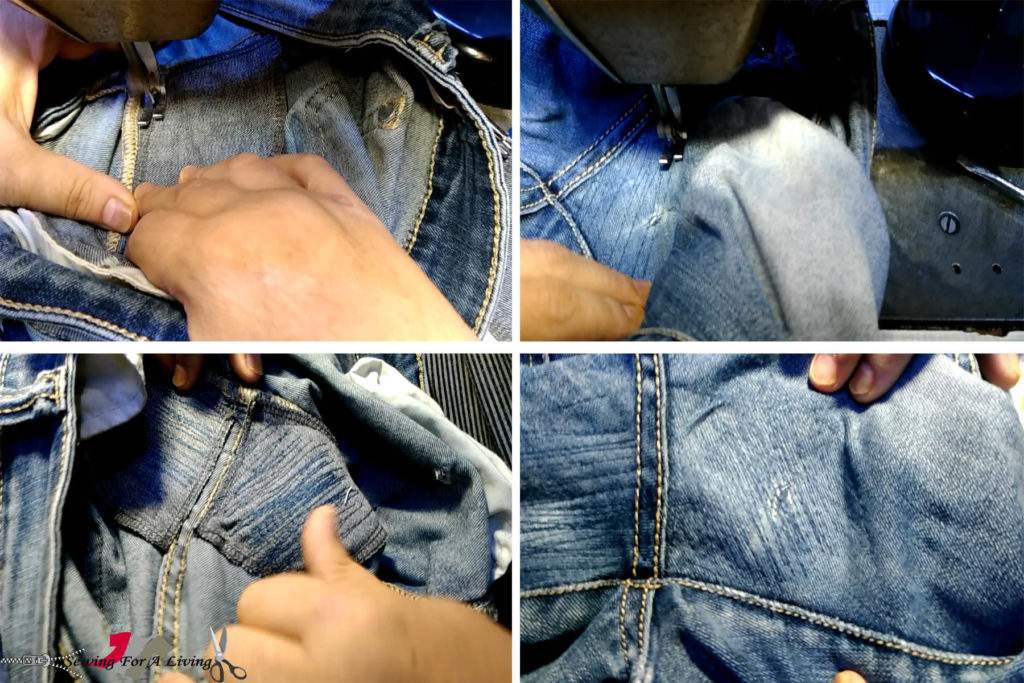
Sew at the back center seam, inside leg, and as far as the patch would go. Make sure to pull the jeans leg slightly, so it doesn’t gather under the patch. Move the jeans around so you can work any direction you want. Attach the second patch. Keep turning the jeans around and pulling the fabric underneath.
Sewing directly on the seams makes the patches more durable. If you put them on the fabric that is more or less worn, you are going to get results that last shorter.
Now,
turn the jeans around so you can stitch on the face of the fabric. This way you are going to be able to see what you do while you are stitching and correct the direction so you get the best results possible.
5. Make a round of forward and backward stitches.
You should sew all the way on the patch. This is sort of a freestyle, just keep making stitches forward and back.
Try to make the stitches in a direction that goes with the grain. This way the stitches would be less visible. Make sure to cover the whole surface of the patch with stitches.
The last step would be to clean the threads and check for wrinkles. Wrinkles happen because the ripped fabric got stretched. You can avoid that effect if you iron the area before sewing. If this happens, just break several stitches, adjust the fabric and sew over again.
6. Clean the threads and check for wrinkles.
Wrinkles happen because the ripped fabric got stretched. You can avoid that effect if you iron the area before sewing. If this happens, just break several stitches, adjust the fabric and sew over again.
Once you’ve covered the whole surface of the patch, you are done. If you’d rather not sew, here is how to fix a hole in jeans with textile glue. Have in mind that gluing the patch is not recommended for fix a hole in jeans between the legs. The extra stitching “recovers” the worn-out fabric in a way and gives the best results for this area.

If you have any questions or would like some help with this project, don’t hesitate to drop me a comment below.
Like what you read here? Support my site
If you want to help me continue delivering similar content, please consider buying me a coffee to keep it going. It really helps me focus and have more time to prepare these tutorials and develop my lessons.
I can devote more time and do everything involved to make this happen and share what I’ve learned about sewing and pattern-making with you.
I would really appreciate it.
More sewing tutorials:
- From jeans to shorts – easy and fast
- How To Take In The Waist On Jeans – Step-by-step
- How to enlarge jeans at the waist and hips
- How to keep the original hem on jeans (2 options)
- How to replace a zipper on jeans
SIGN UP FOR SEWING FOR A LIVING NEWSLETTER
If you like what you read here, join our mailing list so we can send you our new sewing tutorials, pattern-making lessons, patterns, and some occasional offers that we think might interest you!
We will protect and use your data following our Privacy policy.
You may unsubscribe at any time by clicking the link in the emails we send.

Thank you for the awesome tips.
I have watched 6 videos on how to repair jeans and this is the BEST. You gave suggestions that no other video did : finish the edges of patches beforehand, sew in the same direction as the threads in the jeans so it hides the stitching better and attach the patch to the seam of the jeans for extra strength. Thanks so much for this video.
Is it possible to use this tutorial to fix a hole on the outer leg? Thanks.
Sure, you can use it everywhere but use your judgement to decide if it actually looks good when it is in a more visible place.
If you want to try this on the outside of the leg, try making decorative stitching on the outside. You could use a contrasting thread to do this – try a geometric design and it might blend in or do it after the repair. It is sure worth the try.
Interesting content. I liked your video very much. I especially liked the fact that you showed the entire process and how it looks at the finish! Great job!