You have a top that you wish to alter from a turtleneck into a crew neck and you wonder how to do it? You might have different reasons for that. Perhaps you’ve found the perfect top, but you hate turtlenecks. Or, maybe the one you are about to tailor is too tall, too tight, or too loose?
In my case, I had a long-sleeved T-shirt on which my daughter made some ugly holes on the sleeves (see the first picture). I wanted to shorten the sleeves so she can wear it a bit longer.
But,
in my opinion, the turtleneck didn’t look good with short sleeves. So, I altered the neckline, too.
In this tutorial, I am going to show you how to transform a turtleneck into a crew neck on a cotton jersey t-shirt, using the fabric of the turtleneck as a binding tape.
What you are going to need:
- scissors;
- regular sewing machine (or a serger);
- some pins.
Here are the steps to follow if you want to alter a turtleneck into a crew neck.
Remove the turtleneck.
I’ve cut out the seam of the turtleneck (picture 2). I’ve done this because I was going to enlarge the neck opening anyway. If you cut out the seam like me, be careful not to cut excess fabric. You might prefer to remove the stitches instead of cutting them out. On picture 4 you can see the T-shirt without the turtleneck and with shortened sleeves.
2. Cut out the neckline.

Cut out the neck opening in the front as low as you would like it to go. I would’ve gone a bit lower to achieve a more natural shape, but the strass motif in front restricted me. Cut out as a natural curve, ending at the shoulder seams (pictures 5 and 6).
3. Prepare the binding.
I used the same piece of fabric that was used for the turtleneck. I just narrowed the width of the tape. The T-shirt I worked on is made of jersey cotton (knitted fabric). This type of fabric can stretch a bit and distribute on the wider neck opening evenly, without pulling the neckline too much. If this is not your case, you might use another binding that matches the color and texture of the top. Anyway, on knits, I highly recommend using binding. Otherwise, the neckline might stretch too wide.

4. Distribute and sew the binding tape back.
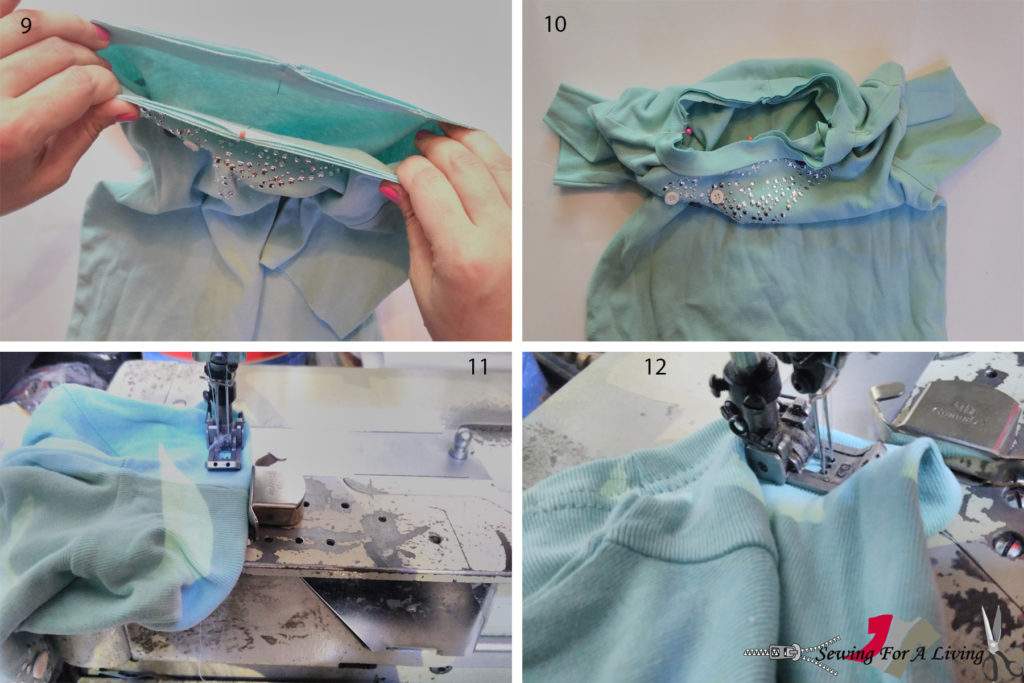
I prefer adding this type of binding because it doesn’t require a tape binder. I pin it to the center front, center back, and both shoulder seams (picture 8) so the tape gets distributed evenly to the neckline opening. It should be a bit tighter than the neck opening (approximately 1.5 inches/ 4 cm shorter). That way it gathers the fabric of the neck opening and holds it together in an appropriate shape (pictures 9 and 10).
Make the joining seam. I used a serger, but you can use any type of seam that tolerates stretching (for example zig-zag stitch).

5. Hem the sleeves.
This is an additional step that has nothing to do with the turtleneck. It is just the last step of altering this T-shirt. I used a cover stitch machine to make the hem (pictures 11 and 12). You can use a zig-zag stitch or any stitch that tolerates stretching on your regular sewing machine.
Keep in mind that the alteration I’ve just shown you might not apply to any top you are trying to tailor. If the turtleneck is too tight, or the neckline opening you want to achieve is bigger, the fabric might not be long enough to make the binding tape. If this happens to be the case, there are other ways to finish the neckline – by hemming, by attaching the binding from other appropriate fabric, or by facing the inside of the neck opening.
In the picture below, you can see the altered T-shirt. I hope you find it useful. If you have any questions or suggestions, please don’t hesitate to drop me a line below.

Related posts:
Like what you read here? Support my site
If you want to help me continue delivering similar content, please consider buying me a coffee to keep it going. It helps me focus and have more time to prepare these tutorials and develop my lessons.
I can devote more time and do everything involved to make this happen and share what I’ve learned about sewing and pattern-making with you.
I would really appreciate it.

And to turn it into a Mock Turtleneck, just narrow the width of the neck by half, correct?
Can this be done on a turtle neck sweater
Yes, but I would make the seams on a serger or make some other overcasting stitch to prevent fraying.
I need to take in the neck on a sweatshirt I’ve bought, is there a way to add an other “layer” of knitted band on top of the band already there? I’ve seen some sweatshirts that have two knitted neck bands. thanks for your help
Do you have a picture of such double neckband? I don’t think I’ve seen one.
I would like to know how to make a v neck shorter
With V necks, I would correct from the shoulder as in this example https://sewingforaliving.com/how-to-make-a-neckline-smaller-or-bigger/#tab-con-3
Thanks for this tutorial, you’ve helped a lot! I topstitched the binding, though – it kept turning inside out.
Topstitching is never a bad idea. But if the fabric would let it, I skip this step. In fact, I would skip any step if possible, haha. If this doesn’t harm my results, of course.