What is a coverstitch machine?
If you’ve been sewing for a while, you must have noticed that double-needle hem that goes on RTW (ready to wear) knit jersey clothing. You might be asking yourself how to make it.
The answer is:
It is made on a coverstitch machine. And it is not the same as the double-needle seam that you can find on the regular sewing machine.
A coverstitch machine is a sewing machine that usually has one, two, or three needles and a looper underneath. The needles and the looper threads create a chain. The seam that is made tolerates stretching very well.
Therefore,
it is mostly used with knitted and stretching fabrics.
In my opinion, it is essential for a complete professional finished look on most knit fabric garments.
It is not the same as a serger/overlocker machine. Although both machines use needles and loopers to create the seam, they are used for different purposes.
A coverstitch machine is used mainly for hemming, not for joining seams (as the serger). On the image below you can see an industrial and a domestic coverstitch sewing machine.

You might be wondering:
How to use a coverstitch machine?
There are two basic ways to use a coverstitch machine: by itself or by using optional accessories. If you are a beginner and need a close-up tutorial on the coverstitch machine and the ways to use it listed below, you might want to check this Coverstitch: Basics & Beyond Course on Craftsy.
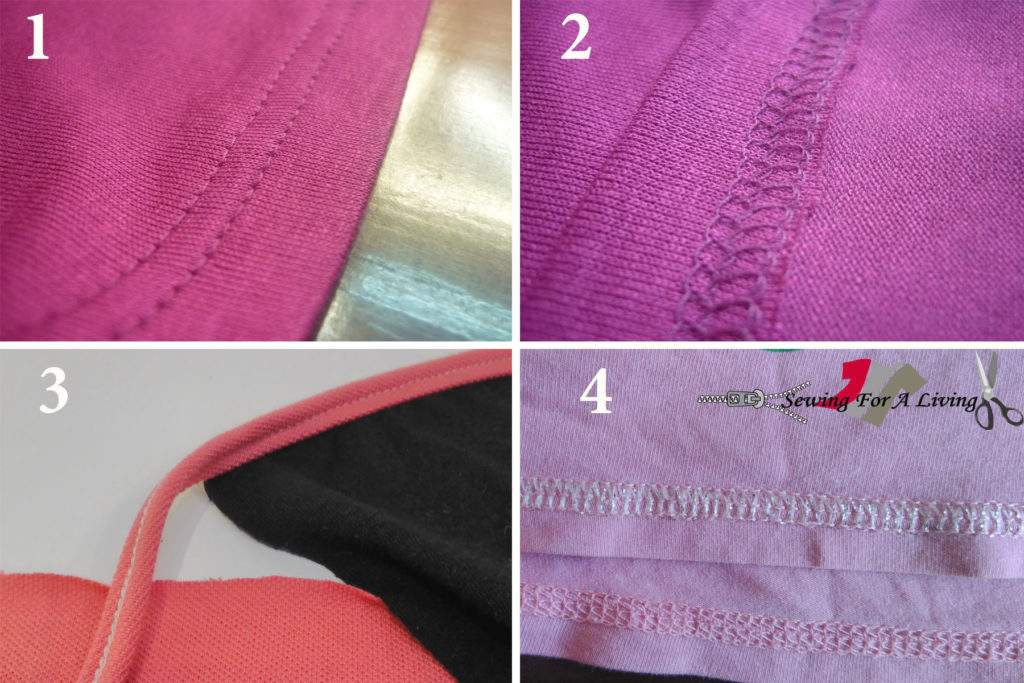
When you use the machine by itself, it produces stitches with two needles on the face (picture 1) and loops on the back of the hem (picture 2).
The seams are made when hemming or to create some decorative top stitching. You can use it on hems and necklines, pocket openings, etc.
Here are some other examples of using the cover stitch: when attaching binding (picture 3) and on a machine with tree needles (picture 4).
You can use the coverstitch machine seam to make a finishing practically anywhere on a knit fabric garment: a neck opening (image 5), a hem (image 6), as a topstitch on elastic, to make a tunnel, etc.

How to sew a hem with a coverstitch machine?
Here is how to do the stitching for hems.
A basic flat hem
A basic flat hem is made when you start and finish somewhere on the garment, for example on a sleeve, without overlapping it on both beginning and end.
In case you are making a basic flat hem, fold the edge of the fabric as wide as you want the hem to be (picture 7). Then, use a hem guide to guide you. This will help prevent wavy edges and uneven hemming.
Keep folding the fabric evenly. Some sewers find it easier to use light under the fabric so that it shows how much they fold. Others use color stickers.
I prefer a heavy magnet because it provides great stability. Be careful, though. It might mess up the electronics of some of the new coverstitch machines.
You will inevitably develop this skill with practice. The created seam would look something like this on the right and the wrong side (pictures 8 and 9).
Once you are done, you need to pull the fabric out of the machine. There is a sequence that should be followed so the threads don’t break and the seam remains even. First, pull some of the needle thread/threads out so they loosen enough (picture 10).
Then, holding the needles as high as they would go, lift the foot. Pull the detail you are sewing straight backward (see the pictures bellow 10and 11). Then, cut the threads and it is done!
If you’ve made a flat hem, you will need to lock the end of the seam. I prefer to do it on the regular machine with a straight stitch as usual.

In most cases, the coverstitch hem is done in the round.
This means it is finished with a couple of stitches directly on the beginning of the seam. That is enough to lock the seam.
Just keep sewing a couple of cms/an inch directly at the beginning of the seam. It would keep it secured enough, so it won’t unravel. You can start and finish the hem anywhere on the garment, but I prefer to do it near one of the side seams (picture 6).
This is a custom order for a dress we made for a client (12). After the fit-on, it turned out to be a bit too long. On the picture below are the steps I followed to hem the dress.

First,
I marked with pins the desired length of the dress (13). Then, I folded it exactly at the pin, one pin at a time and sew over (14).
I make sure to guide the edge of the folded fabric according to the position of the hem guide (image 16). I finished with a couple of stitches over the beginning of the hem as described above.
When the hem was ready, I cut out all the excess fabric (18).
Then, I ironed at the hemline. Ironing is going to make all the difference in appearance, no matter what you are sewing.

Coverstitch machine accessories
Coverstitch machines don’t go with that many accessories like the footers in regular sewing machines for example. There are just a few that are of importance:
Tape binder attachments
Those are tools that feed the binding tape directly under the needles and double fold it around the fabric. There are some variations that a different binder attachment can produce.
Basically, they differ according to the number of needles used, the width of the folded binding, and the width of the folded tape. Here are some examples of tape binders at a different width:

Hem guides
They guide the width of the hem and prevent uneven distances between the edge of the fabric and the seam. You can also use a magnet which sticks on the corpse of the machine if it has a metal one. Or some stickers.
Spare needles and feet
Some domestic coverstitch machines have different feet for a central guide or some gathering attachment tools. But this is basically all there is.
You can find some really good bundle deals on Amazon that include the machine itself and the tools that go with it.
Here is the most important part:
Always buy accessories that are compatible with the exact machine brand and type you own. Otherwise, you may find them of no use.
How do I use the tape binder?
When you use it with a tape binder, the machine creates finishing with a binding tape that is folded around the main fabric.
You can use this type of finishing for hems, neckline binding, spaghetti stripes, stand-alone stripes, etc. To use a tape binder you have to attach it to the coverstitch machine.
Do this according to the manual of your sewing machine. The way a binder is attached varies, so make sure to buy one that is produced for the machine you own.
The next step is to cut a binding tape that has an appropriate width to fit the binder. Put the binding tape facing the wrong side (19). This way, it will be folded with the right side up. Hold the presser foot up so the binding tape goes underneath it (20). Then, start sewing. The tape will form a nice string (21 and 22).

If you need to put the binding on a garment detail (23), start as described above. Make a few stitches so the binding shows on the back side(24). Then, insert the main fabric into the tape binder and continue feeding the fabric into the binding (25).
Once you are done, you need to pull the fabric out of the machine. Do this the same way as described above. Pull the detail you are sewing straight backward (see the pictures below).
First, pull the threads from the needles towards you a bit to loosen them. Do this with the needles at their highest position (27). Otherwise, you might break the needles. Then, lift the foot and pull the fabric back (28). Cut the threads and it is done!

What else is a coverstitch machine used for?
The cover stitch machine is widely used in the textile industry. It is included in a wide variety of projects, like hems, top stitches on elastics or bindings, strip binding, etc. Here are some examples of the application of coverstitch machine stitches into practice.

- Spaghetti straps.
- Straps & binding completely done with a binding attachment tool.
Spaghetti straps are made with a coverstitch binder attachment tool(see what it is and how it is used above).
- Free-standing binding strip used as a string.
You can use the same gadget to create a continuous strip.
- On this same garment, a coverstitch seam is used to make the tunnel for the binding string.
- Belt loops and Topstitching on decorative seams, widely used on pants and jeans.
- Elastic around neckline or sleeves.
- Topstitch on elastic or binding.
- Panties/underwear.
- Topstitched waist on lounge pants, leggings.

- Applied neckline binding on a t-shirt.
Here are a lot of options. In most cases, the appearance of the binding depends on the type of the coverstitch binder. It could fold the binding with different width.
Or, it can ask for one, two, or three needles threaded to make the stitching. It all depends on the type of the coverstitch machine and the binder specifics.
You should always use binders that work with the machine you own. Here are some examples of different cover stitch binders in use.

- Topstitch around a neckband.

- Binding or a coverstitch to finish a pocket opening; as a hem; on the neckline opening:

Most common problems when using the coverstitch machine
- Tunnelling.
Tunnelling appears when the fabric is too light or the second or third needle sews on one layer of fabric. That is why I recommend to fold just a bit more of the fabric and cut the excess out later. At least do this until you get used to folding the exact amount of fabric.
- A wavy seam.
This is usually a matter of not using the hem guides properly. If you follow it exactly this problem should not occur.
- Unpropper threading or needle position.
A coverstitch machine is much easier to thread, but sometimes there might be some issues due to wrong threading. Try to thread it again, both the looper and the needles.
Another common problem is if you have inserted the needles not straight forward towards you.
- Unravelling the seam.
Braking the coverstitch machine seam can be a real challenge if you don’t know how to do it. Here is a video I made on how to unravel the coverstitch seam quick and easy.
Do I need a coverstitch machine?
You can finish practically any sewing project without using a cover stitch.
But,
if you sew a lot with knit fabrics or do alterations and tailoring of RTW garments for you and for clients, you most probably would find that owning one is the best investment to make.
It would save you a lot of time and will give you that professional results. I don’t know anyone who got a coverstitch machine and regretted it. That includes me.
Can I use the double needle seam on my regular sewing machine instead of the coverstitch machine?
The double-needle seam provides only the looks, but not the durability and elasticity of the cover stitch seam. If you want to replace it successfully, I would suggest using a zigzag seam or any other seam that tolerates stretching.
If you need to know more about the coverstitch machine, I highly recommend this beginner-friendly Coverstitch: Basics & Beyond Course on Craftsy.
Like what you read here? Support our site
If you would like to help me continue delivering similar content, please consider buying me a coffee to keep it going. I would really appreciate it.
Still have some questions? Ask me below.
Related posts:
Thanks for the tutorial! On my industrial coverstich machine, I’m having trouble getting the stitches to lock in at the end of a hem done in the round. Could you clarify what you do in this case? Do you take it to your traditional sewing machine and sew a few stitches over the coverstich stitches so they don’t unravel?
Best,
Janet
Hi, Janet! To lock the seams you need the needle lines exactly on top of each other. They should be parallel and matching almost to the point you can’t tell where is the overlapping. If you find that hard to do, a locked straight stitch over the overlapping will do the job, too. Hope this helps!
I found this very useful and wish I had found and read it before I bought my heavy duty CoverPro.
It explained what I should be using the machine for, which is not repairing sail covers and indicated why it skips and loops the threads on the back of the fabric.
Looking forward to using properly.
Back to the treadle for the sail covers though😕
Thank you for posting this. I was wondering how to do you finish a seam on a cardigan as you can’t back stitch on a coverstitch?
If I hem in a circle (as on sleeves, waist, and legs), I finish the seam by sewing an inch or so over the beginning of the seam. This keeps it locked in place. If the hem isn’t finishing in a circle and is more of a straight line, I lock the end of the seam on my regular sewing machine with some back and forward stitching right over each needle seam by the coverstich machine.
I hope this helps!
Any tips for when you are using a coverstitch to topstitch around a corner of say….a back pocket? I have a brother coverstitch and when I attempt to pivot a corner, my stitching comes apart.
Hi Gina, pivoting a corner on a coverstitch is a pain! What I do is to make the straight lines separately from the beginning to the end of the pocket. Then, break some stitches that are beyond the shape I want to create and anchor at the edges (with the straight stitch) so they won’t unravel. It doesn’t sound like a brainer, but this is how it is done in industrial sewing as well.