
In this post, I’m going to show you how to sew buttons and buttonholes with your sewing machine. You can read the instructions, or if you prefer, scroll down to the bottom of the page for the video.
Either way, let’s dive into sewing buttons and buttonholes with a sewing machine.
I used to sew buttons by hand up until recently because I was kind of scared of the button foot and that it might break the needle if I use it inappropriately.
But once I’ve tried it, I actually prefer it. And, if sewing buttons by hand is a possibility, sewing the buttonholes is not. At least for me because I like to do all my sewing on the machine and because hand sewn buttonholes require a lot of time and skill.
So I recommend that you sew both the buttons and the buttonholes on the machine.
Mark and prepare to sew the buttons and buttonholes
Take into consideration that the place where the buttons and buttonholes are is usually under a lot of pressure.
That’s why we need to strengthen the fabric in that area. I’ve used this fusible interfacing to reinforce the placket (image 1).
I would add it to the wrong side on half the fold of the placket. That’s because I want it reinforced, but not too much so that it changes the actual feel and look of the fabric on the face side.
If you want to learn more about interfacing, read this article.
The dress that needs buttons on the front is self-drafted and that’s why I need to figure out the place of the buttons myself.
If you want to see how I drafted and sewn the collar for the dress, read here.

I made this dress with hidden buttons, so I am going to put the buttonholes on the inner placket.
Usually, for women the buttons are put on the left and for men – on the right.
It depends on the project, but for buttons this size we usually need between 2.5 and 3 inches distance between them. That would be approximately 7 – 7.5 cm.
If you are working on a pattern, the position of the buttons and buttonholes should be marked.
I want the buttons in a straight line, so I draw a vertical line at ⅜ of an inch or one cm from the edge of the placket (image 2).
On this line, I am going to mark the place of each button and then do the same on the other side for the buttonholes (image 3).
I am really careful to mark at the same level because even a small difference in the position of the button and the buttonhole can result in odd shapes later when the garment is buttoned up (image 4).
Now that I have the right places for the buttons and the buttonholes, I am going to sew them. I am using these two feet (image 5).
The small one is for the buttons and the big one is for the buttonholes. These feet, at least in my experience, usually come as accessories with the machine.
If you don’t own them, you can get them separately. They are included in this 42-feet box that I ordered on Amazon.
Sew a buttonhole

First, I am going to sew a couple of buttonholes and buttons on some black scraps and with a contrasting thread, so that it is easier to see. And then, I am going to finish the dress with the matching thread.
I am going to start with the buttonholes. I always do, because if I need to move the buttons position a bit to fit, I can do that according to the finished buttonholes.
The buttonhole foot has marks on the face side and can be adjusted according to the size of the buttons.
Adjust the settings of the machine. A buttonhole has four sides and I am going to switch the stitch type from 1 to 4 as I go (image 6).
I am also setting the stitch length to an appropriate one. For my machine, it would be anywhere between 0 and 1, where 0 would be a really dense stitch.
Snap the foot on the machine and then adjust it according to the mark you made. Put the mark exactly in the middle of the hole and adjust the length to match the mark (image 7).

I am sewing the first position of the buttonhole which is the left vertical side. I am going to go all the way down to the end of the mark (image 8).
Then I am going to switch to the second position, which is for the horizontal stitching. Always adjust the position with the needle up, so you don’t break it. I am going to make a couple of stitches here, lift the needle and switch to position 3.
I am sewing all the way up to the beginning, lift the needle, and switch to position 4 to finish the buttonhole with the last horizontal stitches (image 10).
To finish the buttonhole, we need to cut through the fabric. To make sure I am not going to cut through the thread and damage the buttonhole, I am going to put two pins, one at each end (image 11). The pins are going to serve as stoppers for the seam ripper.
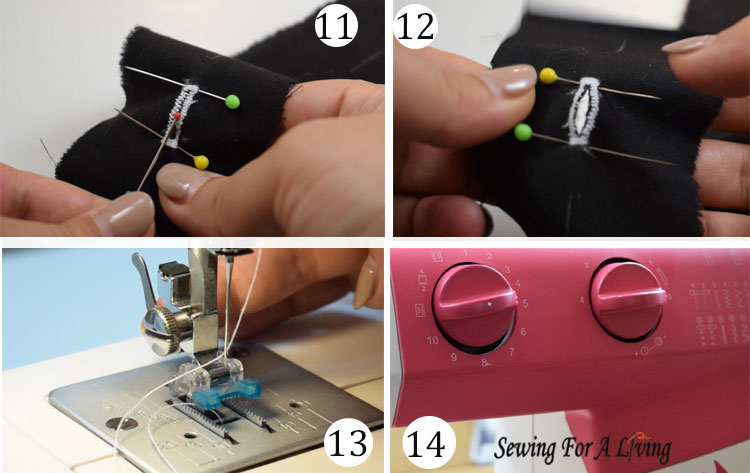
I am going to cut in both directions until I reach the pins. And the buttonhole is done (image 12).
How to sew a button
Here is how to sew a button.
I am going to replace the foot with the button foot (image 13). Then, adjust the settings of the machine. I am going to set the stitch length at 0 because the stitch should be completely horizontal and go through the holes of the button.
Then, I am going to set it to a narrow zig-zag seam, which on my machine is between 4 and 5.
I put the button under the foot. I adjust it properly to match the mark on the fabric. And, to fit the holes in the opening of the foot. The needle fits better in the holes when they are closer to the foot (image 15).

I’m going to try and see where the needle goes while I move it by hand. If it doesn fit, I adjust. If it goes straight in the holes, I sew as I usually would.
And here are the finished button and buttonhole (image 16).
I am going to follow the same steps to finish the closing of the dress.
Like what you read here? Support my site
If you would like to help me continue delivering similar content, please consider buying me a coffee to keep it going. It really helps me focus and have more time to prepare these tutorials and develop my lessons.
I can devote more time and do all the things involved in order to make this happen and share with you what I’ve learned about sewing and pattern making.
I would really appreciate it.
Watch the video tutorial on sewing buttons and buttonholes:
More sewing tutorials:
- Sew the perfect rolled hems
- DIY Organza Gift Bags
- How to replace elastic in swimwear
- How to sew an invisible zipper on a dress
- Sewing with elastic thread – make a shirred dress
SIGN UP FOR SEWING FOR A LIVING NEWSLETTER
If you like what you read here, join our mailing list so we can send you our new sewing tutorials, pattern-making lessons, and patterns, as well as some occasional offers that we think, might interest you!
We will protect and use your data in accordance with our Privacy policy.
You may unsubscribe at any time by clicking the link in the emails we send.
Pingback: How to Sew Buttonholes on Your Sewing Machine – Tutorial - DIY GALAXY
Pingback: How you can Sew Buttonholes on Your Stitching Machine – Tutorial – Stitching | Pure Profitz
Pingback: How to Sew Buttonholes on Your Sewing Machine – Tutorial – Sewing – The-Crafty-Dad
Pingback: How to Sew Buttonholes on Your Sewing Machine – Tutorial – Sewing – Household Attire
Pingback: The way to Stitch Buttonholes on Your Stitching Gadget – Instructional – Stitching – smartchoiceafrica.com