Are you looking for the perfect circle skirt pattern? Why don’t you draft it yourself? It is easy and doesn’t take a lot of time.
In this step by step tutorial, I am going to show you how to draft a circle skirt pattern. I am going to give some suggestions on how to use it in different projects and with a variety of fabric widths and textures.
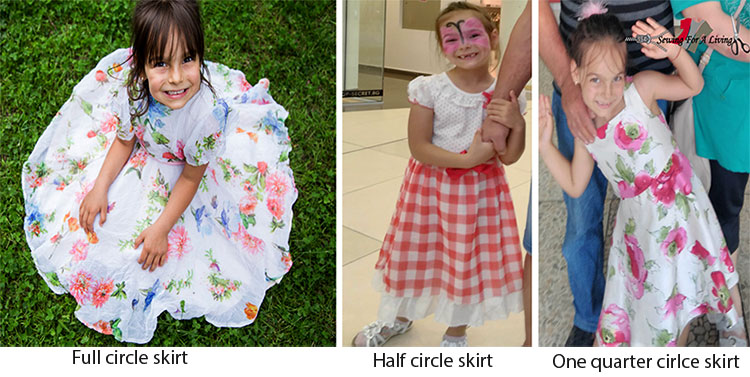
You can use this tutorial to make any of these skirts – a full circle skirt, a half-circle skirt, ¾ circle skirt and even a ¼ circle skirt which very much resembles the A-line skirt.
Watch the full circleskirt video tutorial.
Or,
read the detailed written instructions on how to draft a circle skirt.
How to draft a full circle skirt
Any pattern drafting project begins with taking the measurements of the body. The waist should be measured at the smaller part of the torso.
Of course,
this is in case if you want the skirt to rest on the waist. If you want it to stay lower on the hips, take measure there. The length of the skirt should be measured from that point on.

Required measurements
A full circle skirt is essentially two circles inside of each other (see the picture below). To draft the skirt, you are going to need just two measurements – the waist circumference and the desired length.
It is not only easy to draft, but it is also easy to sew. This makes it a project that is suitable for beginners.
There is a little math included, but only to calculate the radius of the waist circle. The formula that is used is simple.
You have to divide the circumference of the waist (C ) by 3.14 to get the diameter (d) of the inner circle. Then divide it by 2 once again to get the radius (r).

Here is an example.
Let’s say our waist is measured 26” or 66 cm. The diameter of the skirt would be 26” divided to 3.14 which rounded equals to 8.3”.
Divide the diameter in half to get the radius of the skirt and we are done with math. That would be 8.3”/2 = 4.2”.
If you work in centimeters, a waist of 66 cm divided by 3.14 would be 21 cm for the diameter and 10.5 cm for the radius (the diameter divided by 2).
The radius and the length of the skirt are the only numbers we’re going to use to draft our pattern.
Like what you read here? Support my site
If you want to help me continue delivering similar content, please consider buying me a coffee to keep it going. It really helps me focus and have more time to prepare these tutorials and develop my lessons.
I can devote more time and do everything involved to make this happen and share what I’ve learned about sewing and pattern-making with you.
I would really appreciate it.
Drafting the pattern on paper
To save time, I prefer to draft my circle skirts directly on the fabric. If you do so, there won’t be an actual pattern on paper to use later on other projects. Therefore, if you sew mainly for yourself it might be better to draft the pattern on paper.
Use a square piece of paper. If the skirt is going to be let’s say 30“ long, the paper piece for the pattern should be at least 40”x40”. In cm, that would be a 1mx1m piece of paper for a 75 cm long skirt.
To save fabric, you can make the full circle skirt with two side seams or four. If so, don’t forget to add seam allowances for every seam there is to be made.
Have in mind that cutting the skirt into pieces is a good option to reduce fabric consumption, but it is not appropriate for some stripes or repeated print pattern fabrics.
The first step is to draft the waistline of the skirt. To do so, start adding small marks from the edge of the paper that equal the length of the radius (picture 1). When done, just join them in a curve (picture 2).

The next step is to draft the length of the skirt. Just add the same little marks starting from the waistline you just drafted (picture 3) and then join the marks together to form the skirt (picture 4).
Add fold marks as the pattern we’ve just drafted is for 1/4 circle skirt. Add seam allowance at the waistline and hem allowance.
There is an option to add the seam allowance directly to the formula we used, but I find it more complicated so I just add it at the end.
Also, if the allowances are added to the formula you have to know how many pieces the skirt would be before cutting.
Cut out the ready pattern – it should look like the one on picture 4.
Let’s see how to position the pattern on the fabric so we can cut.
How to fold fabric for a full circle skirt
There are several ways to position the pattern on the fabric. If you want to get one full circle without adding side seams, the fabric must be folded into two or four as shown below.
- Copy the pattern you’ve drafted and fold the fabric once vertically as shown below. If you prefer to make the skirt with two side seams, fold the fabric once vertically and cut out the pattern twice.
- Or, fold the fabric once horizontally and then once again vertically. Then, put the pattern on the edges and cut.
- Cut the pattern out four times without folding the fabric for the smallest fabric consumption.

How to draft a half circle skirt
Drafting the pattern on paper
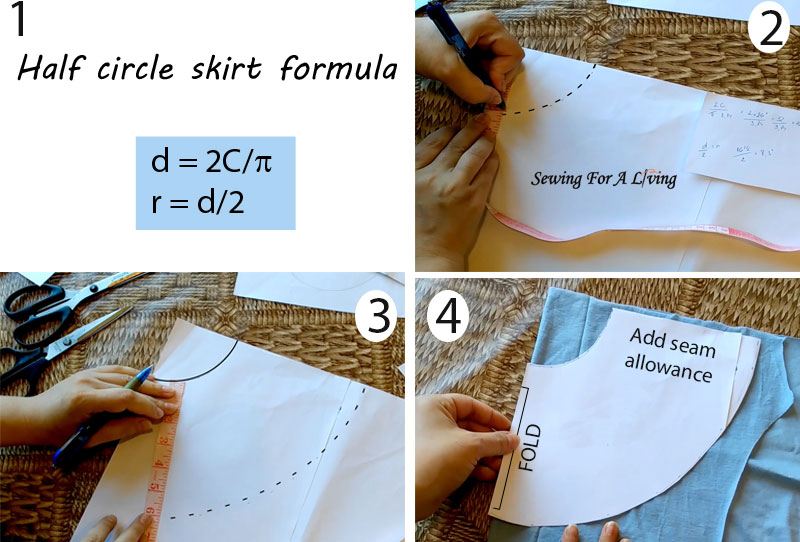
To draft the half-circle skirt we use basically the same measurements, except we need to double the circle at the waist (the waist circumference). If we use the same measurement as the example above, it is going to look like this:
Let’s use the same measurements from the example above. The waist measure 26” or 66 cm. The diameter of the skirt would be 2×26” divided to 3.14 which when rounded equals 16.5”.
Divide the diameter in half to get the radius. That would be 16.5”/2 = 8.3”.
If you work in centimeters, a waist of 2×66 cm divided by 3.14 would be 42 cm for the diameter and 21 cm for the radius (the diameter divided by 2).
With the radius we got using the formula, we draft the inner circle (picture 2). Next, starting from the curve we just drafted, we measure the length of the skirt and mark for the second circle (picture 3).

How to fold fabric for a half-circle skirt
The difference in the fullness of the skirt comes not only from the pattern but also from the way the fabric is folded when cut.
To cut the half-circle skirt, just fold the fabric once. this will reduce the skirt’s fullness by half. At the same time, the circumference at the waistline will remain the same (image 4).
How to draft a quarter circle skirt – a ¼ circle skirt
Drafting the pattern on paper
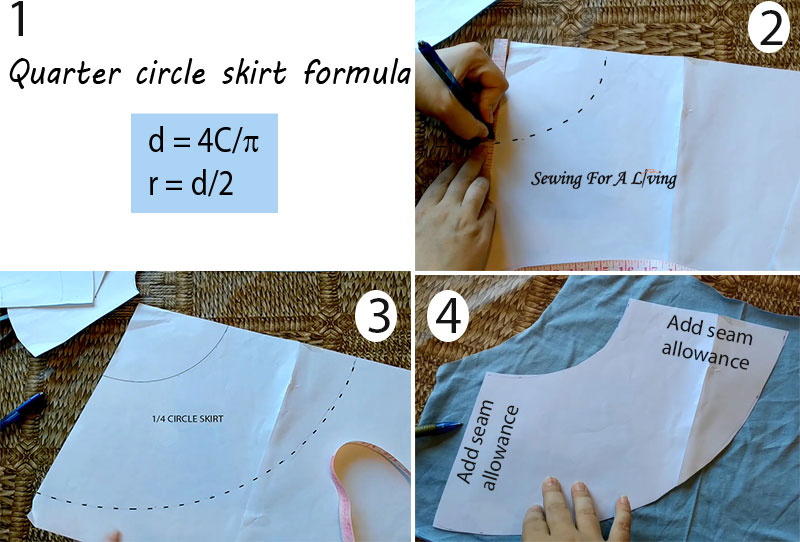
The same idea is behind making the quarter circle skirt. We need to quadruple the waist measurement in the formula.
Multiply the waist measurement 26 inches by 4 (66 cm x 4) and divide by 3.14 to get the diameter.
Then,
divide the diameter by two to get the radius. Use the radius length to make marks for the waist circumference, starting from the corner of the paper (pic 2). Then, starting from the curve we just drafted, mark the desired length of the skirt and draft the second circle.
When drafted like this, the pattern for a quarter circle skirt is layed on the fabric with no folds.
Add seam and hem allowance all around the pattern.

Drafting a ¾ circle skirt

Sometimes you might want to make a full circle skirt but the width of the fabric wouldn’t allow it.
Then, you can make the width of the second circle at the hemline a little smaller, keeping all other measurements and calculations the same.
This will reduce the width of the skirt a little but nothing significantly visible. It is going to look like the picture above.
In order to keep the calculations simpler, I didn’t add the seam and hem allowances in the formulas. Don’t forget to add allowance where appropriate.

How can you use the pattern?
The pattern you just drafted can be used to make a skirt or a dress. You can add a waistband for a skirt or a bodice for a dress. A waistband can be a rectangular piece with the size of the waist plus seam allowance.
You can even use another pattern’s upper part and just replace the skirt detail to create a full skirt dress.

After all,
this is what clothing design by flat pattern drafting is about. You can mix and match basic pattern elements to achieve that unique style you have as an idea. Pattern drafting is the connection between the designer’s idea and the actual garment.
Check out this girls’ full skirt dress pattern I made for my daughter using exactly the same drafting technique.
More pattern making posts:

Pingback: Shirred Shoulder Tie Dress DIY – The Maker Studio
I like sewing and this article offers a great video tutorial – I find it really easy to follow 🙂 It will come in handy when I start to make princess costumes for my nieces this coming Halloween. The drafting technique seems complicated at first, but as I read through it again, I can get the basics down. Thanks for the instructions!
You are welcome! You can check this tutorial with a free pattern if you need some Halloween ideas for the girls http://sewingforaliving.com/diy-how-to-make-a-ladybug-costume-for-halloween-with-a-free-pdf-pattern.
I am also working on a Pumpkin Princess costume tutorial right now, so check my blog later if you please to get some fresh ideas.
Interesting article on making a circle skirt , your little girl is so lucky to have you to make such nice outfits for her.
You give such easy simple instructions in your article, I take it you have been doing this for some time now?
You do not see skirts as often today, most ladies today wear pants. I do like to see a lady in a skirt, just something about them which appeals to me.
I am glad you found the instructions easy to follow, as this is my biggest concern when I create them. This feedback motivates me to keep going so thank you for your comment!