In this post, I am going to show you my favorite way to sew a pillowcase. You can use this tutorial to make a pillowcase of any material and size. I am going to use a French seam to make my pillowcase look pretty on the wrong side, as well as the face side.
In this example, I’m making a satin pillowcase as an attempt to follow the Curly girl method. I thought it might be a good opportunity to show you my favorite way to make pillow cases.
If I have to be honest, the satin I used turns this fairly easy project into a more challenging one. If you are a beginner, try making your first pillowcases from cotton and I promise it is going to be a quick and easy sew.
If you prefer the written instructions, keep on reading. If you would rather watch the video tutorial, scroll down to the bottom of this post.

How much fabric do you need to sew a pillowcase?
To begin, first we need to determine the amount of fabric that we need. Take the size of your pillow. Measure the width and length. That’s the size of the pillow case we need when done. To those measurements, we need to add hem and seam allowances.
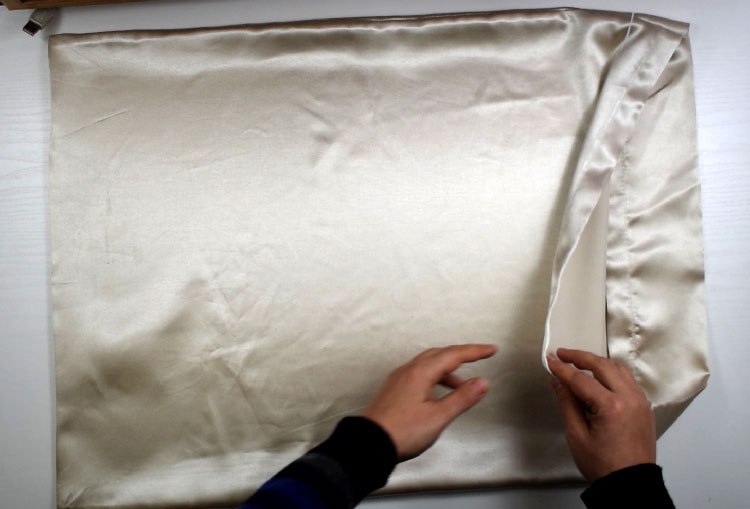
For the width, I am using twice the width of the pillow because the fabric is on fold on one side, plus 2 inches on each end for a hem or a total of 4 inches for hems. On top of that, I add 4’’ for the overlap (see the image above).
A bigger overlap looks better when you put the pillow in, so if the fabric width allows, I would rather aim for 8 inches overlap. But 4 inches would do as well.
For the height, I measure the height of the pillow and I add one inch seam allowance on both top and bottom.
For the width:
WIDTH = 2x width of the pillow + 2x 2 inches hem allowance + 4-8 inches for the flap
For the height:
HЕIGHT = height of the pillow + 2x 1 inch seam allowance
Here is an example of my pillowcase for a pillow that is 18 inches by 28 inches:
Width of fabric = 2×28 + 2×2 +4 = 64 inches
Height of fabric = 18 + 2×1 = 20 inches
Sometimes if there is not enough fabric width, I will make the hems more narrow so that I have enough fabric to overlap. Or, if the fabric is really narrow, I might cut it vertically or add a seam on the side where I have a fold now.
So, to summarize, I need twice the width plus twice the hem allowance and I aim for 1 inch wide hems plus the size of the overlap which I aim to be 8 inches.
Cut the fabric for the pillowcase
I have a leftover piece of satin fabric here that is 64 inches wide which suits me as there is enough for hems and overlap. As for the height, I need to shorten a bit to match my pillow.
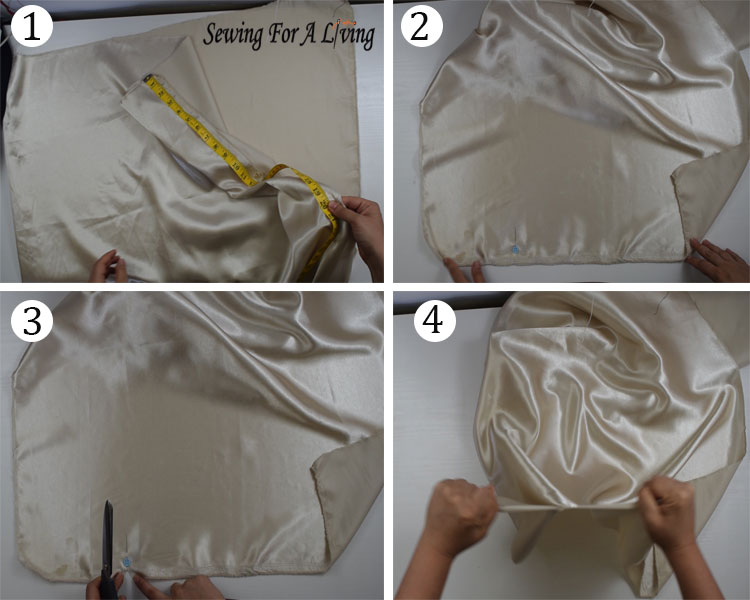
I measure the height of my pillow plus seam allowance (image 1) and put a mark with a pin (image 2). Then, I cut aiming to make the cut at a straight perpendicular line (image 3) and I need to go just a bit beyond the salvage. All woven fabrics rip straight on the grain.
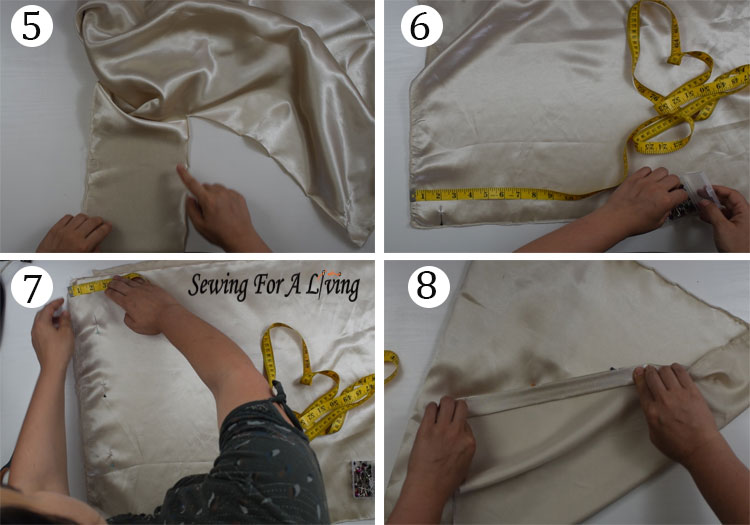
That’s why I rip the fabric with my hands and it goes at a straight line (image 4). If you check the excess strip, you’ll see that it’s absolutely even all along (image 5).

Hem both vertical sides of the pillowcase
I am going to make the hems on the vertical sides. I am putting pins to mark the hemline at 2’’ (image 6) on both sides (image 7).

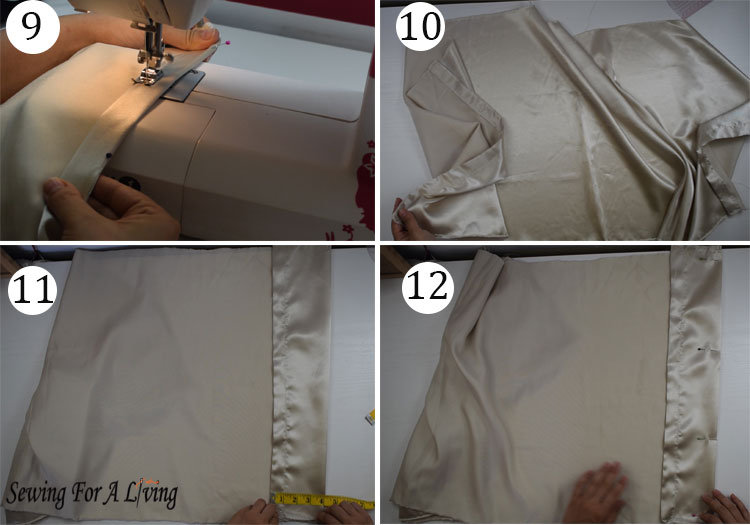
I double fold the fabric (image 8) and sew on the wrong side, close to the edge of the fabric fold (image 9). The right thing here is to pin the hems in place before sewing and even iron press them. This will make it easier. I though, like to skip steps here and there.
Then, I repeat with the other side.

Fix the overlapping pillowcase flap in place
Now that I’ve finished hemming both vertical sides of the pillow (image 10), I am going to fold the overlapping flap. To fit my pillows and after the hems, I have 4 inches left for the flap.
So, I fold and pin at 4 inches wrong sides together (image 12). I need a flap only on one side and it doesn’t really matter which one.

Sew the top and bottom of the pillowcase with a French seam
Then I fold the pillow case in half, wrong sides together (image 13). I put pins on the top and the bottom because I’m about to sew here with a French seam (image 14).
If you don’t know what a French seam is, it might seem a little strange to sew on the face side but it will all make sense in a minute. The purpose of the French seam is to hide the seam allowance in so that you have a pretty, finished look on the wrong side.
I am going to sew the top and bottom with a ⅜ of an inch or 1 cm seam allowance (image 15). When I finish with these seams, the flap will stay fixed in place (image 16).
I trim half of my seam allowance, because I don’t want it to stay in the way (image 17).

And, I turn the pillow case outside in (image 18).
The last thing I need to do is to hide the seam allowance in. I do my best to push the seam in and in the center. You can iron it or pin it in place. And then sew at the wrong side again at ⅜ of an inch (image 19).
My seams now look pretty on the wrong side as well as the face side (image 20). And that’s it, I have my new satin pillowcase to look after my curls.
Like what you read here? Support my site

Hi sewing friends, Daniela here! As a passionate sewist and pattern maker, I love to empower fellow creators to sew their dream wardrobes. Join me on a fun journey where we unlock our creativity, stitch by stitch.
If this tutorial has helped you, please consider supporting the blog with a small donation. This way I can keep it up and continue sharing for free.
It is always greatly appreciated!
Here is the video tutorial on how to make a pillowcase:
I hope you enjoyed this pattern-making lesson. Happy sewing!
Some more recources on sewing for beginners:
- Free online sewing classes for beginners
- Best Sewing Machine For Beginners And How To Pick The One For You
- Sewing with elastic thread – make a shirred dress
- Types of zippers – what you need to know
- What is interfacing in sewing?
- Learning How To Sew (and why you should)
SIGN UP FOR SEWING FOR A LIVING NEWSLETTER
If you like what you read here, join our mailing list so we can send you our new sewing tutorials, pattern-making lessons, patterns, and some occasional offers that we think might interest you!
We will protect and use your data following our Privacy policy.
You may unsubscribe at any time by clicking the link in the emails we send.

Daniela thanks so much for the videos, I have been inspired to try out on many other projects.