In this post, I am going to show you how to make a travel neck pillow by yourself. This DIY tutorial comes with a pattern in toddler/kids and adult sizes that you can get for free as a “Thank you!” gift if you choose to become a subscriber to my email list.
The kid’s size pattern fits nicely up to a 10-year-old. For older kids, use the adult version of the pattern.
To download the travel neck pillow pattern, scroll down to the end of this post.
Travel neck pillow video tutorial
DIY Travel Neck Pillow
I had two reasons to make this pillow myself. First, I didn’t like the support our store-bought pillow provided. Of course, I could search for a more supportive one, but I also really wanted it to match the car seat cover I made a while ago.

Here is how to make it yourself:
What you are going to need to make a travel pillow (image 1)
- the pattern;
- 12 inches/30 cm of non-stretch fabric for the kids’ version and 20 inches/50 cm for the adult one;
- pins, scissors, a sewing machine;
- polyfill or other stuffing material;
- hand needle and a matching thread.
Steps to follow when making the travel neck pillow
Use the pattern to cut two details of the travel pillow
The idea to make a travel neck pillow came later, so I didn’t have enough fabric left to use.
That’s why I’ve joined some scrap pieces together to get the shape of the pillow. If you are using the pattern and enough fabric, you are going to end up with two whole and even details that look much prettier than mine (image 2).
Put them face sides together and pin them if you like. Sew all around the pillow except the narrow part on the inside. We are going to use it as a hole through which to turn the pillow inside out later.
Leaving the hole at this place, it would be a bit harder to hand stitch later, but it’s the least visible place so that’s where I am going to make it. If you prefer, you can leave the opening elsewhere to make it easier for you to hand stitch later.
Sew it with ⅜ of an inch or 1 cm seam allowance (image 3).
Use a straight stitch and anchor the seam at the beginning and the end.
Turn the pillow inside out by pushing it through the hole we left (image 4).
You might want to iron at this point, but the filling is going to pull the seams anyway so I am going to skip this step.

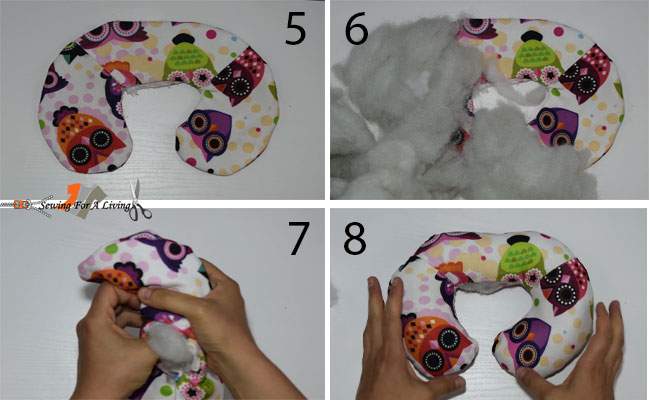
Stuff the pillow with poly-fil or other stuffing material
Here is how the travel pillow looks now (image 5). Now I am going to start stuffing the fill-in (image 6). How much you are going to stuff the pillow depends on your preferences.
I am using my thumbs to push the stuffing all the way in and I am careful to use the same amount of fill in all parts of the pillow (image 7).

Close the opening we left in the middle of the pillow
Once I am done, I need to close the hole in the middle (image 8). I am going to do that with the invisible hand stitch or the so-called ladder stitch. Here is how to do it.
Start at one side and insert the needle a bit in on one side and then on the other side so the seam allowance gets pushed inside and both sides get joined together (image 9).
This pillow is nicely stuffed, so I don’t pull the sides together right from the first stitches. I make a couple of them and then pull them together so that the thread doesn’t break under the pressure. I am going to go all the way up until I close the hole.
Then, I am going to go backward. Going back is not strictly necessary, but in my case, the fabric tends to unravel, so I am going to secure it.
To finish the stitch, instead of making a knot I am going to stick the needle inside the pillow. Then, take it out on the other side, cut the remaining thread and the end of it would disappear into the inside of the pillow (image 10).

To download the pattern, click on the button below. The adult and toddler/kids versions of the travel neck pillow pattern are provided in separate PDF files.
Like what you read here? Support my site
If you want to help me continue delivering similar content, please consider buying me a coffee to keep it going. It helps me focus and have more time to prepare these tutorials and develop my lessons.
I can devote more time and do everything involved to make this happen and share what I’ve learned about sewing and pattern-making with you.
I would appreciate it.
More sewing tutorials:
- How to make a car seat cover for a baby/toddler
- DIY Cape Tutorials – Make Your Own Halloween Costume
- DIY Organza String Bags
- Embellish Your Wardrobe: Create a Classic Box-Pleated Skirt
- Sewing with elastic thread – make a shirred dress
SIGN UP FOR SEWING FOR A LIVING NEWSLETTER
If you like what you read here, join our mailing list so we can send you our new sewing tutorials, pattern-making lessons, patterns, and some occasional offers that we think might interest you!
We will protect and use your data following our Privacy policy.
You may unsubscribe at any time by clicking the link in the emails we send.
