Hello, sewing friends! Welcome back to another sewing alterations tutorial. This seems to be turning into a series as there is so much to alterations apart from the regular hemming and zipper replacement that I want to share.
Many sewists are intimidated by alterations and there is a good reason for that. They usually require a lot of creativity as no two problems are exactly the same. But as in anything in life, if you dive a bit deeper into it you are going to get much more confident when approaching alterations. After all, sewing is for solving problems, not creating ones, right?
Below are a couple of things I’ve been working on recently:
- Replacing a non-separating zipper on a skirt;
- Replacing a separating zipper on a man’s cardigan;
- Replacing the elastic in cuffs on a pair of pants.
If you’d rather read the instructuions, scroll down below the video.
Replacing a zipper on a skirt
This knitted skirt has a broken zipper. It was originally made with an invisible zipper. I am going to replace it with a regular non-separating zipper of the same length (image 1).
The reason for that is that invisible zippers are more delicate and prone to breaking and in my case, there is not much gained from hiding the zipper. The fabric of the skirt is coarse and patterned and a regular zipper will do the job just fine (image 2).
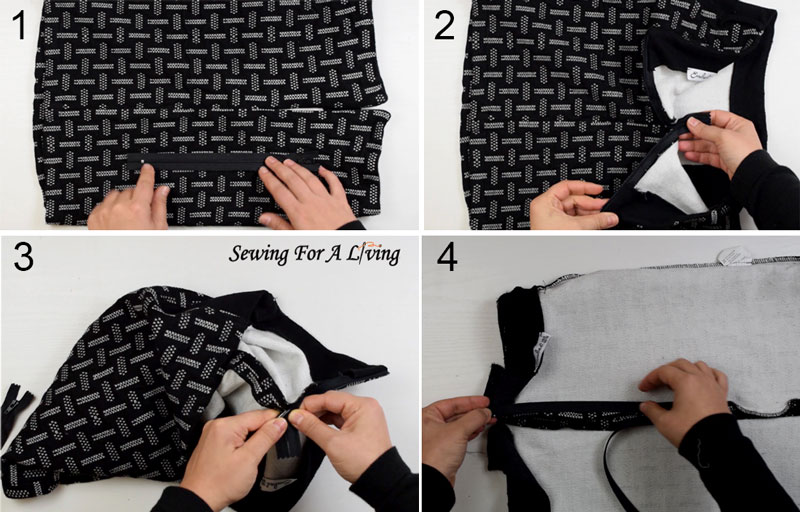
To begin, I remove the old zipper (image 3).
Then, I open the zipper and pin one side of the zipper to the skirt, aligning at the seam allowance and the top stopper to the edge (image 4). I put on the zipper foot to make the seam and attach the zipper all the way down (image 5).
I turn the skirt with the face side up and close the zipper (image 6). I start pinning to the face side because I want the sides to align nicely (image 7). This is not exactly how I would sew a zipper on woven, non-stretching fabrics. I have other tutorials on that, which are linked at the end of this post.
But in this case, the fabric is very stretchy and can easily be pulled and twisted in odd shapes when sewn on the other side.
So, I pin it to the face side to see how it is going to look when finished.
I like it like this so I go ahead and move the pins to the inside and over the zipper, where I am going to actually sew (image 8).
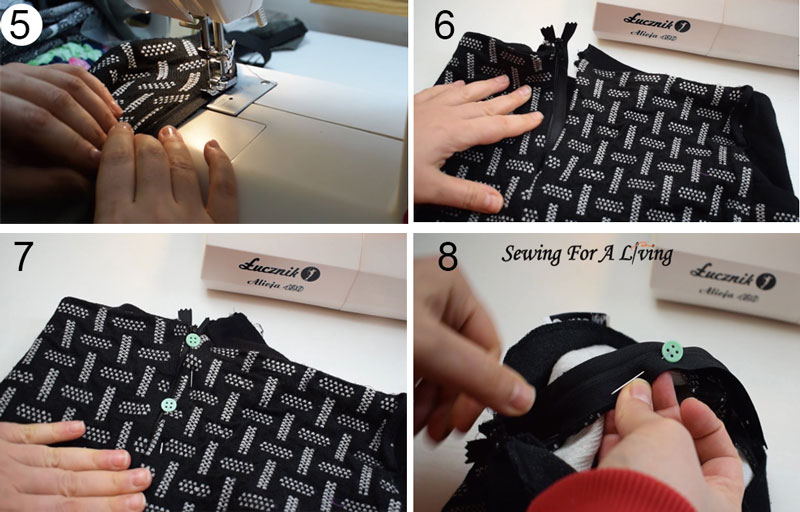
I move the zipper foot to the left side and sew the zipper all the way down as I did with the other side (image 9).
Then, I check the face side to see how I’ve done. It looks okay, there are no waves that often appear if the fabric is stretched too much while sewing the zipper.
At this point, I would usually top stitch all around the zipper. But I am going to skip it on this one because, in my opinion, this fabric doesn’t need it.
I am moving on to the waistline facings. I am sandwiching the zipper between the facing and the main skirt detail (image 11) and sewing with the zipper foot, close to the zipper (image 12).

I flip the face side out and this is how it looks when finished (image 13). I am going to repeat with the other side.

This is the skirt with the zipper replaced (image 14). A steam iron press will make it look even better. I am pretty happy with the result, so I move on to the next garment.
How to replace the zipper on a man’s cardigan
Here I have a knit cardigan with a center front zipper that needs to be replaced.
I’ve already removed the broken zipper (image 1). This one has a facing that is attached to the front.

To begin, I pin one side of the zipper to the facing (image 2). I align the stopper with the top of the collar. I put the zipper with the wrong side to the facing, so that it is going to be sandwiched between the facing and the front like this in the end.
I am using the zipper foot to sew the facing to the zipper (image 3). When I get to the zipper pull, I lift the foot with the needle down, move the pull out of the way and sew the rest of the zipper as close to the teeth as I can (image 4).

I switch the direction of the foot and repeat with the other side (image 5). Now I need to sew the front to the zipper. I am going to do that with a topstitching seam like this (image 6).
To sew the left side, I need the lines at the collar and the waistline to match the right side (image 7). To do that, I close the zipper and pin so that the lines match. Then, I go and sew this side as well, moving the zipper pull out of the way so that I can sew as close to the teeth as I can (image 8).
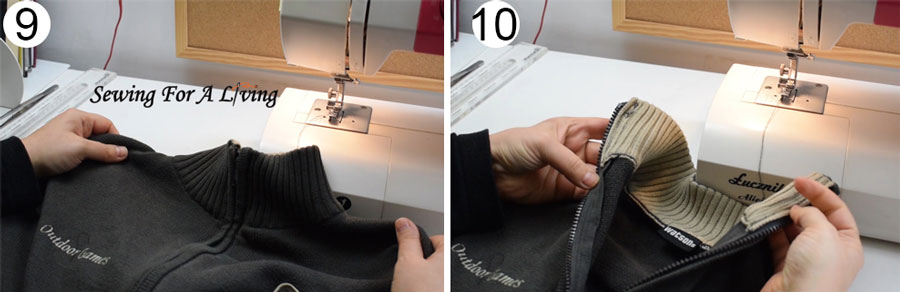
This is how the zipper looks when finished on the face side (image 9) and on the inside (image 10).
How to replace the elastic in cuffed pants
Next, I am going to be replacing the elastic in the cuffs on a pair of pants.
Usually, when you need to replace elastic it’s because it has gone bad and stretched. In this case, the elastic is too tight and uncomfortable at the ankles, so I am going to use longer pieces.

I start by detaching the cuffs and removed the old elastic (image 1 and 2). Very often, cufs are sewn in a circle. These were not. So, as I usually do, I will follow the technique that was originally used.
First, I measure how much elastic I need. I would cut it just a bit shorter than the leg opening (image 3 and 4). In this case, approximately 1 inch or 2.5 cm shorter than the cuff. Keep in mind that it will get even shorter due to the seam allowance.
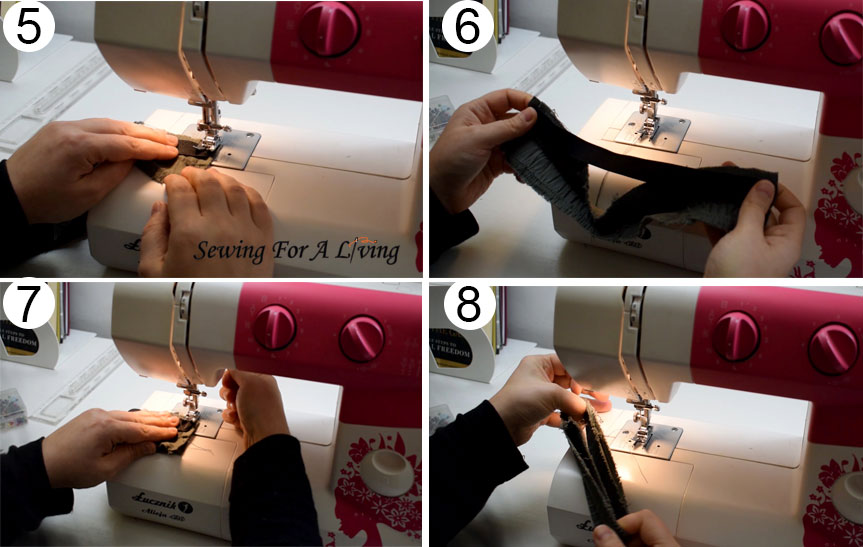
I sew the elastic to one side of the cuff (image 5). Next, I attach it to the other side (image 6). And then, finish the cuff by joining both sides, face sides together (image 7). I flip it over so that the elastic stay on the inside (image 8).
Next, I attach the cuffs back to the legs. I put the leg and the cuff face sides together, the cuff going around the leg (image 9). I align the cuff seam with the inseam of the leg and pin (image 10). Then, I fold the cuff in half and pin the middle to the outseam (image 11). I sew the cuff and the leg together, pulling the cuff as I go just enough to stretch and match the leg circumference. This is how I am going to get an even gathering.
I am using the serger for this, but you can use a straight stitch, too. And here is the finished cuff (image 12).

More sewing tutorials:
- How to replace the zipper on a jacket
- Types of zippers – what you need to know
- Making Some Everyday Sewing Alterations
- How to sew an invisible zipper on a dress
- How to replace a zipper on jeans
SIGN UP FOR SEWING FOR A LIVING NEWSLETTER
If you like what you read here, join our mailing list so we can send you our new sewing tutorials, pattern-making lessons, patterns, and some occasional offers that we think might interest you!
We will protect and use your data following our Privacy policy.
You may unsubscribe at any time by clicking the link in the emails we send.