Hi sewing friends! In this post, I am going to show you how to use the narrow hemmer foot to get pretty rolled hems. You can also find it as a rolled hem foot, narrow hem foot, etc. If you prefer to go straight to the video tutorial, scroll to the bottom of this page.
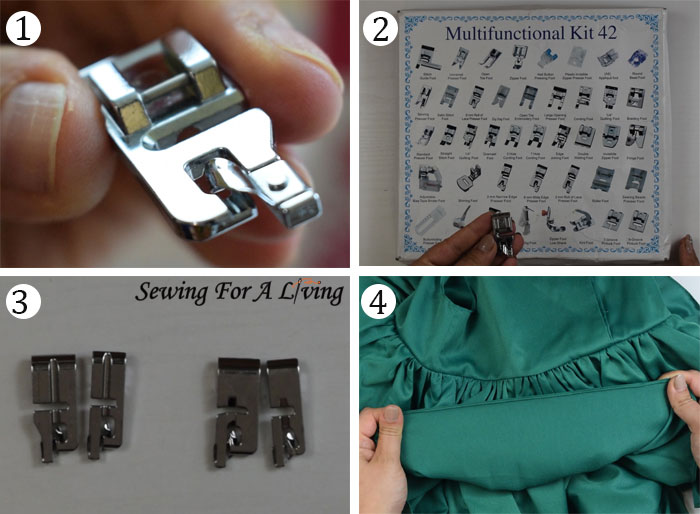
I’ve used the narrow hem foot (image 1) to sew long, straight line hems like the ones on these dresses. I’ve also used it on curves like full circle skirts. And on solid light to medium-weight woven fabrics, as well as delicate ones like chiffons and silk.
I’ve even used it on more challenging curves like necklines and armholes.
If you prefer to go straight to the video, scroll down to the bottom of this page. If you’d rather go through the written steps, keep on reading.
I got my narrow hemmer feet with this 42 pieces kit from Amazon (image 2). In this set, there are 4 narrow hemmer feet, which I frequently use (image 3).
It took me a while to figure out which is used for what as the set did not come with any manual or instructions. I see that now there are some that come with a manual, which could be pretty handy especially if you are a beginner.
These narrow hem feet, together with a couple more, are the ones I seem to use the most from this box. Here you can see how to use the invisible zipper foot and the regular zipper foot.
What the narrow hem foot does
Here is what the narrow hem foot does. It makes a tiny, pretty hem, which looks good on the face side as well as the wrong side of the garment (image 4).
The rolled hems look professional and even. And, once you get used to this foot and how to feed the fabric into it properly, you can actually sew pretty fast compared to other methods to hem a garment, especially with a narrow hem.
You can buy this foot separately. It can be branded to match your machine or a universal one like mine. It’s not common for this foot to come with the machine (like regular, buttonholes, and zipper feet). But it’s a small investment that, in my opinion, is worth it.
Here are the narrow hemmer feet that come from this box. Two are for 3 mm wide hems and the other 2 are for 6 mm wide hems (image 3). This is an image of the wrong side of the feet. To see how the foot looks on the top side, check image 1.
The other difference you can notice is that on the bottom side, 2 of them have a tunnel that goes through the whole length of the feet and the other 2 are missing it.
The way I figured it out is that the ones with the tunnels are for more solid wovens and the ones without are for sheer and lightweight fabrics. Depending on the brand and manufacturer, there might or might not be a tunnel at the bottom of the foot.
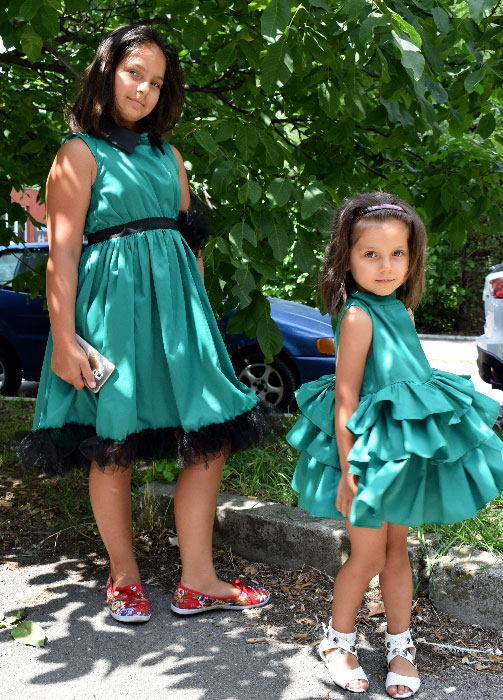
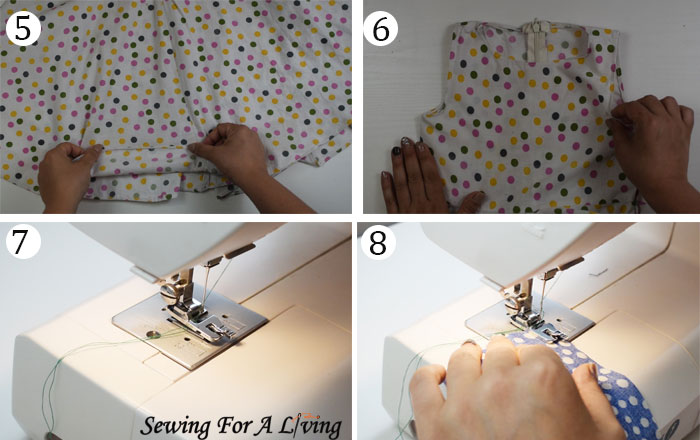
Here is a close look of the rolled hem on a full circle skirt dress (image 5). On this dress, I also used the narrow hemmer foot for the armholes and neckline (image 6).
This worked well on these cotton fabric armholes. But, it can be challenging on some slippery, lightweight fabrics, where I would rather make the rolled hems with the regular foot and fold by hand.
How to use the narrow hemmer foot
First, I am going to show how to use the narrow hemmer foot with medium weight woven fabric. I sew with the 6 mm foot with the tunnel at the bottom.
Snap it on the machine and then adjust the threads so that they both are underneath the foot (image 7).
I am using this piece of fabric because you can easily tell which is the wrong side of the fabric here.
To start hemming, I am going to insert the fabric with the wrong side up (image 8). I am going to start sewing right at the beginning of the fabric and with no seam allowance.
I am making a couple of stitches, just enough so that the thread holds on to the fabric and without inserting the fabric into the foot tunnel yet.
Then, I am going to lift the foot and hold the free ends of the threads as a prop to help me insert the beginning of the fabric into the folding tunnel (image 9).
I am pulling front and back slightly to adjust the fabric into the foot. I want my needle at the beginning of the fabric because I want the seam to start right at the top.
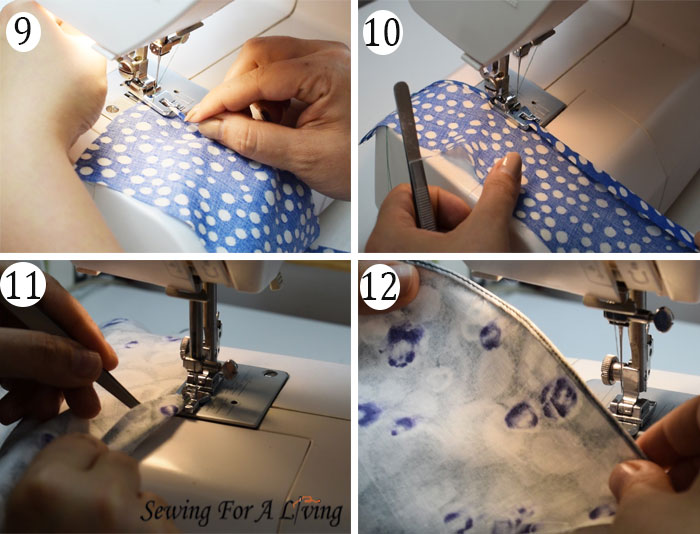
How much fabric you insert is essential for a good, even narrow hem. The folded edge of the fabric needs to touch the edge of the foot on the right. It should not go under the foot (image 10). The raw edge of the fabric should touch the other side of the tunnel or slightly go over.
Try to feed the same amount of fabric all along so that the hem doesn’t spoil. If you feed too much or too little fabric, the hem might get wrinkled, wider, or the raw edge might show on the wrong side.
The narrow hem foot on curves
To hem a curve, the steps would be pretty much the same (image 11). I start by sewing a couple of stitches at the edge, then holding the threads to help me feed the fabric into the tunnel.
I position the beginning of the fabric under the needle because the hem should start from the top.
Folding the fabric as I go, I try to make an even fold and not to fold too much or too little. I am going slower here and using the twisters as a prop as the curve is more challenging than the straight line (image 11).
That’s because my curve is pretty big, but if you are hemming a skirt or a dress, the curve usually would be more shallow and easy to work on.
The narrow hem foot on light-weight and sheer fabrics
To hem a light-weight fabric like this chiffon, I am going to switch to the other foot without the tunnel underneath and use a thinner needle.
I am following the same steps, putting the fabric with the wrong side up, sewing a bit at the edge (image 13), using the threads to help me feed the fabric into the foot (image 14), and sew while folding the fabric as I go (image 15).
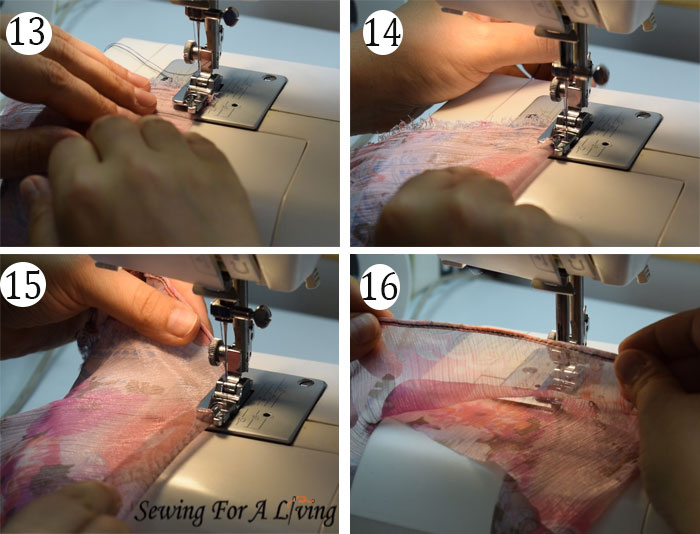
On image 16 you can see the finished rowed hem.
If you happen to have only one hemmer foot with or without a tunnel under it, don’t worry. I am pretty sure that you can use it on any fabric. Just try on a scrap to see how it goes.
Most common problems
Here are some of the problems you might run into while using this foot.
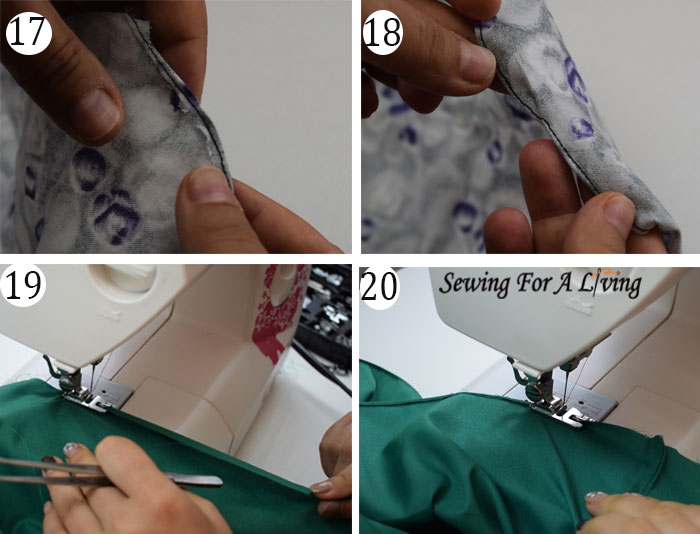
If you fold too little, the raw edge of the fabric will show on the wrong side like this (image 17). If you fold too much, the hem will be properly formed, but the raw edge of the fabric will still show.
If the folded fabric goes underneath the foot on the right there might be uneven folds of fabric that might form on the face, on the wrong side, or on both (image 18).
The rolled hem foot on garments
This is how I would use the narrow hemmer foot in case I need straight lines and corners hemmed.
Insert the fabric into the foot
When I sew garments, I usually hem in a circle. In this case, I am going to insert the fabric with the wrong side up anywhere on the hemline (image 19).
I usually choose a place close to the side seams and at the back, but that’s just my preference. I am not going to use the threads prop here because there is enough fabric on the back of the foot to help me feed it in the foot tunnel.
Then, I’m going to fold the fabric up and keep it restricted between the edge on the right and the one on the left as I go. For this foot, I’m folding approximately ⅜ of an inch. As I saw, the narrow hem is starting to form (image 20).
Once you understand how the foot works and your hands get into the habit of feeding the fabric properly, you can make the hem with a good speed. At this point, I sew as quickly as I would a normal straight line. But it was not so the first time I used a narrow hem foot, so don’t get discouraged.
Sew through the side seams
There are 2 things that might bother you along the way here: one is the hem allowances on the side seams. If you try to feed the seam allowance into the tunnel, the fabric bulk is too much for the tunnel and it would get stuck into the foot or just distort the hem in that area.
That’s why I like to cut the end of the seam allowance at a 45-degree angle (image 21), being careful not to cut too close to the seam so I don’t break it and the side seam opens. When I do that, the fabric amount at the hem is reduced. There is no bulk, and I continue as usual (image 22).
Another option is to make the side seams after you hem.
Finish the hem
To finish the hem, sew as close to the beginning of the seam as possible. Make sure to leave half an inch or so from the seam, so that you get the fabric out easily (image 23). Then, with the needle down, lift the foot up.
Use tweezers or your fingers to manually fold the rest of the fabric in the shape of the rest of the hem (image 24). Put the foot down and sew the rest of the hem as you would with the regular foot. Go an inch or so over the beginning of the seam and backstitch to lock the seam (image 25).

For more challenging curves, like the armholes, sometimes I would use the hemmer foot, and sometimes I would fold the fabric by hand as I go (image 26).
It depends on the fabric and how easy it is to work with. More slippery fabrics like this one are harder to feed into the foot evenly all along the curve and that’s why I prefer to fold the narrow hem by hand as I go.

And that’s all I have to share for this foot. I find it pretty useful. It’s one of the few from the 42 feet set that I use often.
Like what you read here? Support my site
If you would like to help me continue delivering similar content, please consider buying me a coffee. It really helps me focus and have more time to prepare these tutorials and develop my lessons.
I can devote more time and do all the things involved in order to make this happen. I love to share with you what I’ve learned about sewing and pattern making!
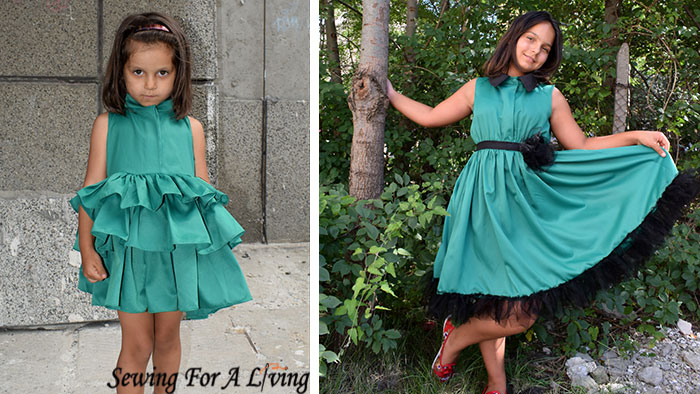
And here are the finished dresses. For the first one, I used Pinterest inspiration. For the second one, we started with a description and added some details on the go.
Here is the video I made:
More sewing tutorials:
- How to sew a pillowcase
- How to fix torn jeans pockets
- How to replace elastic in swimwear
- How to sew an invisible zipper on a dress
- Sewing with elastic thread – make a shirred dress
SIGN UP FOR SEWING FOR A LIVING NEWSLETTER
If you like what you read here, join our mailing list so we can send you our new sewing tutorials, pattern making lessons, and patterns, as well as some occasional offers that we think might interest you!
We will protect and use your data in accordance with our Privacy policy.
You may unsubscribe at any time by clicking the link in the emails we send.

Just a fresher on sewing, can the hem foot be used on butterfly straight machine?
The one I show here are snap-on feet and can be used on most contemporary sewing machines. Just make sure that you check if your machine is a high or low shank and buy the foot accordingly. If you get the whole box like me, there is an adjustment piece that can be used on the high shank machines to make them low shank and still use the feet.
Hope this helps!
Ty for sharing. I have been making pants thanks to your fantastic knit pants tutorial. I have been using cheap polar fleece. I love using this material, very easy to work with, with a regular sewing machine. The thing I find hard is where the out seam and inseam meet it can be very tricky to get them even with the rest of the hem (2.5 cm).
Here in Australia its now moving onto summer so I am thinking of working with jersey knit fabric, and that rolling hem foot maybe worth getting?
Ty once again for sharing with us. Take care.