In this tutorial, I’m going to show you how I repalce the zipper on a jacket.
These are the step-by-step instructions. If you prefer the video tutorial, scroll down to the bottom of this page.

Before I start with this alteration, I want to say that I know zippers are intimidating for beginners. They most certainly were for me.
But as with everything else, if you follow certain steps, you are going to get nice results.
The worst that can happen is to rip a seam a couple of times until you get everything right. So why don’t you give it a try?
Not every broken zipper situation requires the replacement of the whole zipper, though. In this tutorial, I explain how and when you can fix a zipper by simply changing the zipper pull.
But If you are dealing with missing teeth, spoiled coil, or damaged zipper pin, you will need to replace the zipper.
Prepare to replace the zipper on the jacket
To begin, you are going to need the zipper foot and a suitable zipper. I usually go for a zipper that is the same as the original one. For example, here I have a nylon coil and that’s what I’m going to use as well.
In the best case, use a zipper that is the same length as the original.
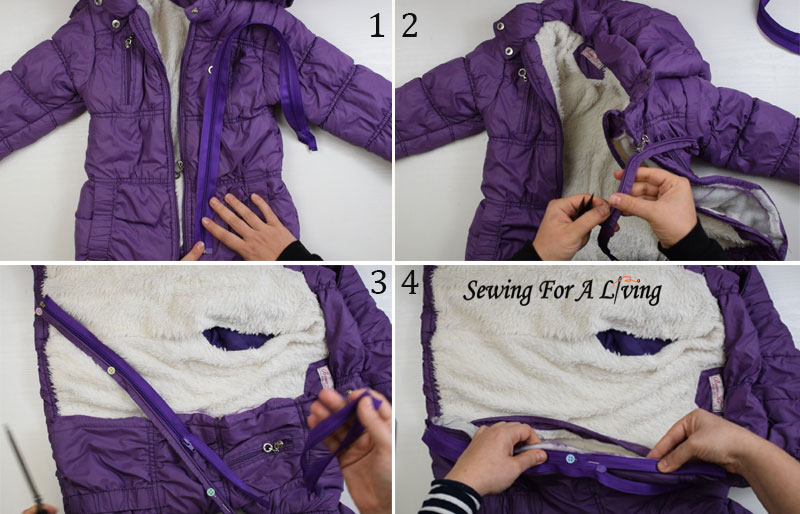
Very often though, you might not be able to get the right length in the right color. That’s my case here. The closest match I found is a zipper in a different shade of purple and also significantly longer (image 1).
If it’s molded or metal teeth zipper, I would shorten it.
I have a post on the types of zippers and how to shorten a metal zipper if you need to investigate this further.
In my case, the zipper is nylon coil, so I am going to cut it short. I’m using the piping tape to measure how long I need the zipper (image 3). The best way is to measure the actual zipper you are replacing.
To begin, I need to remove the broken zipper completely (image 2). I am being careful here because the fabric gets worn off over time and I don’t want to tear it.
I start anywhere, just not close to the ends because the seams are backstitch secured there and it’s hard enough to break through all these seams.
There usually are at least three, sometimes more seams that hold the zipper. That includes topstitching, joining seams, under or over flap seams if there are any, etc.
In my case, there is a piping that goes over the zipper and that’s one more seam I need to break. I am going to keep the piping tape as I am going to attach it again to the new zipper.
There might be different design elements on different jackets. For example, here they’ve used piping, but there might be an under zipper or over zipper flap.
Pay attention to how the jacket you are working on is made while breaking the seams and try to keep it the same way, following the same sequence when sewing it later.
Once I’m done ripping, I make sure to carefully remove all old threads.
Sew one side of the zipper
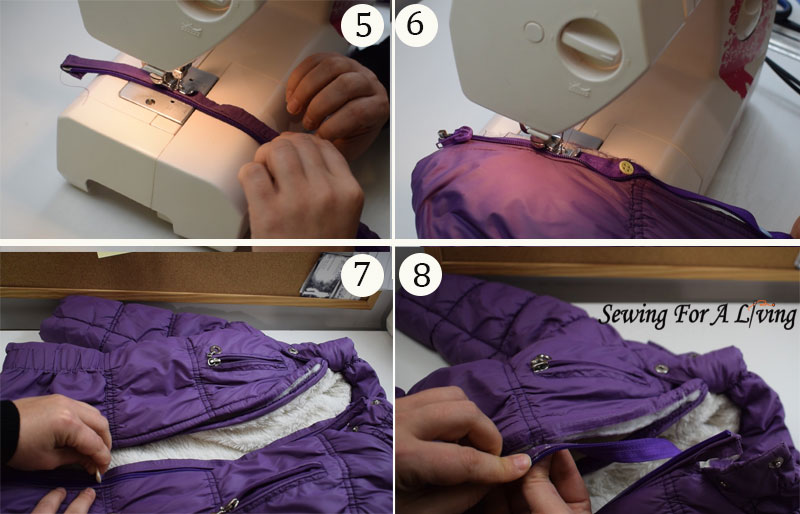
I am pinning the front, the piping, and the zipper together and join them with one seam (image 4). If you are less experienced through, I would advice you make each seam separately like I am going to show below.
I carefully align the center front, the edge of the piping tape, and the edge of the zipper tape and I’m going all the way up.
Sew the piping to the zipper first because it would be easier to attach to the front and there would be less layers to mind (image 5).
Sew the zipper to the front with the zipper foot (image 6). This way the seam goes as close to the coil as possible and less zipper tape is showing.
Make sure to move the zipper pull out of the way because it would not let you sew close the coil or teeth, depending on your zipper choice.
When you get to it, lift the foot with the needle down and push the zipper pull away, so that you can continue with the rest of this side.
When all seems nice and in place, I go for the other side.
Sewing the other side of the zipper
Sewing the second front is a bit trickier because you need to watch for decorative or quilting seams like the ones I have here.
It most certainly doesn’t look very pretty when those seams are off. So, let’s make sure to match them.
I’m zipping up and marking the position of the seams on the other side of the zipper (image 7). I open the zipper, align the marks with the seams (image 8), and pin the second half of it to the other front (image 9).
I am gonna zip it up one more time to check if I like how the quilting seams match (image 10). And then, I sew the other side (image 11).

Attach the lining to the zipper
The next step here is to attach the lining. I am going to sew it from the inside out. To do so, I’m going to pull out the sleeve and find the topstitch seam (image 12).
This seam closes the hole through which the last seams were made on the inside so that jackets look pretty both on the face and the lining side.
You can find it on almost any jacket. If you can’t find such a seam on any of the sleeves, just open a hole along the seam with the seam ripper.
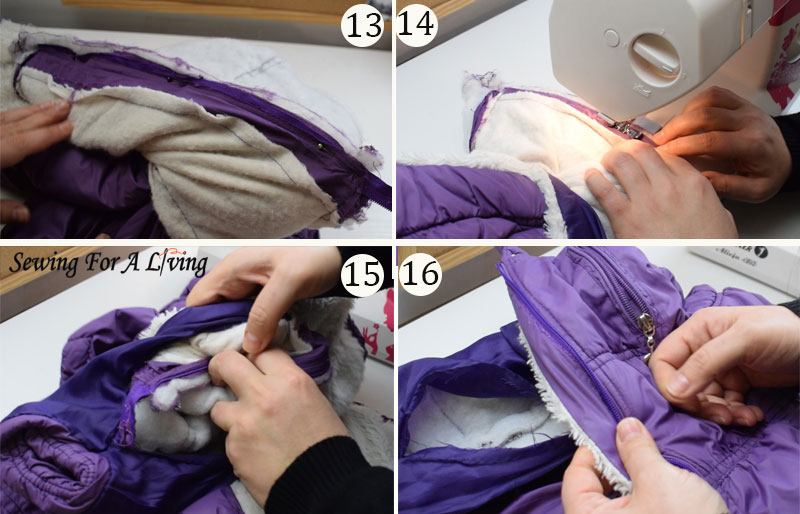
Once I remove the stitching, I go and pull the whole front through the sleeve.
The face sides are together, the zipper is sandwiched in between, so I am pinning the lining to the rest of the front (image 13).
And then, I am sewing them together, using the zipper foot and sewing close to the coil (image 14).
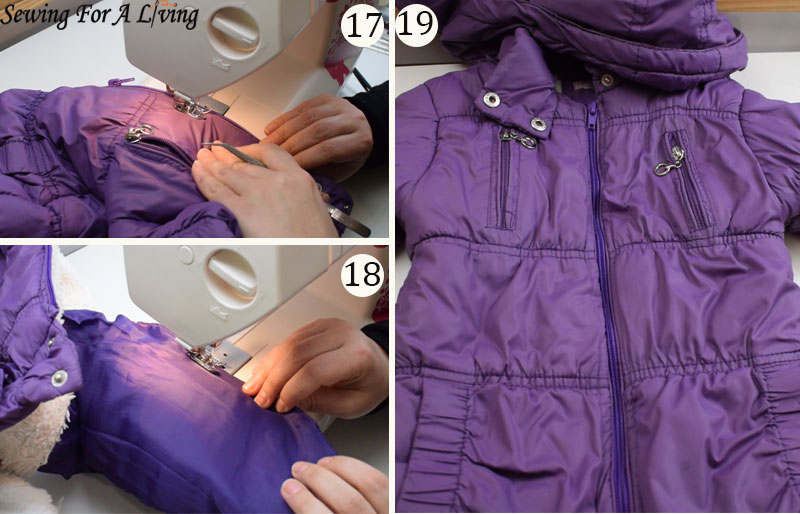
I’m going to flip the jacket through the hole once again (image 15) and check the front (image 16).
I am pretty happy with the result and sometimes I might leave it like this. This time though, I have to restore the top stitch so I’m going to go and do that, following the original line (image 17).
And here is my jacket (image 19). I zip it up again to see if everything is ok. Then, go ahead and close the hole in the sleeve by topstitching at the edge (image 18).
And basically, that’s how I would replace a zipper.
Like what you read here? Support my site
If you would like to help me continue delivering similar content, please consider buying me a coffee to keep it going. It really helps me focus and have more time to prepare these tutorials and develop my lessons.
I can devote more time and do all the things involved in order to make this happen and share with you what I’ve learned about sewing and pattern making.
I would really appreciate it.
Watch the video tutorial on how to replace the zipper on a jacket:
If you follow any of my tutorials to make or fix something of your own, tag me on Instagram @sewingforaliving to make sure I can find it and love it.
More sewing tutorials:
- How to replace a zipper on jeans
- Types of zippers – what you need to know
- How to replace elastic in swimwear
- How to sew an invisible zipper on a dress
- Sewing with elastic thread – make a shirred dress
SIGN UP FOR SEWING FOR A LIVING NEWSLETTER
If you like what you read here, join our mailing list so we can send you our new sewing tutorials, pattern-making lessons, and patterns, as well as some occasional offers that we think, might interest you!
We will protect and use your data in accordance with our Privacy policy.
You may unsubscribe at any time by clicking the link in the emails we send.
I leave the original zipper in the garment. I buy one that matches as closely as possible. I then sew the new one over the old one and carefully cut out the old zipper. Not as professional looking as this technique but if you are a beginner it’s much easier. It accomplishes the job of keeping things zipped up and cozy.