In this post, I am going to show you how to make a pencil skirt. Drafting the pencil skirt pattern repeats many of the steps we followed to make the basic straight skirt.
If you already know how to draft the straight skirt, you can scroll down to the end of this post. There are the adjustments made to the hemline that actually differ a straight from a pencil skirt.
If you’ve already drafted the basic skirt pattern, you can simply make the changes to the pattern described below and then trace out the new pattern using tracing paper.
If you don’t have a basic skirt pattern, here is how to draft the pencil skirt pattern from scratch.

Measurements for making the skirt
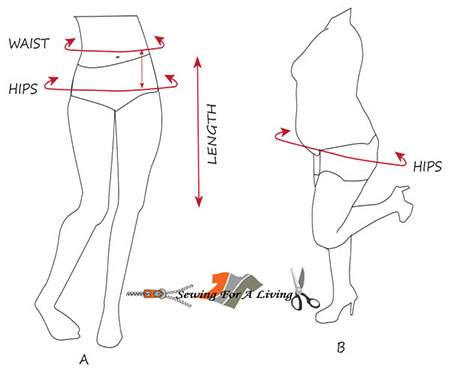
For the pencil skirt, we are going to need waist, hips, waist to hips (hip depth) and overall length.
- Waist
Measure the smallest part of the waist. Or, if you prefer the skirt to start lower on the hips, measure that circumference.
- Hips

Measure at the widest part of the hips. If you have a bigger belly, you should measure the circumference of your hips through the lower part of the abdominals (as shown on B above).
- Hip depth
This is the distance between the waist and the widest part of the hips you just measured.
- Length
Measure the overall length of the skirt on the outer leg. Start from the waist (or a bit lower if you prefer lower rise) and measure down as long as you want the skirt to finish.
- How much you need to take in at the hemline
This measurement is a bit tricky. That’s because it depends widely on your preferences regarding the fit. If you want the pencil skirt really fitted at the hemline, take the measurements around the knees (or calfs, tights).
Then substract, this measurement from the hip measurement in order to find out how much you need to take in at the hemline.
Divide that measurement by 4 because you are going to work on 1/4 front and back pattern.
You might want to add a couple of inches for ease of movement. This depends on the fabric you are working with and the fit you want to achieve. So, there is not an exact number here.
Here is a post on sewing ease you might find useful.
What you are going to need
- a big sheet of paper (or tracing paper)
- grid ruler
- hip curve ruler
- paper scissors
Drafting the pencil skirt sloper
Outline the pattern
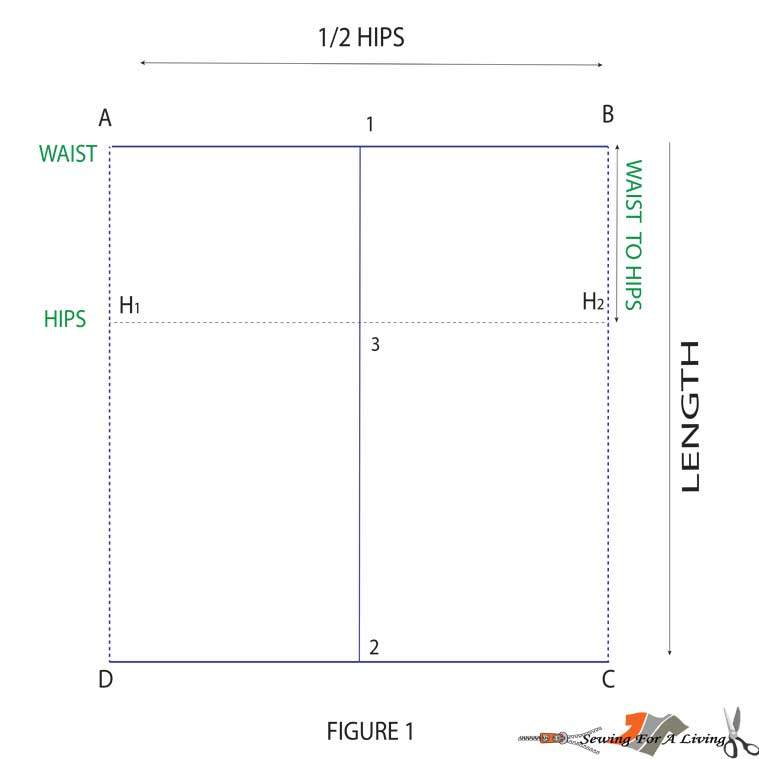
- Start building the rectangle ABCD where A to B is 1/2 the hips circumference and A to D and B to C is the length of the skirt (figure 1).
You can draw AD and BC with a dotted line, because they represent the center fold of the front and back sloper.
Steps to follow:
From A and B down, measure and apply the hip depth and mark the hip line with a dotted H1-H2 line.
Measure the middle beween A and B and mark with 1. We measure the middle between C and D and mark with 2.
Connect 1 and 2.
Where the line crosses the hip line, we mark point 3.

Mark the darts and waist points
Mark the front and the back pattern piece, because we are going to make different darts (figure 2).
That would be the only difference between front and back pattern for that simple skirt.
If you have plans to create a different style out of it, however, having two separate pattern pieces can be of great use. For example, if you add pleats only at the front.
Next, we mark the center folds and the position of the darts.
Measure the middle between H1 and 3 and mark 4. Measure the center between 3 and H2 and mark 6.

Do the same on the AB line. Measure the center between A and 1 and 1 and B and mark those points with 5 and 7.
Connect 4 with 5 and 6 with 7. Those two new lines mark the positon of the darts.
Next, we mark the position of the dart legs and the dart length. Mark 1/2 inch (1.2 cms) in both directions of points 5 and 7 and mark the dark legs.
Then, from points 5 and 7 down we measure and apply the darts length. These would be 3.5 inches (9 cms) long on the front sloper, and 5 inches (12 cms) on the back.
Mark the waist. Starting at A, measure 1/4 waist + 1 inch (2.5 cms) for the dart and mark. Do the same starting at B towards 1.
Starting at those two new marks, measure 3/4 inches (2 cms) straight up and mark with X (figure 2).
Draw the pattern
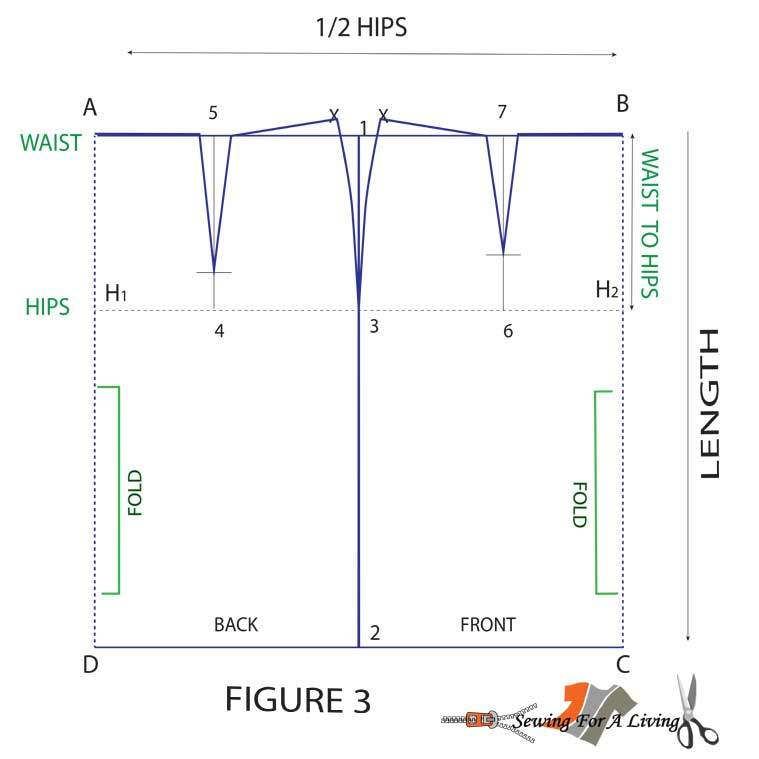
Starting at the X marks, use the hip curve ruler to connect each X mark with point 3 at the hip line (figure 3). Continue straight down the rectangle until you reach point 2.
Then, draw the dart legs. We do that by connecting the points for length and width on both sides of lines 4-5 and 6-7.
Connect the X points with the outer dart legs with a staright line to shape the waist (figure 3).
Trace the rest of the pattern, following the shape of the rectangle.

Making the pencil skirt – narrow at the hem
Next, we need to shape the skirt at the hemline (line D-C). How wide the skirt is going to be at the hem depends on your measurements (circumference at the hemline) and preferences.
In most cases, the amount to take in is ⅝ to 1 ⅕ inches (1,5 – 3 cm) on each side. That would be a total of 2.5 to 5 inches (6-12 cms).
If you go beyond that, you might restrict leg movement too much. That’s why I would go up to 1 ⅕ inches (3 cm) and narrow more at the fitting if necessary.

Starting from point 2, measure ¼ the distance you want to take in on the hem line towards points C and put a mark (figure 4). We use ¼ because we are working on ¼ of the pattern. Repeat with back detail starting from point 2 towards point D.
Make sure to divide the amount you want to take in evenly between the front and the back. Otherwise, the side seams are going to twist towards front or back.
Draw a straight line from the new marks up to the under hip area. The line should follow the natural shape of the body.
Keep in mind that for woven fabrics you most probably are going to need a slit at the back (or front, side) to compensate for the restricted movement (image 1 and 2).

In my How to draft a skirt post, I wrote about how to add a slit to the pattern. There you can also find how to add seam and hem allowance to the skirt pattern, as well as wearing ease, facing, or waistband.
If you are making a pencil skirt pattern for knitted fabrics, a slit is usually unnecessary and so are darts (image 3). But drafting the skirt pattern for knit fabrics is a topic for a future post that I am hoping I am going to get to soon.
Like what you read here? Support my site

Hi sewing friends, Daniela here! As a passionate sewist and pattern maker, I love to empower fellow creators to sew their dream wardrobes. Join me on a fun journey where we unlock our creativity, stitch by stitch.
If this tutorial has helped you, please consider supporting the blog with a small donation. This way I can keep it up and continue sharing for free.
It is always greatly appreciated!
Let me know what you think.
Related posts:
- How to make a skirt pattern like an expert
- 3 Easy Ways To Draft a Harem Pants Pattern
- How to draft a circle skirt pattern
- Draft and sew a collar and a collar stand
SIGN UP FOR SEWING FOR A LIVING NEWSLETTER
If you like what you read here, join our mailing list so we can send you our new sewing tutorials, pattern-making lessons, patterns, and some occasional offers that we think might interest you!
We will protect and use your data following our Privacy policy.
You may unsubscribe at any time by clicking the link in the emails we send.

You are a very good teacher! very clear
Very easy steps to explain. Please bring new blogs.
Pingback: DIY Wedding: Beginning skirt construction
Simple, east-to-follow instructions. Especially love the tip on measuring for a large tummy.
Well done 👏✔
Does this drafting pattern account for seam allowances? Or would I have to add those?
You need to add seam allowance.